Welcome to our PuppetShow – Return to Joyville Walkthrough. Your journey will follow the path Felicia takes through her father’s maligned stage and town. As you try to help the troubled young woman, you will encounter numerous puzzles and obstructions meant to block your path. Luckily, we know all the tips and tricks to help you through Joyville.
Contents
Tips and Tricks
Our PuppetShow – Return to Joyville Walkthrough will see you through the game start to finish, but a few tricks along the way never hurt! Whether you need a quick hand or a reminder of a complex mechanic, refer to our tips to get you over hurdles you may encounter.
-The hint button refills over time.
-The hand icon allows you to take items that can be added to your inventory.
-Most minigames can be skipped after a certain amount of time has passed.
-Inventory items can be scrolled through by selecting Tools and the directional arrows.
-Some hidden objects are randomized in the hidden object puzzles.
-The hand will transform into a magnifying glass when you can zoom in on an object.
PuppetShow – Return to Joyville Walkthrough
Chapter 1: Town of the Puppeteer
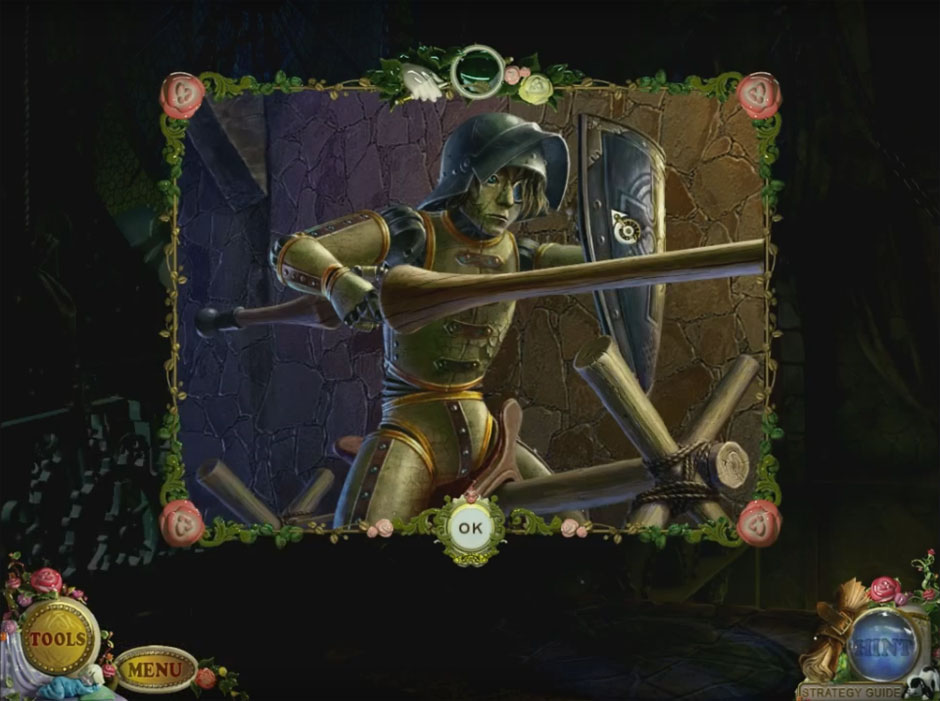
The game opens on a likely street with a strange, curvy road and lopsided buildings. Your journey will take you into a realm of unsettling events and enigmatic, tortured figures. Tread carefully, or return to safety before taking the plunge. The choice is yours.
Select the hooded figure.
– Take the newspaper.
Select the bench.
– Take the cork .
Select the horn to the right of the gate.
– Place the cork inside the horn.
Travel through the gate.
Select the window’s left pane.
– Take the latch knob.
Travel right once.
Select the trunk beneath the handrail.
– Take the razor.
Select the door.
– Drop the latch knob on the latch.
– Drag the knob to the right to begin a hidden object puzzle.
Select the paper to find the XRAY.
Unzip the zipper to find the BOWLING BALL.
Make sure you get the BALL!
Travel through the door.
Speak with the man seated at the desk.
– Give him the newspaper.
Select the logs near the furnace.
– Move a log and take the glove.
Open the furnace using the glove.
– Select the furnace.
– Remove the paper and take the doll.
Select the cane stand on the left.
– Take the cane and elastic band.
Select the desk.
– Take the telescope.
– Select and read the paper and the letter.
Finish the hidden object puzzle.
– Select the chest and take the STICK.
– Grab the MOON and place it in the slot near the owl.
– Grab the FEATHER.
– Place the STICK and FEATHER on the table.
– Take the ARROW.
– Drop the ARROW on the archer’s bow.
– Once the curtain opens, open the door.
– Select the closet door.
– Grab the BROOM HANDLE.
– Place the BROOM HANDLE on the BROOM.
– Take the BROOM.
– Sweep the spider web with the BROOM.
– Grab the BUST.
– Place the BUST on the mannequin.
– Grab the KEY.
– The KEY will unlock the closet lock.
– Take the PUZZLE PIECE.
– Select the picture frame.
– Place the PUZZLE PIECE inside the frame.
– Complete the puzzle.
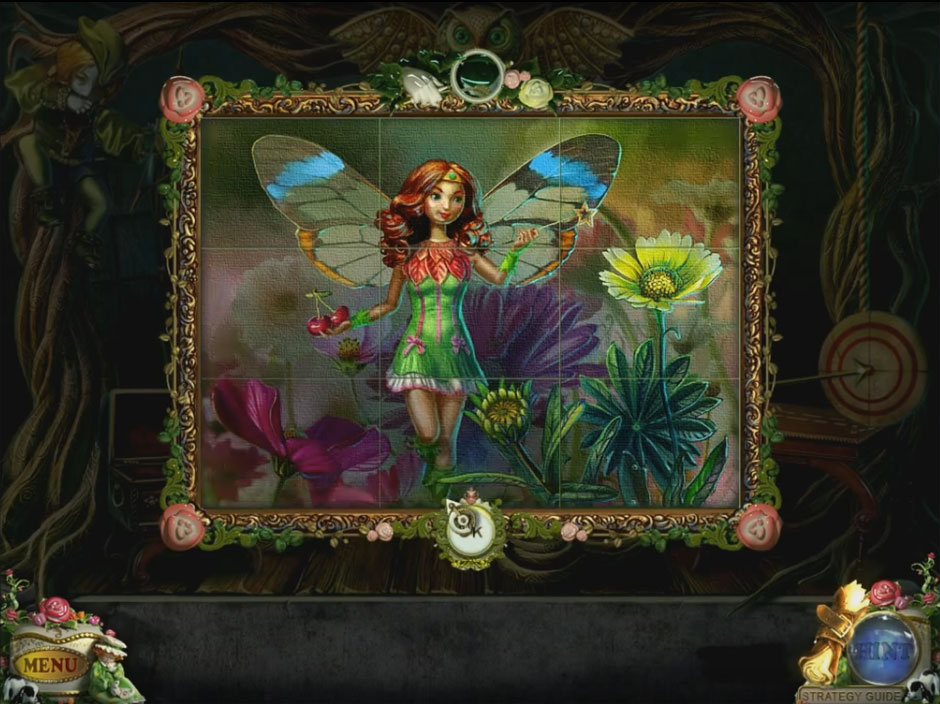
PuppetShow Return to Joyville Fairy Puzzle Solution
– Take the FADER.
Travel outside the home.
Select the tricycle.
– Place the elastic band on the handlebars.
– Drop the ball onto the band and fire it.
Travel into the tree house.
Select the window.
– Take the doll.
Drop the telescope on the tripod.
Select the drawing on the wall.
Select the left side of the wall.
– Remove the doll with the razor.
Select the table.
– Place the three dolls on the board to begin a puzzle!
The goal of the puzzle is to match the dolls with their respective seasons that are on the board. For a solution, look at our image.
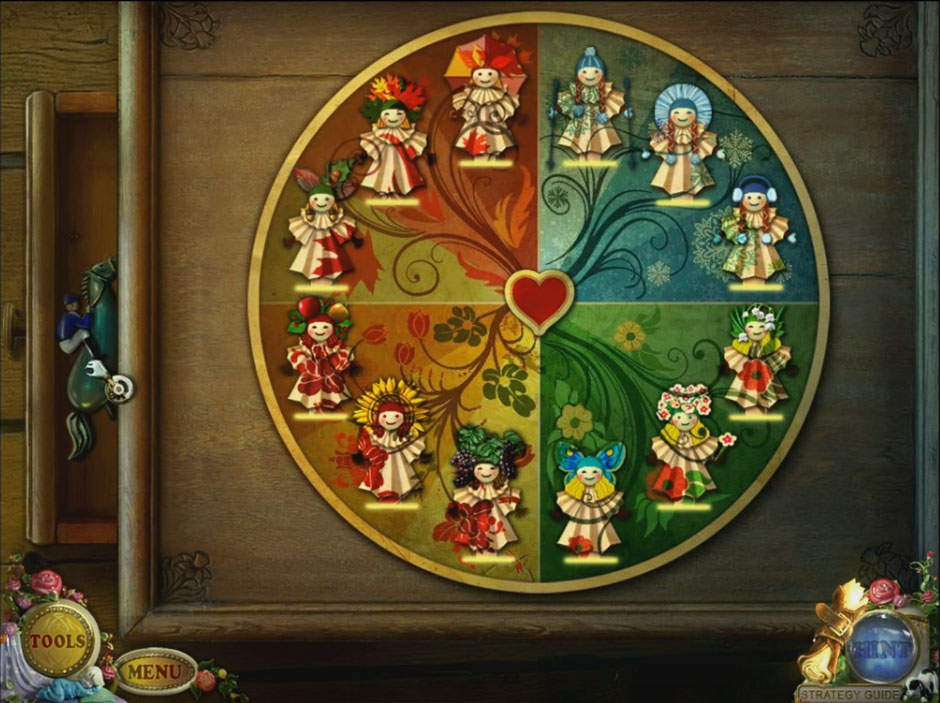
PuppetShow Return to Joyville Doll Puzzle Solution
When the puzzle is complete, take the rider on the left.
Travel outside the tree house.
Complete the hidden object puzzle.
– Select the bag to find TICTACTOE.
– Select the links three times to find the DOG.
– Make sure you get the TWEEZERS!
Select the suitcase.
– Drop the rider inside it.
Place the fader on the zipper.
Arrange the jockeys so that they finish in the same order depicted on the suitcase.
– Select riders to swap them.
– Select the fader to have them move forward.
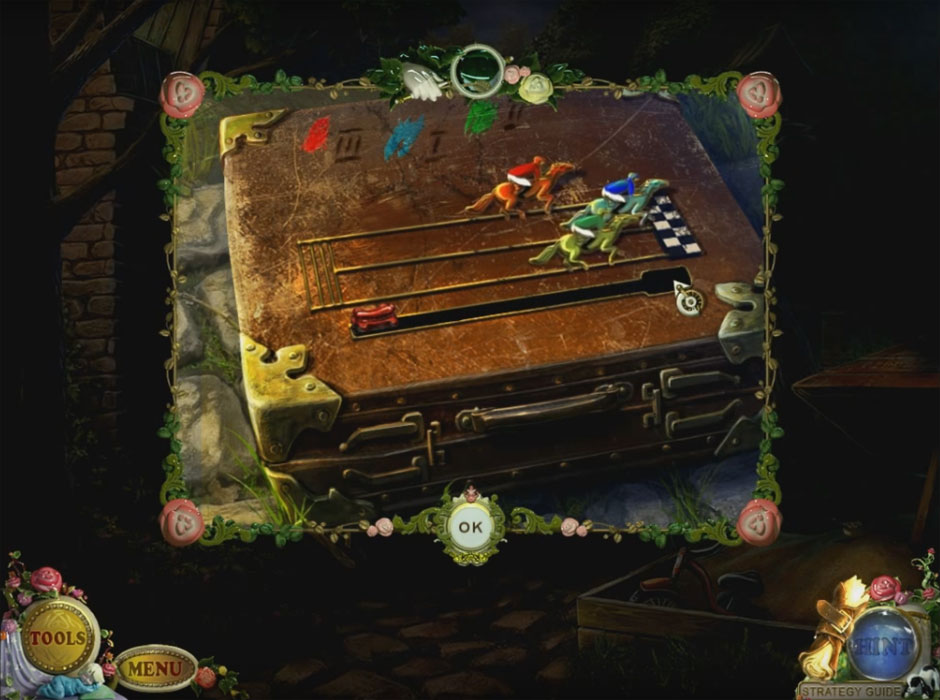
PuppetShow Return to Joyville Jockey Puzzle Solution
Take the helmet.
Travel down once.
Select the doll.
– Remove the beetle in her chest with the tweezers.
– Take the jump rope on her wrist.
Travel down once. Travel left once.
Select the lowered puppet.
– Drop the helmet on his head.
Select the motor.
– Take the lever.
Drop the jump rope on the motor.
– Pull the rope to get the motor started.
Travel through the front door.
Chapter 2: Home of the Tailor
The strange tailor will welcome you into her collection of ball gowns and ancient supplies. A puppet herself, she will not be of much help on your journey through her quarters.
Select the clothes on the rack.
– Push them aside to find the handle.
Select the drawer on the right.
– Take the lock pick inside the drawer.
Select the mannequin.
– Notice the numbers 8, 35, and 62.
Travel down once. Travel left once.
Speak with the puppeteer.
Select the postings on the right.
– Grab the hammer and matches.
– Select the door behind the puppeteer.
– Use the code you found earlier: 853562.
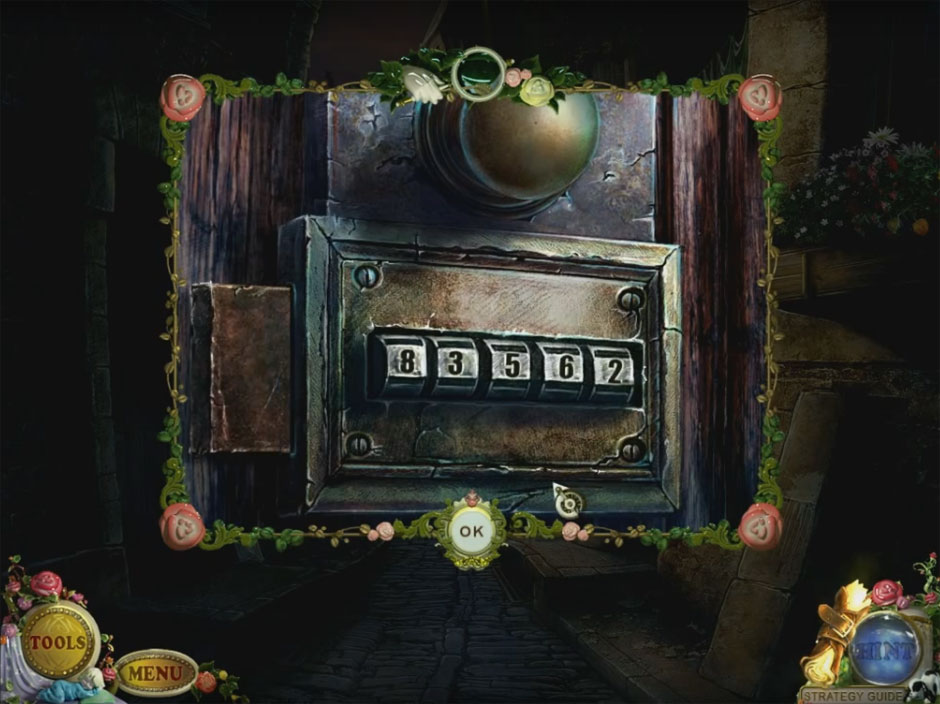
PuppetShow Return to Joyville Door Code
Travel through the door.
Select the woman.
– Take the tape from her face.
Grab the chain from the chair.
Travel down once and forward once.
Select the lamppost next to the garden fence.
– The lock pick will unlock the lock.
– Take the ladder.
Select the water stand in the back.
– Place the handle on the syphon.
– Grab the soda syphon.
Complete the hidden object puzzle.
– Select the knife to find XII.
– Inside the gun is the BULLET.
– Make sure you get the SCISSORS!
Travel forward once.
Move closer to the doors and guards.
Select the guard on the right.
– Cut the straps on his chest with the scissors.
– Select his chest to begin a puzzle!
The goal of the puzzle is to move the pieces into the matching springs on the board by pressing the arrow keys.
The solution is: 4, 2, 5, 10, 9, 13, 10, 3, 11, 1, 6, 8, 12, 7
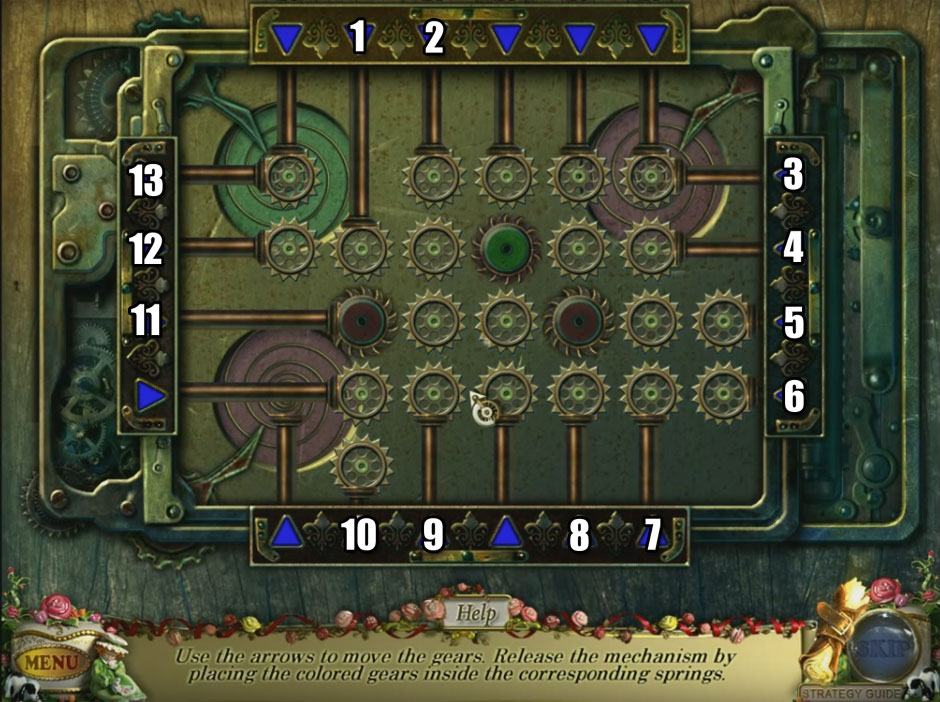
PuppetShow Return to Joyville Spring Puzzle Solution
Once finished, take the sword.
Travel down once.
Select the bushes.
– Trim the bushes with the sword.
Use the hammer against the window three times.
– Select the latch.
Travel through the window to reach the basement.
Select the puppet.
– Select the door attached to its head.
– Grab the carabiner.
Select the back door.
– Drop the chain onto the door.
Select the chain on the ground.
– Place the carabiner onto the chain.
Select the wheel on the boiler to the left.
– Drop the lever onto the wheel.
– Pull the lever.
Select the door.
– The cane can be used to snag the bag.
– Open the bag to find the fingers.
Travel back to the center of the town.
Complete the hidden object puzzle.
– Select the crowbar to find the BALLS.
– Select the four fish to find the SUN.
– Make sure you get the JESTER!
Travel down once.
Place the ladder beneath the lamp.
– Select the lamp.
– Open the glass and light the candle with the matches.
– Take the lamp.
Travel to the tailor’s shop.
Select the sewing machine.
– Place the fingers on the puppet.
Select the machine once more.
– Remove the cover to find the dowel.
Select the red fabric on the ground beneath the machine.
– Read the note.
Travel out. Travel left once. Travel into the door on the left.
Select the bottom left of the chair.
– The dowel will enter the pin.
– Use the hammer on the dowel.
– Grab the master key.
Travel to the front of the theater.
Select the locked door.
– Use the master key on the lock.
– Turn the key three times.
Select the locked door.
Travel into the theater.
Chapter 3: Theater
The scene opens in an eerily illuminated hallway guarded by a suit of armor. Tread carefully as you search for Felicia.
Select the discarded puppet on the carpet.
– Grab the spring pin.
– Look at the note.
Travel through the center door on the left.
Drop the lamp.
– Take the oil can in the center of the room, near the ceiling.
Travel down once.
Select the helmet on the left.
– Drop the oil can on the helmet.
– Lift up the helmet and take the clasp.
Travel through the farthest door on the left.
Push the partition aside.
Complete the hidden object puzzle.
– Open the purse to find the POSTCARD.
– Select the brush to find the PINK WATER.
– Make sure you take the CARPET BEATER!
Travel down once.
Select the door on the left.
– Place the spring pin into the lock to begin a new puzzle!
The point of the puzzle is to arrange the latches into the correct order. Press the keys to move the latches. The writing beneath the keys will give you important hints! See our image for the solution.

PuppetShow Return to Joyville Latch Puzzle Solution
Travel through the door.
Select the jester.
– Select the lever.
– Grab the club.
Travel back to the dark room.
Drop the club on the chest.
– Take the tapestry.
Travel to the jester’s room.
Select the jester.
– Take the hanging puppet.
– Drop the carpet beater onto the jester.
– The tapestry will hang on the clothes hangers.
– Pull the lever.
– Take note of the puzzle solution.
Travel to the dressing room.
Select the desk.
– Select the paper.
– Grab the lady.
– Read the note.
Select the box on the desk.
– Place the lady and jester on the box.
Place the figures as they appear in our solution image.
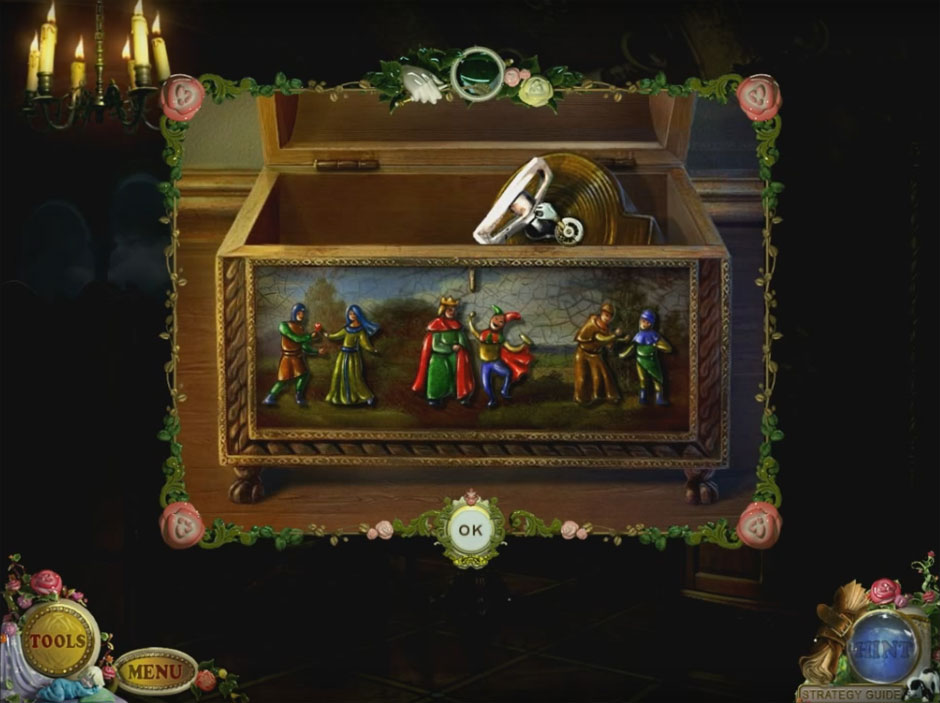
PuppetShow Return to Joyville Puzzle Box Figures
– Grab the puzzle core from inside the box.
Travel down once.
Select the farthest door.
– Drop the puzzle core into the center portion of the door to begin a puzzle!
By dragging the rings around the puzzle, you will eventually lock pieces into different holes. The object is to get all of the rings into their respective locks. See our image for the solution.
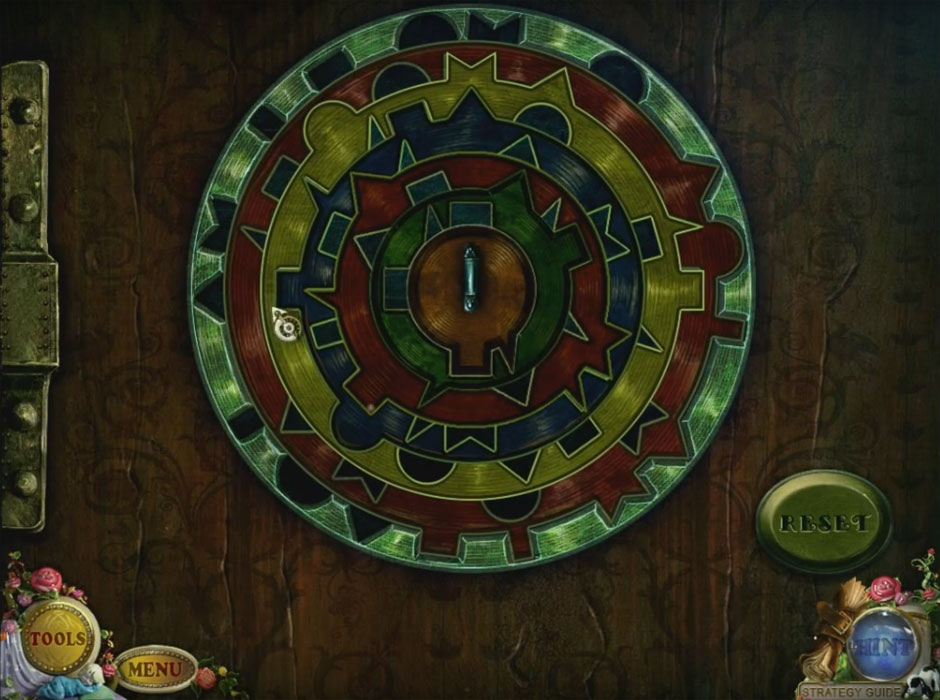
PuppetShow Return to Joyville Ring Puzzle Solution
Travel through the door.
Use the soda syphon to put out the fire.
Complete the hidden object puzzle.
– Select the lapel to find the FEATHER.
– Select the spoon to uncover the TEA BAG.
– Make sure you get the RULER!
Travel through the door on the right.
Complete the hidden object puzzle.
– Select the cabinet to find the MATCHBOX.
– Select the pastry bag.
– Select the cake slices.
– Take the CAKE.
– Make sure you get the KNIFE!
Select the table.
– Grab the bolts.
Select the vent.
– The beans can be taken by using the ruler.
Travel down once. Travel through the curtains to the right.
Select the painting.
– Grab the key.
Travel down once. Travel through the door on the left.
Select the plank.
– Grab the mahout.
Select the leather bag.
– Drop the clasp on the missing latch.
– Look inside the bag to find the bicycle key.
Select the puppet.
– Use the knife to cut the screw from the badge.
Travel to the jester’s room.
Select the area behind the elephant’s left ear.
– Drop the mahout into the carrier.
Select the cage.
– The key will turn the lock.
– Turn the key three times to find the comb.
Travel to the corridor with the red curtain. Travel through the red curtain.
Select the puppet.
– Drop the beans into his hand.
Select the base that the puppet stands on.
– Drop the bolts into the mechanism.
– Use the badge to tighten the bolts.
Travel up the stairs after the beanstalk appears.
Chapter 4: The Great Beanstalk
Jack survived the beanstalk, but can you? Your ascent into the unknown is a perilous one, and your return to the floor below is not guaranteed as you progress through the next chapter of your journey.
Select the device beneath the draw ropes.
– Grab the poker.
Select the curtains.
Travel through the curtains.
Select the balcony railing.
– Grab the polygon.
Complete the hidden object puzzle.
– Select the dominos to find the DOUBLE THREE.
– Select the second chair cushion from the left to find the PYRAMID.
– Make sure you grab the COIN!
Travel out of the room.
Select the monk automaton.
– Drop the coin into the machine on his back.
– Grab the hand from the opened slot.
Travel back to the second corridor.
Complete the hidden object challenge.
– Turn the pages of the book to find the WAX SEAL.
– Select the scroll to uncover the POSTER.
– Make sure you take the HACKSAW!
Travel through the left door.
Select the plank above the counter.
– Remove the fastenings with the hacksaw.
– Grab the board.
Travel back to the restaurant.
Select the upper cupboard.
– Drop the polygon into the empty slot to begin a new puzzle!
The object of the puzzle is to place the monkey legs so that they are either holding a banana or another monkey’s limb.
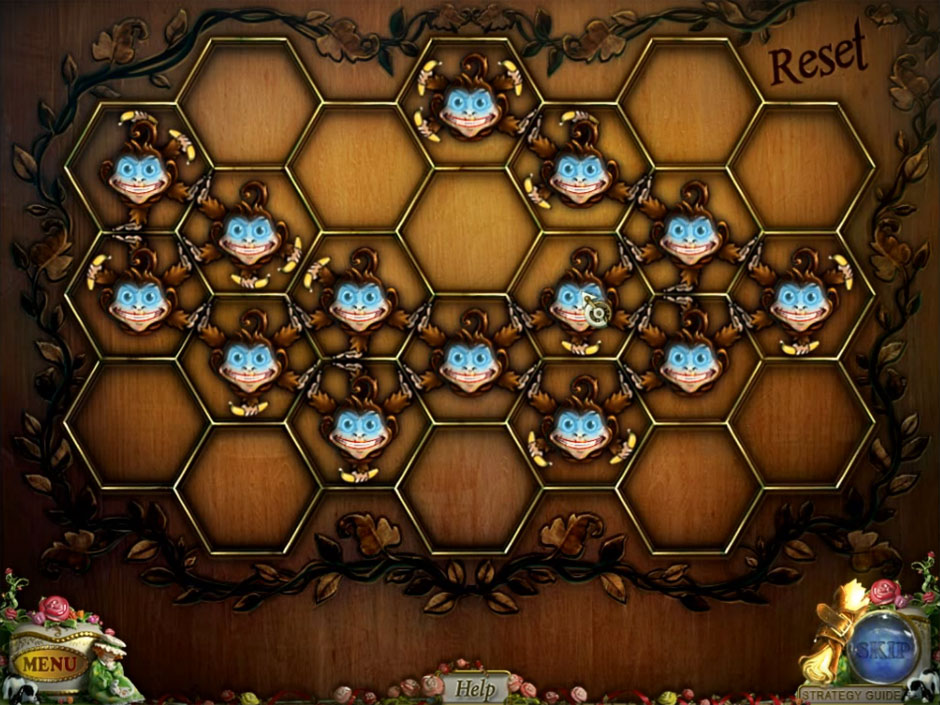
PuppetShow Return to Joyville Monkey Puzzle Solution
Refer to our solution if you need help.
The crown will appear in the hutch when the puzzle is complete.
Complete the hidden object puzzle.
– Move the handkerchief to find the CORN.
– Place the coin into the slot connected to the cash register’s side.
– Take the CHECK.
– Make sure you get the WHEEL!
Travel to the dressing room again.
Complete the hidden object challenge.
– Drop the powder puff on the powder to find the HANDPRINT.
– Make sure you get the LIGHTBULB.
Select the closet.
– Drop the hand on the closet door to begin a puzzle.
The object of the puzzle is match the opposite image to the image that appears on the side with the question mark.
Select the question mark and arrows will appear.
– The left arrow will reveal fashion accessories.
– The right arrow will reveal numerous faces.
– Match the faces to the accessories by rotating the wheels.
See our solution image if you need help!
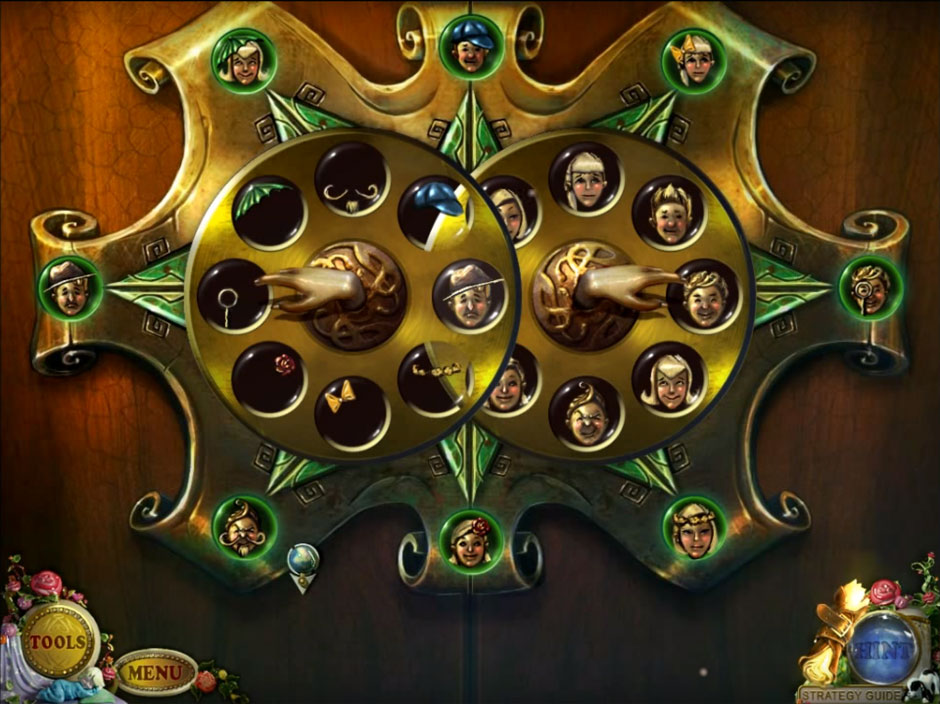
PuppetShow Return to Joyville Fashion Accessories Puzzle Solution
Select the closet to find the helmet.
Travel back until you reach the beanstalk. Travel through the left door. Travel through the curtains.
Select the balcony railing.
– Drop the board on the railing.
Travel across the board.
Select the wired contraption to begin a new puzzle!
The goal of this puzzle is to display every possible color combination along the perimeter of the wheel.
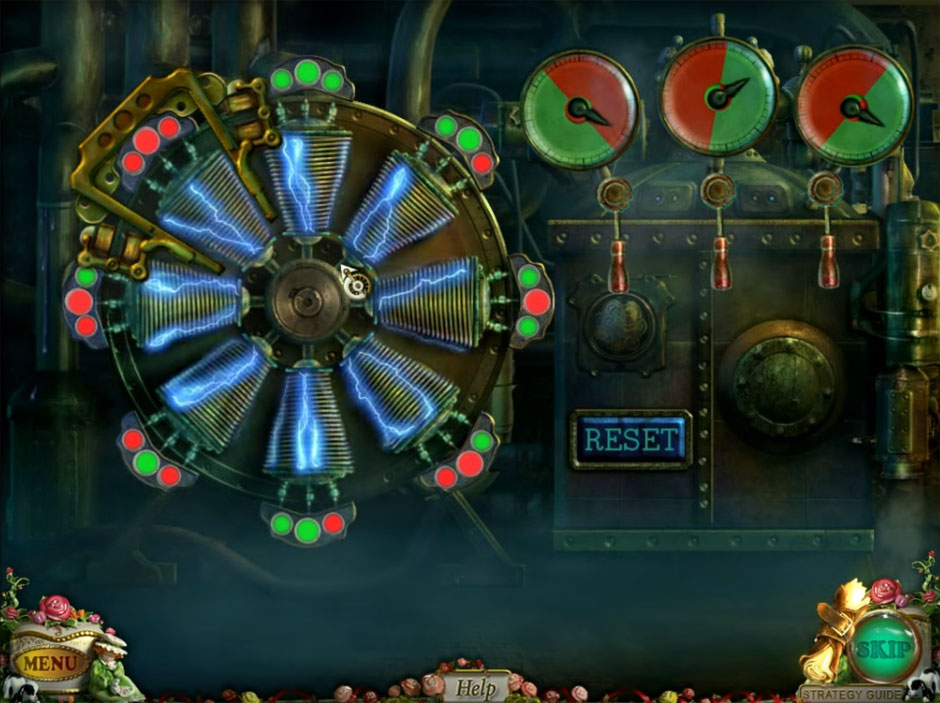
PuppetShow Return to Joyville Electric Wheel Puzzle Solution
Refer to our solution if you need help!
Select the projector.
– Remove the lid and drop the light bulb inside.
Travel through the new door on the right side of the room.
Select the window.
– Use the poker to take down the three boards.
Open the window.
Complete the hidden object challenge.
– Select the trapdoor.
– Grab the HORSE and BOTTLE.
– Drop the carpet beater on the jacket.
– Grab the PISTOL.
– Make sure you get the LANCE!
Travel down twice.
Complete the hidden object challenge.
– Select the tear to find the COMB.
– Drop the quill in the inkpot.
– Grab the SIGNATURE.
– Make sure you take the BAND!
Travel forward once.
Select the panel.
– Drop the band onto it.
– Select the handle and hold it.
Take the puzzle key.
Travel back to the beanstalk’s base.
Select the door at the top of the stairs.
Chapter 5: Tower
The tower is an ascent that will lead you past crooked clocks, rotten stairs, and ghostly window panes. Your search will continue as you solve more puzzles and work your way through narrow corridors.
You have activated a new puzzle!
– Move each piece until a lock is revealed.
– A piece cannot pass over a screw.
– See our solution image if you need help!
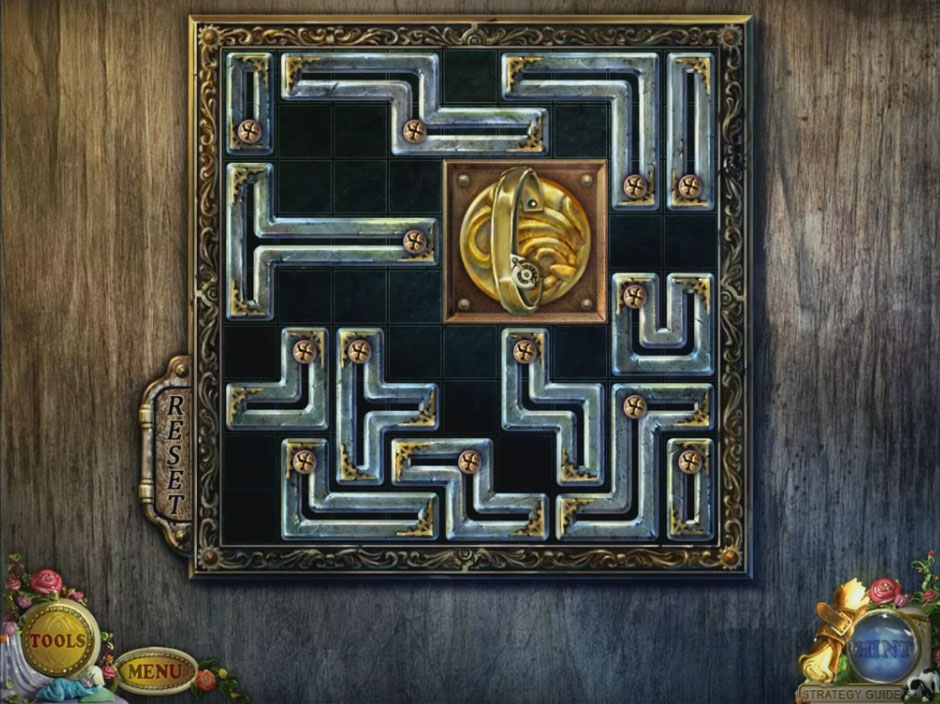
PuppetShow Return to Joyville Screw Puzzle Solution
Place the puzzle key in the exposed lock.
Travel through the door.
Select the head of the dragon.
Select the gear hanging from the chain.
– Grab the valve.
Complete the hidden object puzzle.
– To get the PELICAN, select the rope on the right side.
– Use the shard to cut the bag.
– Take the SPRING.
– Make sure you get the PINCERS!
Travel to the roof.
Complete the hidden object challenge.
– Drop the wheat onto the mill.
– Grab the FLOUR.
– Place the tongs on the tomato.
– Grab the TOMATO JUICE.
– Make sure you take the FILE!
– Select the shield.
– The pincers can take out the nails.
Take the shield.
Walk down twice. Walk right once.
Select the device just above the floor.
– The file will cut the valve free.
– Take the valve.
Travel to the room with the dragon head.
Complete the hidden object puzzle.
– Select the woodpecker to find the CATERPILLAR.
– The sledgehammer will break the brick wall to reveal the SPEARHEAD.
– Make sure you get the ROPE!
Travel once more to the dark room located in the first corridor.
Select the puppet tied to the wheel.
– Drop the valve on the wheel.
– Select the valve twice.
Take the prince.
Travel to the room with the dragon.
Select the cart.
– Drop the prince onto the cart.
– Give the prince the helmet, lance, and shield.
PuppetShow Return to Joyville Prince Mannequin Armor
– Select the cart again to push it forward.
Travel forward once.
Speak with the doll in the corner.
Select the puppet who is standing.
– Place the comb inside the slot of the red mechanism.
– Time for another puzzle!
The point of the puzzle is to arrange the hands holding the puppet’s hair into a certain order. The arrow keys on the red box move the hands.
To complete the puzzle, the arrows must be pressed in this order: Bx2, Dx2, C, A, Bx4, Ax4, Bx4, Dx2, C, Ax2, B, Cx2, B
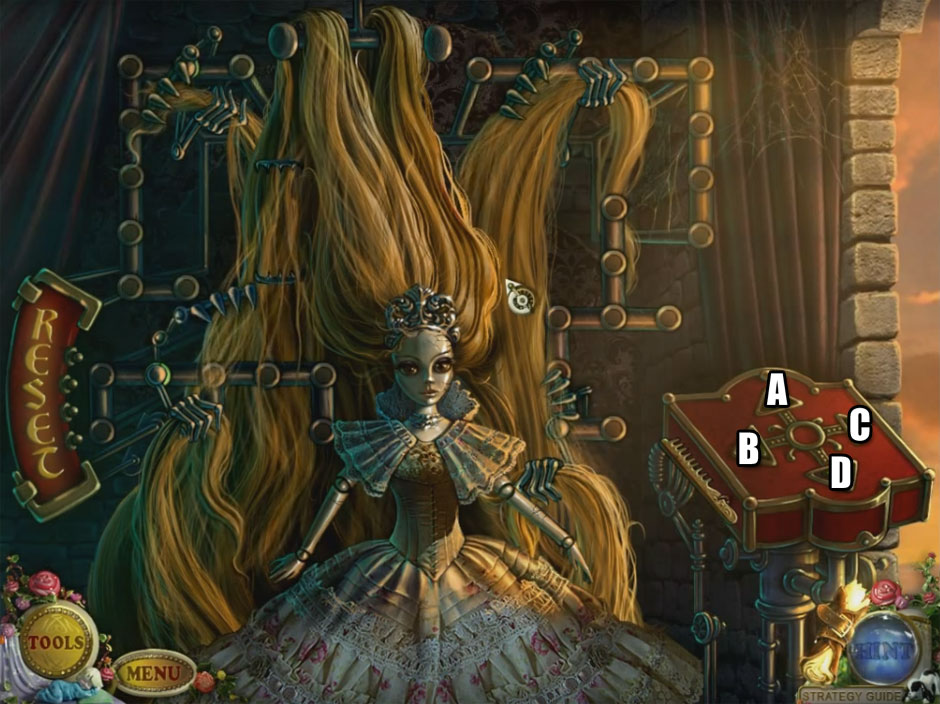
PuppetShow Return to Joyville Puppet Hair Puzzle Solution
– Once finished, select the piece of hair on the balcony.
Travel out the window.
Select the cherubs.
– Drop the rope on the cherub’s hand.
– Pull the rope to find the heart.
Travel back to the second corridor.
Select the strange machine near the back.
Drop the heart near the bottom cherub to begin a new puzzle!
The object of the puzzle is to move the blue cherub to the cherub with the red heart. However, the arrows will only move in the direction they are pointing.
To complete the puzzle, use this combination: 2A right, 3B, 4A, 4B, 3C, 2B right, 2C down, 2D, 2C, 3C up, 4D, 3D, 2C right, 4E, 3D, 2D down, 3E, 3D right, 3E down, 3F, 3E, 4E up, 3E right, 5E, 4E, 4F, 5F, 3F down, 4F down, 4G, 5G, 4F right
PuppetShow Return to Joyville Cherub Puzzle Solution
Travel through the door.
Chapter 6: Theater Stage
The stage awaits you along with its host of players and empty seats. Once filled to the brim with audiences and visitors, it has since become abandoned. However, it is not forgotten. To complete the mystery, you must decipher its rusty secrets.
Select the chair.
– Drop the crown on the head.
– Grab the chest key.
Travel through the door to the left.
Select the chest.
– The chest key will unlock the lock.
– Select the lock to pop open the latch.
Select the drawer.
– Take the beard.
Travel down. Travel to the stage.
Speak with Felicia.
Complete the hidden object puzzle.
– Select the drawer to find the OPERA GLASSES.
– Make sure you grab the EYES.
Travel to the right side of the stage.
Select the air canister.
– Drop the tank valve onto the canister.
– Grab the balloons.
Travel down.
Complete the hidden object puzzle.
– Select the quill to find the SIGNATURE.
– Make sure you get the SNAIL!
Travel to the left side of the stage.
Select the axe man.
– Place the eyes in his eye sockets.
– Take the axe that will drop.
Select the bottom of the moving set on the right.
– Place the wheel on the spoke.
Travel down twice. Travel through the door on the left.
Remove the wallpaper on the left side of the room.
– The axe will remove the boards after three hits.
– Complete the hidden object puzzle.
– Drag the brush to the shoe polish to make the DARK SHOES.
– Use the cloth on the bottle to find the MALTESE CROSS.
– Select the loose tie to find the TIE.
– Make sure you get the CHAIN.
Travel to the right side of the stage.
Select the gears and switch on the back wall.
– Drop the chain on the gears.
– Select the handle.
Travel up the ladder.
Select the desk.
– Select the sheet of paper.
Complete the hidden object challenge.
– Select the box to find the PRAWN.
– Select the tennis shoe to find the GUM.
– Make sure you get the PINS.
Travel to the left side of the stage.
Select the board.
– Place the bicycle key in the lock.
– Remove the decoration to the right.
Travel to the right once.
Use the lamp to see.
Select the fire hydrant.
– Grab the snail.
Travel to the auditorium. Travel left once.
Select the back door.
– Drop the pins onto the lock to begin a new puzzle!
The goal of the puzzle is to have the arms of the two figures take the correct position.
The solution is quite simple. Simply press the key marked A twice.
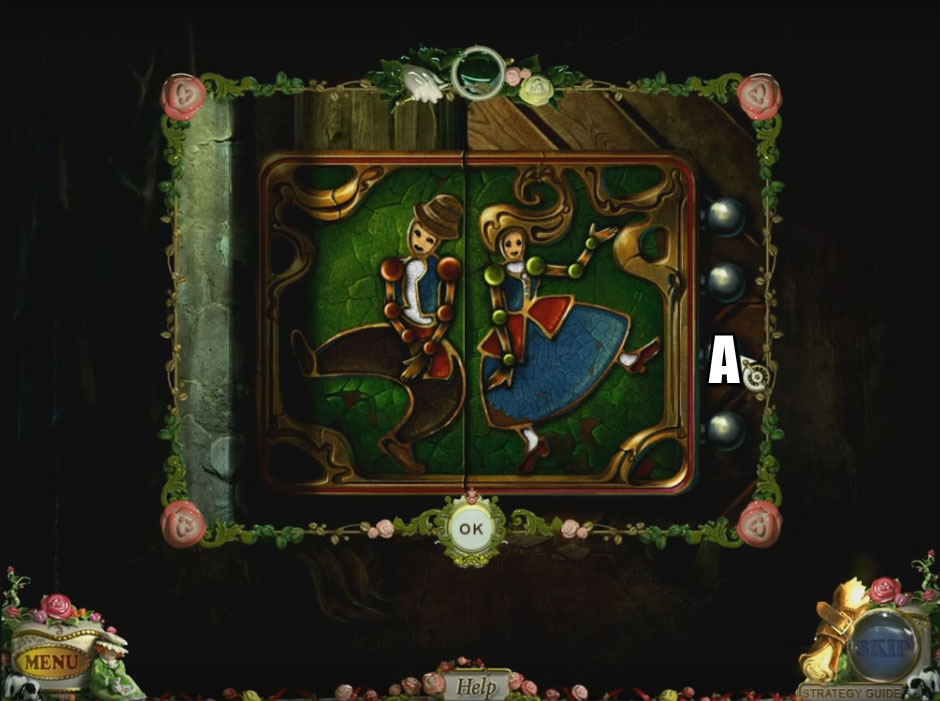
PuppetShow Return to Joyville Dancing Figures Puzzle Solution
Travel through the door.
Chapter 7: Storage
The storage room is littered with lost items. You have made your way this far, but the curtains of the puppet show can always draw closed and put an end to your journey.
Complete the hidden object puzzle.
– Select the lower rocket lid to find the COW.
– Select the upper rocket lid to find the SPRING.
– Make sure you get the HONEY.
Select the phonograph.
– Grab the mechanism button.
Travel through the door on the left.
Select the rope.
– Pull the door open.
Travel through the door.
Select the shelf near the ceiling.
– Grab the monkey jack.
Select the blueprints hanging on the wall.
Select the door on the right.
– Place the two snails against the door to begin a new puzzle!
The goal of the puzzle is to move the crab legs so that they connect to the snail shells.
Use the red buttons to move the crab legs.
Enter this sequence to solve the puzzle: B, Dx3, Ax2, Ex2, F, G, A, G, Hx2, C, Dx2, G, Ex2, Ax2
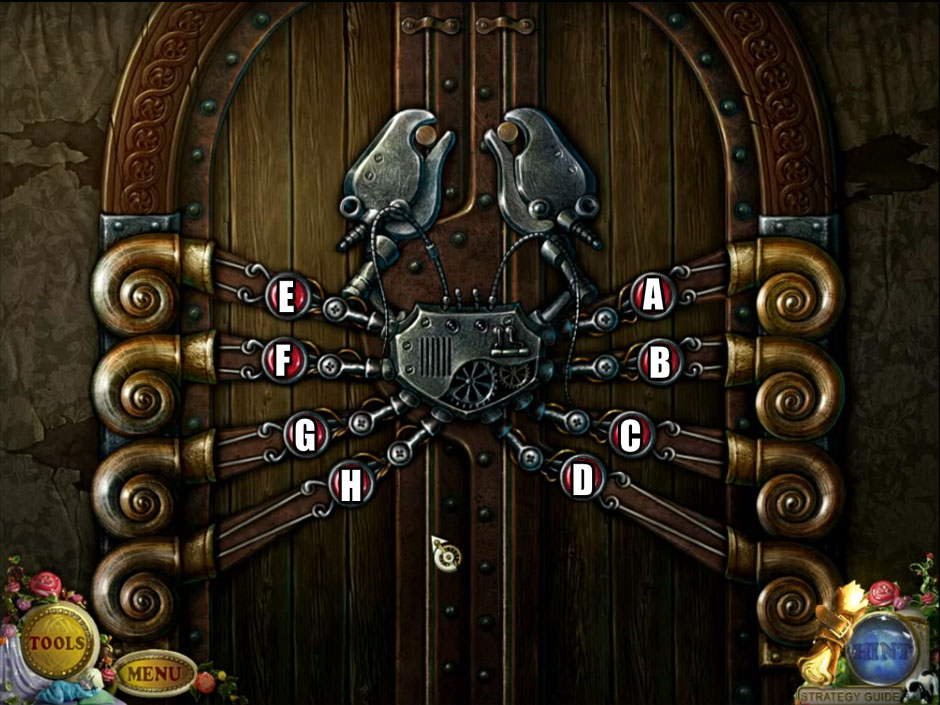
PuppetShow Return to Joyville Crab Door Lock Puzzle Solution
Finish the hidden object puzzle.
– Select the box to find the DEVIL.
– Select the moth to find the COCOON.
– Make sure you take the PROPELLER!
Travel down.
Place the honey on the bear.
Select the honey.
– Attach the balloons to the bucket.
Select the fan.
– Remove the fan cover and place the propeller inside.
– Select the handle and the fan will start.
– Enjoy the bear!
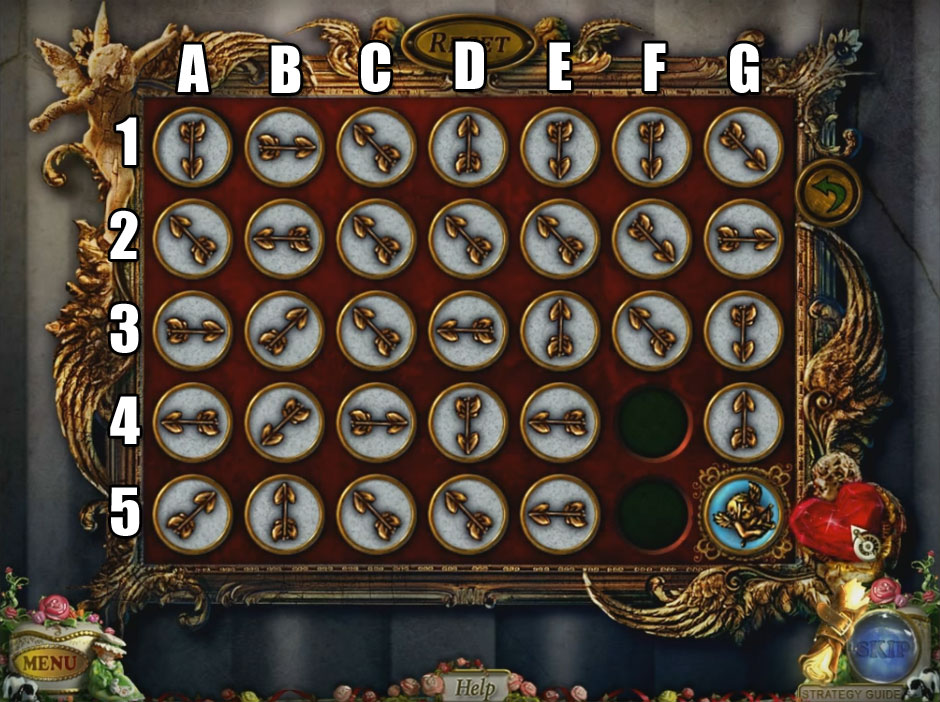
Select the chest to begin a new puzzle!
The goal is to use the hedgehog to grab, drag, and drop the mushroom into the hole near the bottom of the screen.
The arrow keys to the right will rotate the board back and forth.
Small acorns on the board will rotate individual pieces on the board.
Press the start button, then follow this combination to complete the puzzle: Dx2, Cx2, Ax3, Cx2, Dx1, then A, D, C, D, B, D, C
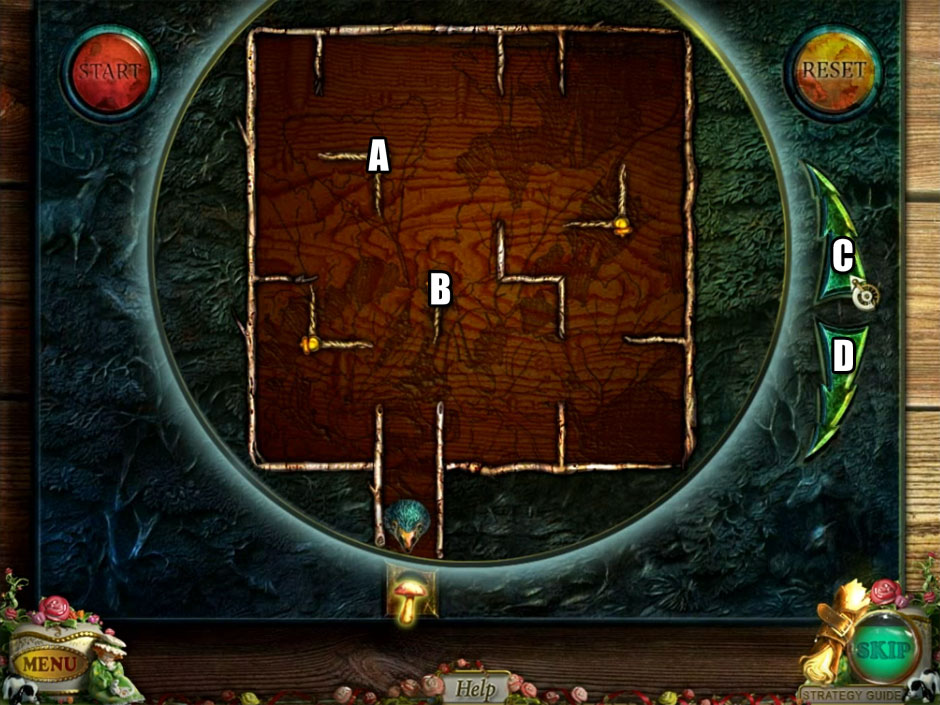
PuppetShow Return to Joyville Acorn Rotation Puzzle
Travel through the chest.
Finish the hidden object puzzle.
– Place the blue fabric on the doll’s head to find the HAIR BOW.
– Make sure you get the HOOK!
Travel through the door on the right.
Select the book located on the table.
Complete the hidden object puzzle.
– Select the chessboard to find the QUEEN.
– Select the blue cover to find the COCKEREL.
– Make sure you grab the PENGUIN!
Travel down twice. Travel through the back door.
Finish the hidden object challenge.
– The FISH is in the pelican’s beak.
– Select the cloth to find the SPECTACLES along with the SHIP.
– Make sure you get the POT!
Travel down four times. Travel forward once. Travel to the right side of the stage. Travel up the ladder.
Complete the hidden object puzzle.
– Select the box to uncover several items.
– Select the jacket to find the MITTEN.
– Make sure you find the HAND CRANK!
Select the controls.
– Place the mechanism button on the mechanism to begin a puzzle.
The object is to use the arrows to move the different pieces until they match the positions displayed on a sheet of paper to the right.
Use this sequence to solve the puzzle: Ax2, C, B, E, A, C, B, D, Bx3 C, A, C, B, C, A, E, B, C, A, E, B, C, A, E, B, C, A, Dx2, A, C, Ex2, A, D, B, C, A, C, A, Bx2

PuppetShow Return to Joyville Crate Sorting Puzzle Solution
Select the wheel to the right.
– Take the resin.
Travel back to the basement beneath the theater.
Select the statue.
– Place the monkey jack on the base.
– Place the hand crank on the jack.
– Twist the crank to find the record.
Travel down twice.
Chapter 8: The Closing Act
The final paths of this haunting mystery have finally arrived. Do you have the courage and fortitude to finish the path you started? Proceed carefully, and you may make it to the end.
Complete the hidden object puzzle.
– Select the helmet to find the PHARAOH.
– Select the box to find the BALL.
– Make sure you get the SNAKE!
Select the phonograph.
– Drop the record on the spinning table.
Select the broken egg man.
– Take the wrench.
Travel down to the basement. Travel through the right door.
Select the furnace.
– Drop the pot on the coals.
– Drop the resin in the pot.
– Take the liquid resin.
Complete the hidden object puzzle.
– Select the knife to find the AVOCADO HALF.
– Select the ball to find the FRECKLES.
– Make sure you get the CUTTING PLIERS.
Travel down once.
Select the sarcophagus.
– Drop the beard on the corpse’s face.
– Drop the snake on the head.
– Grab the bandage.
Travel left once.
Select the pipe.
– Drop the bandage on the pipe.
– Drop the liquid resin on the pipe.
Travel down once.
Finish the hidden object challenge.
– Drop the glue bottle on the broken plate.
– Take the PLATE.
– Make sure you get the PENGUIN FLIPPERS!
Travel down once. Travel through the back door.
Select the table.
– Drop the penguin head and penguin flippers onto the strange looking plane.
– Take the penguin.
Travel back once. Travel into the chest. In the basement, travel left once.
Place the hook on the grate.
– Select the hole.
– Drop the penguin into the running water.
Select the opposite end of the hole.
– Grab the lock gear.
Select the grate on the side of the water pump.
– The wrench will remove the two bolts from the grate.
Remove the grate to begin a new puzzle!
The goal of the puzzle is to use levers to shift water pressure in the tanks until they reach the green span on the dials.
The white buttons will move the water sprayers.
The red and blue levers will drain water from the tanks.
Use this sequence to complete the puzzle: A, Bx3, D, Ax3, Bx5, E, Ax2, Bx3
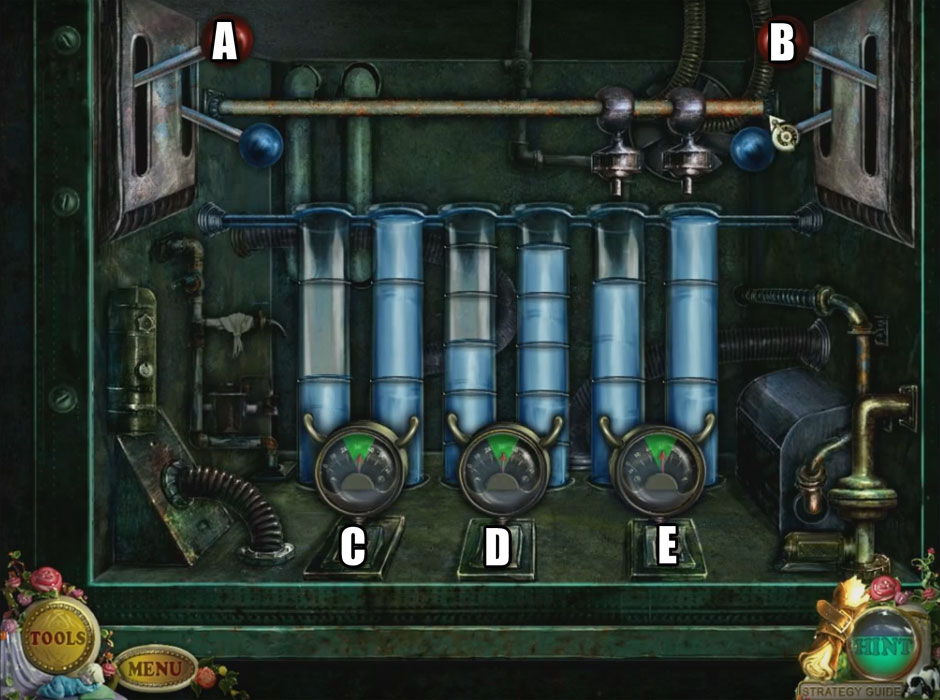
PuppetShow Return to Joyville Water Tank Puzzle Solution
Travel down once.
Select the back door.
– Drop the lock gear on the door to begin a new puzzle!
The point of the puzzle is to move the dials until the numbers that face one another equal the sum on the plate above them. Look at our screenshot for the answer.
PuppetShow Return to Joyville Number Dial Puzzle Solution
Travel through the door.
Speak with Ornella.
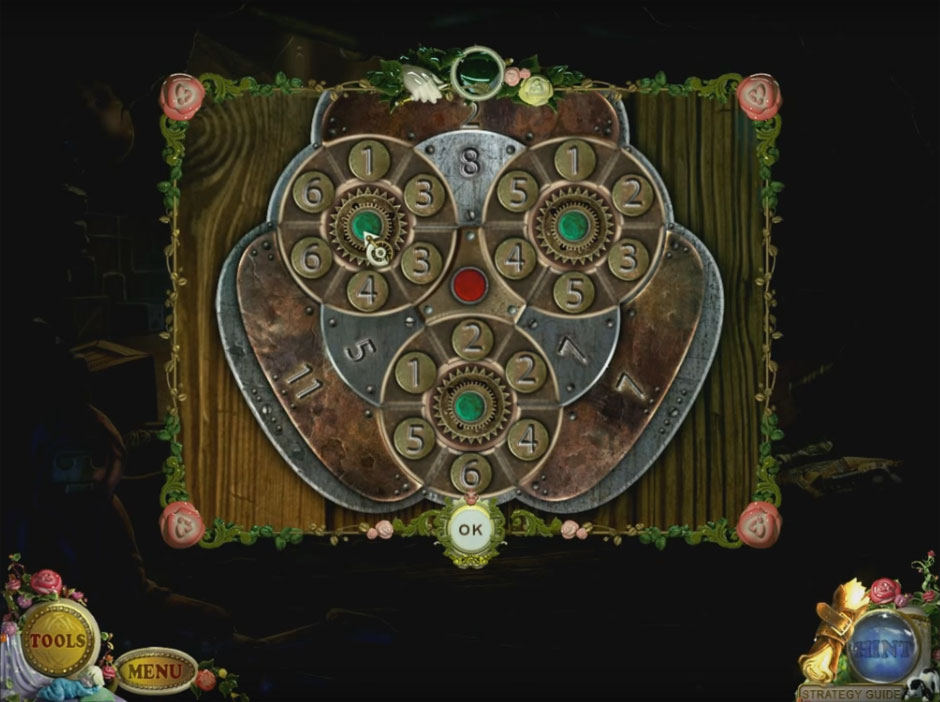
– Select the crate to begin a new puzzle!
The object is to adjust the gears in a certain order to show the wires.
The puzzle can be solved by selecting the gears in the following sequence: C, Dx3, Ax3, Bx4
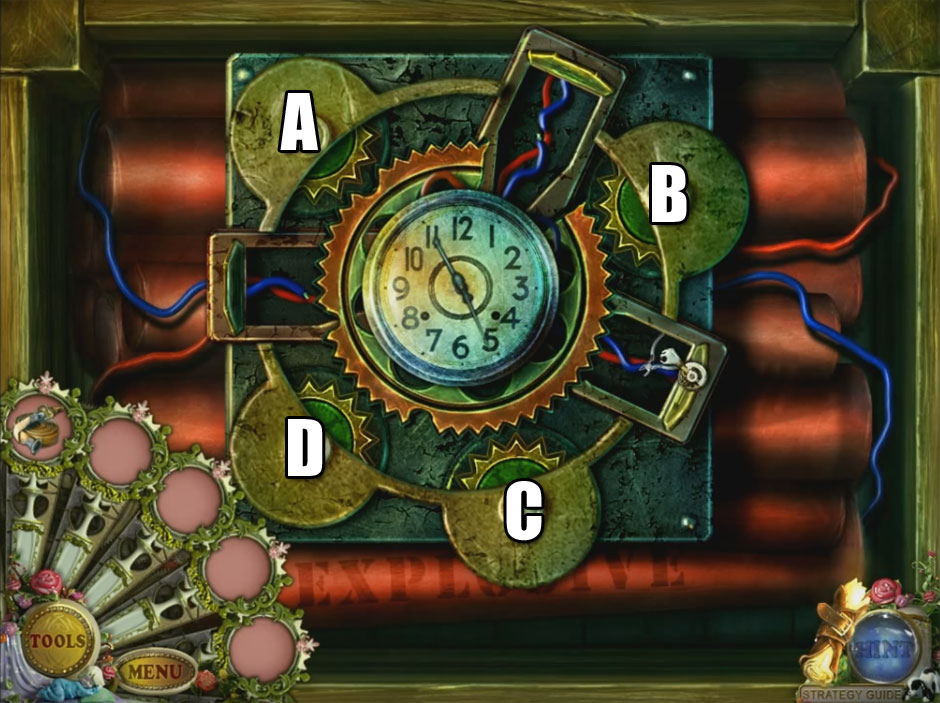
PuppetShow Return to Joyville Gear Sequence Puzzle Solution
– Use the cutting pliers to cut the wires.
Travel down four times.
Complete the hidden object puzzle.
– Select the pocket to find the CORAL.
– Select the second pocket to find the CORNFLOWER.
– Drop the brush on the palette.
– Grab the SUN.
– Make sure you take the HOSE.
Travel down once. Travel to the stage.
Look at the ground.
– Take the button.
Walk down once.
Select the fire alarm on the left column.
– Place the button on the alarm.
– Select the button.
Travel to the stage.
Release Ornella.
Travel to the left side of the stage. Travel to the right of the set.
Select the fire hydrant.
– Place the hose on the hydrant.
– Use the fire hose.
Well done!
If you enjoyed this guide, then check out one of our many other guides! We recommend our Haunted Halls: Fears from Childhood Walkthrough. Until next time!