Statues have taken over the village of Marlet! Find the Princess and decide her fate. Our Royal Detective – The Lord of Statues Walkthrough will guide you step-by-step through the game with numerous tips, tricks, and solutions. If you’re an Avid Collector, all 26 Miniature locations are also covered in our walkthrough.
Contents
General Tips & Tricks
This section is dedicated to the essentials you will need to know when playing Royal Detective: The Lord of Statues.
- There are three difficulty modes available:
- Casual – A relaxed gameplay experience. Sparkles show up over all important game locations and Hints recharge quickly.
- Advanced – Overcome challenges without additional aid. Hints will take longer to recharge and there is no additional help.
- Hardcore – Play the game with no help. No minigame skip, no tips, and no hints.
- Rupert is your sidekick: a small statue who will also act as your Hint button. When Rupert is around, you can click on him to figure out what you should do next. Rupert will help you as often as needed, but it will take time before he can help you again once you do use a Hint.
- You may skip puzzles, but you will need to wait before they can be skipped (does not apply to Hardcore mode).
- You can keep track of where you are and where you’ve been by using the Map, located in the bottom left of your screen.
- Click the Menu button to view options or return to the Main Menu at any time.
- All Inventory Items are written as such in the guide and shown at the bottom of your screen.
- Objects with blue names in hidden object scenes will need an extra action or combination before they can be picked up or crossed off the list.
- Collectible Miniatures, 26 in total, can be found throughout the game. Their locations are outlined in the guide below.
Royal Detective – The Lord of Statues Walkthrough
The village of Marlet is in trouble. Statues have come alive! Can you solve the mystery behind the statue maker and the Princess?
Chapter 1: Optics Workshop
Cobblestone Bridge
- Your companion, Rupert, waves to you. Click on him; he will provide you with Hints from now on.
- Take a closer look at the rooster weather vane and add the Rooster to your inventory. The Miniature 1/26 is under the rooster.
- Look down into the gap to the left. You can get the chest by using the Rooster on it. A hidden object scene will appear over the broken chest. Find all the items listed at the bottom of your screen. Once you’ve found them all, you will acquire the Sheriff Star.
- There’s a book on the ground. Collect the Apple Part (1) inside for your inventory.
- Ahead is a locked gate. Place the Sheriff Star in the grove to open it and go to the next area.
Plaza
- Examine the bottom of the statue in front of you. The Scoop here can be added to your inventory.
- A short ways ahead is a carriage. Collect the Cane and Wheel Part (1) here.
- Head right to the Storefront.
Storefront
- The Wheel Part (2) is on the door. Click on it to collect it. Take a closer look at the statue on the right. The Gold Coin inventory item can be found here.
- Examine the window on the left. Knock down icicles with the Cane to reveal a hidden object scene.
- Find all the items in the scene. You will receive the Apple Part (2) once complete.
- Go back to the Cobblestone Bridge.
Cobblestone Bridge
- Use the Wheel Parts (1 and 2) on the incomplete wheel on the broken wheel. The completed Wheel will be added to your inventory.
- Return to the Plaza.
Plaza
- After the cutscene, look at the carriage and use the Wheel here. Click on the carriage to roll it away.
- Go straight through the arch to a new area.
Estate Gate
- On the left is a wheel. Collect the Apple Part (3) here to collect it.
- On the left is a stone fist coming through the wall. Collect the Nail to the left of it.
- Examine the chains on the right. Collect the Lion Tile (1) just beyond them to add it to your inventory.
- Have a look at the text in the right portion of the wall, then go back to the Plaza.
Plaza
- Talk to the Archer statue and then look at the base. Examine the pedestal and trigger a puzzle using the Apple Parts (1, 2, and 3). Move the rings on the target so that the apple forms a complete image in the center. When you finish the puzzle, you will receive the Target.
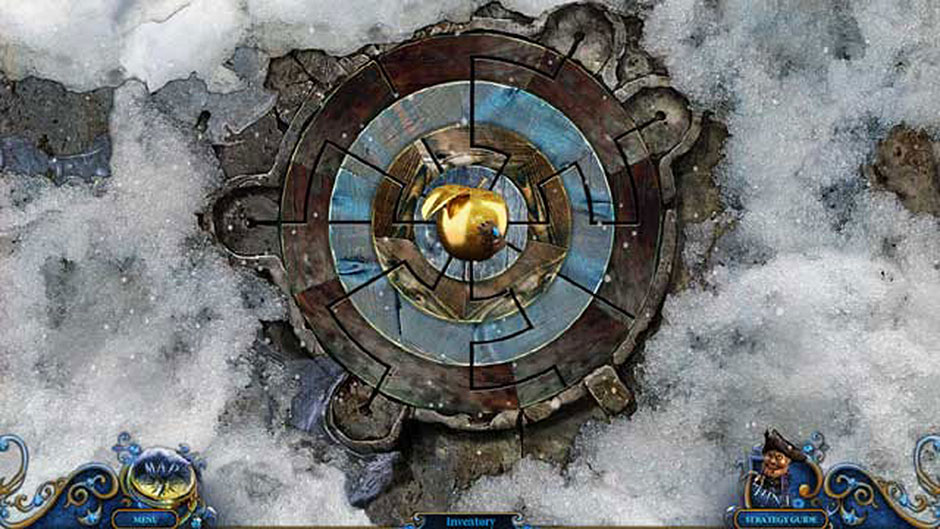
Royal Detective – Lord of Statues Apple Puzzle Solution
- Head back to the Storefront.
Storefront
- Use the Target on the groove in the door and go back to the Plaza.
Plaza
- Have the Archer statue shoot the doors open for you. Now the store is open, so return to the Storefront and enter the Optics Workshop.
Optics Workshop
- Take a look at the box on the table on the right. The Miniature 2/26 is lying in front of it.
- Use the Nail from your inventory to remove the broken key, then use the Gold Coin to open the box. Collect the inventory items Jam and Vampire Magnet.
- Examine the camera to the right. Remove the lens, then after triggering the cutscene with the photo, collect the Spring.
- Examine the framed map at the back of the workshop. Make a puzzle appear by using the Vampire Magnet on it. Place the mythical creatures into their correct locations. The finished puzzle looks like this and will reward you with the Magnifying Glass:
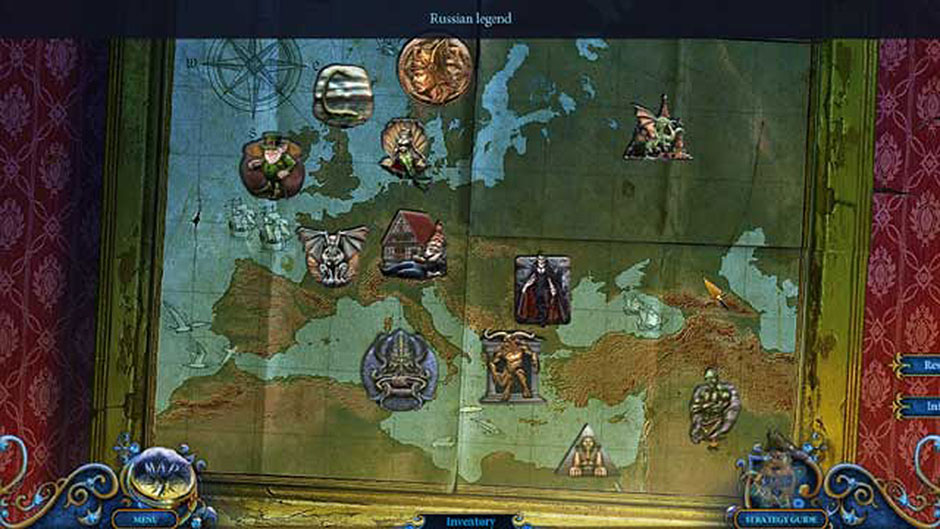
Royal Detective – Lord of Statues Mythical Creature Map Puzzle Solution
- Go to the Plaza.
Plaza
- Look at the round stone to the left and use the Jam to make a puzzle appear. Paint sections of the cake so that none of the touching sections have the same color. You will receive the Lion Tile (2) once completed. The solution looks like this:
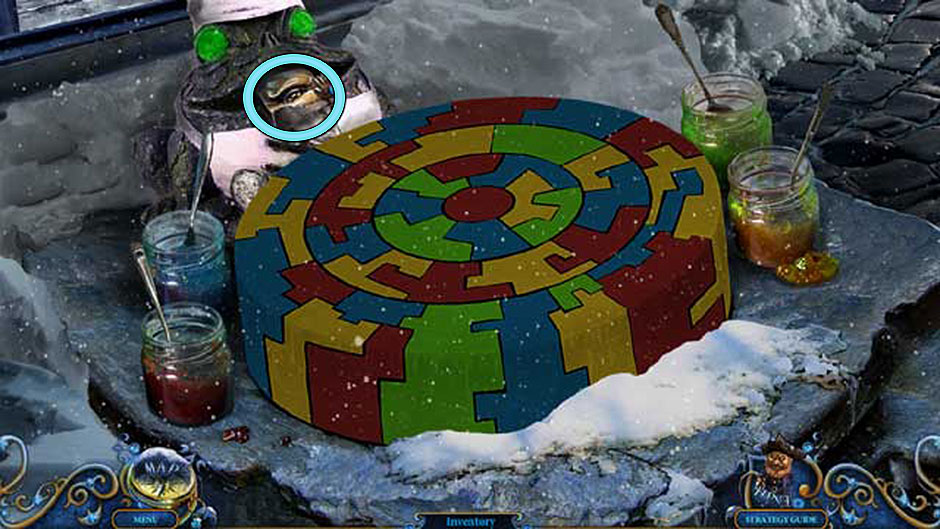
Royal Detective – Lord of Statues Cake Frosting Puzzle Solution
- Go back to the Optics Workshop.
Optics Workshop
- Look at the stove to the left and use the Lion Tiles (1 and 2) on the slots, then open the hatch. Collect the Miniature 3/26 on the left and the Hook with Chain.
- Use the Magnifying Glass in your inventory on the round stand, lighting a fire. Use the Scoop from your inventory to collect the resulting Embers.
- Return to the Estate Gate.
Chapter 2: The Estate
Estate Gate
- Take a closer look at the chains to the right. Melt the ice using the Embers, then click the Wrench to collect it. This will also make a hidden object scene show up. Find all the items listed. Once you’ve found them all, you’ll acquire the Fossil.
- Create a way up the tower by using the Hook with Chain on the window. Collect the Miniature 4/26 in the lower right corner and the Telescope. Use the Fossil on the wolf statue and collect the Flail.
- Go back to the Cobblestone Bridge.
Cobblestone Bridge
- Examine the statue to the right. Trigger a cutscene by using the Flail from your inventory on it. Once the statue is gone, collect Atlas’ Head and return to the Plaza.
Plaza
- Set the Telescope up in the window of the tall house on the left. Collect the Miniature 5/26 on the window sill and get the Smith’s Tongs by using the Rooster. After the cutscene, click on both again to re-add them to your inventory and return to the Storefront.
Storefront
- Look at the statue to the right and use the Smith’s Tongs to remove the nails. Collect the Miner and go back to the Estate Gate.
Estate Gate
- Look at the damaged section of wall to the left and use the Miner. Look at the wall once more and collect Atlas’ Hand. It will be added to your inventory.
- To the right is a statue with missing parts. Place Atlas’ Hand and Atlas’ Head in their proper positions on the statue, then click on the gate.
- Open the gate by clicking on the knocker that looks like a lion and go into the next area.
Garden
- Watch the cutscene after clicking on the little girl here.
- Take a closer look at the wicker basket on the left. Collect Miniature 6/26 inside, the Baking Form, and the Flowers 1/2.
- Examine the bucket under the sign. Collect the Miniature 7/26 to the right of it, then collect the Handle above it.
- Miniature 8/28 is on top of the Garden sign.
- Take a closer look at the fountain in front of you. Look at it again once the ice is gone to enter a puzzle. Click on the pot to make the water stop flowing, revealing a reflection in the water. Arrange the flowers so that they match this reflection. Completing this puzzle will reward you with a new hidden object area. The solution is shown below.
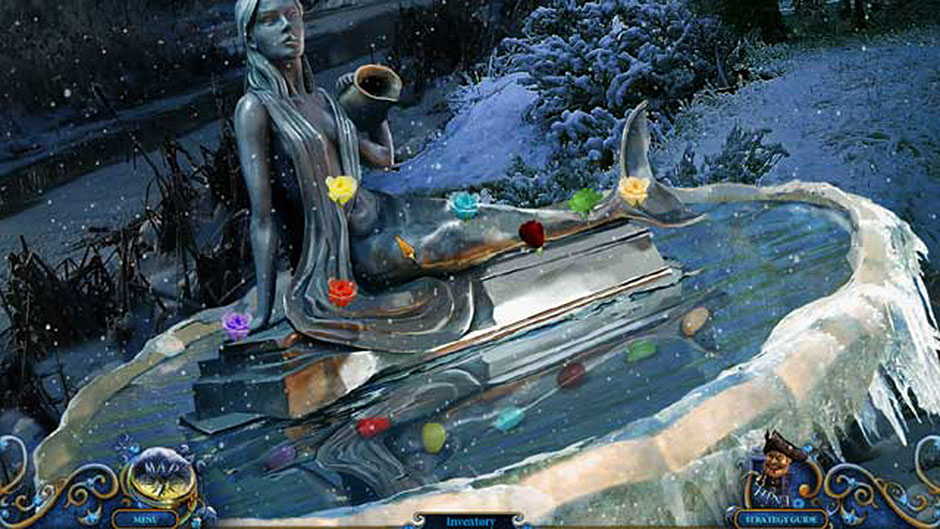
Royal Detective – Lord of Statues Mermaid Flower Puzzle Solution
- Enter the hidden object area and find all the items listed. When you finish the area, you’ll get the Princess Figure (1).
- Go straight.
Estate Steps
- Miniature 9/26 is lying on the right side of the staircase.
- Look at the box sitting on the stairs. Miniature 10/26 is in the upper-right corner of the close-up. Click on the stone underneath it to move it aside and acquire the Crest Part (1) for your inventory.
- Go through the arch on the left.
Tower Base
- Examine the picnic basket sitting on the ground. Collect Miniature 11/26 to the left of it, then pick up the Ginger inside to add it to your inventory.
- Pick up the Crest Part (2) next to the post on the left, then return to the Optics Workshop.
Optics Workshop
- Look at the camera sitting on top of the table on the right. Use the inventory item Handle on the Can of Flour, then collect it and go back to the Estate Steps.
Estate Steps
- Go through the door up the steps and enter the Estate Hall.
Estate Hall
- Go through the double doors toward the bottom right.
Dinette
- Examine the mantle and click on the Miniature 12/26 to the right next to the vase to collect it. Click on the envelope and a cutscene will pop up. Afterward, click on the rip in the painting to tear it away completely. Make a mental note about the clue tipping you off, then collect the Princess Figure (2).
- Look at the chair on the left of the table. Startle the chicken using the Rooster to acquire the Egg. Remember to grab the Rooster again, too.
- The Miniature 13/26 is at the top of the table close-up to the left of the teacup. Collect the Glue here, too.
- Put the Can of Flour and the Ginger on the table, then place the Egg on the stand. Put flour in the bowl using the wood spoon, add the egg, then apply ginger. Use the whisk to mix all the ingredients, then collect the resulting Dough for your inventory.
- Go back to the Estate Hall.
Estate Hall
- Head up the stairs and right.
Statue
- Remove the cloth and examine the statue. Collect the Princess Figure (3) and the Flowers 2/2, then go back to the Storefront.
Storefront
- Look above the door and use the Wrench, then collect the red Rag and go inside the Optics Workshop.
Optics Workshop
- Use the Baking Form in the oven on the left and place the Dough in it. Collect the baked Gingerbread and go back to the Estate Hall.
Estate Hall
- Give the dog the Gingerbread and head past it through the white door to a new area.
Servant Quarters
- Take a look at the sewing machine and collect the Needle and Thread. Look under the bed and collect the Shovel. Take a closer look at the top of the bed and break the crystal ball by clicking on it. Collect the Golden Angel.
- Examine the book lying beneath the pillow. After a cutscene, examine the bird cage. Open the door of the cage and add the Horse’s Leg to your inventory.
- Open the closet to find a new hidden object scene. Find all the objects listed, then collect the Gnome as your reward and return to the Optics Workshop.
Chapter 3: The Tower
Optics Workshop
- Look at the chair and use the Rag on it, followed by the Needle and Thread. Collect the fixed Chair, then go to the Dinette.
Dinette
- Use the Golden Angel on the box on top of the mantle and collect the Emerald inside.
- Place the Chair on the switch in the floor on the right side of the table to uncover a new hidden object scene. Find all the objects listed to be rewarded with the Horse Head, then go back out to the Estate Hall.
Estate Hall
- Examine the doors on the other side of the hall and use the Crest Parts (x2) to open the door and enter.
Amadey’s Workroom
- Take a closer look at the small stand platforms in front of you and use the Princess Figures (x3) here. A puzzle will appear.
- Put each figure on the correct pedestal. You can click on figures to swap them. When all the figures are in their correct locations, the Knight’s Hand will be given to you.
Royal Detective – Lord of Statues Pedestal Puzzle Solution
- Return to the Estate Steps.
Estate Steps
- Use the Gnome from your inventory on the tree to the left, then use the Rooster to retrieve the ladder. Re-collect the Gnome and examine the tree for another puzzle. Piece the eggs back together using the solution image below as reference. Once you’ve completed the puzzle, the Feather will be added to your inventory.
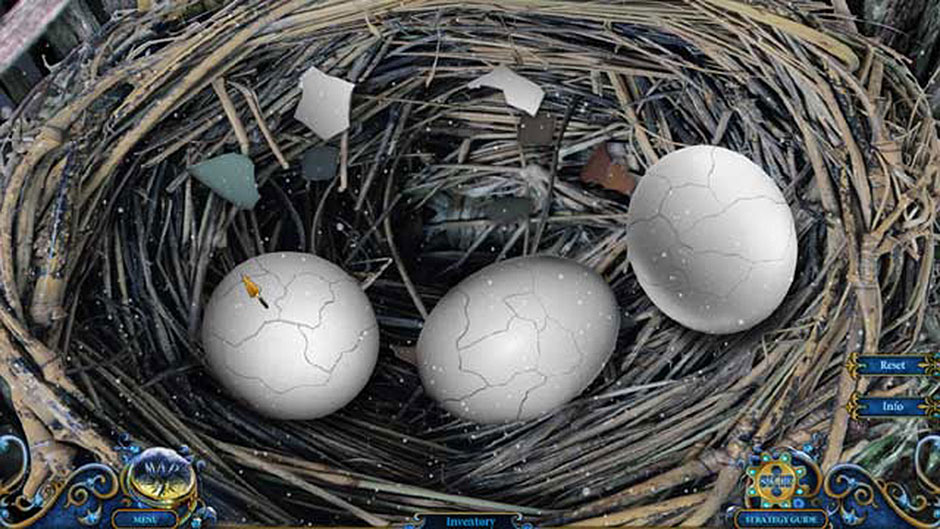
Royal Detective – Lord of Statues Egg Puzzle Solution
- Go back to Amadey’s Workroom.
Amadey’s Workroom
- Use the Horse Head, the Knight’s Hand, the Feather, and the Horse’s Leg to open the lock on the cabinet at the rear of the area. Collect the Golden Arrows inside.
- Backtrack to the Plaza.
Plaza
- Present the Golden Arrows to the Archer, then go back to the Tower Base.
Tower Base
- Collect the Spyglass the statue drops to put it in your inventory.
- Examine the tower doors and collect the Signalman toward the lower right corner, then go back to Amadey’s Workroom.
Amadey’s Workroom
- Look at the railroad scale model and place the Signalman on his pedestal to the left. Collect the Key for your inventory.
- Notice the brick wall toward the right and use the Miner here. When he fails to demolish it, give him the Spyglass, then click to enter the resulting hidden object scene. Find all the items listed here, then add the Bell (1) to your inventory and proceed back to the Servant Quarters.
Servant Quarters
- Place the Key into the bird inside the cage, then wind it. Click on the inventory item Bronze Ring that appears and return to the Estate Steps.
Estate Steps
- Examine the box on the stairs again and place the Bronze Ring into the ox. Collect the Paint and Bell (2) inside when the box opens, then go back to the Tower Base.
Tower Base
- Examine the tower doors and use the Bells (x2) on the jester. To solve the resulting puzzle, click on glass sections until they’re the correct color. The solution is shown here. When you finish, the doors will open and you can enter the Tower.
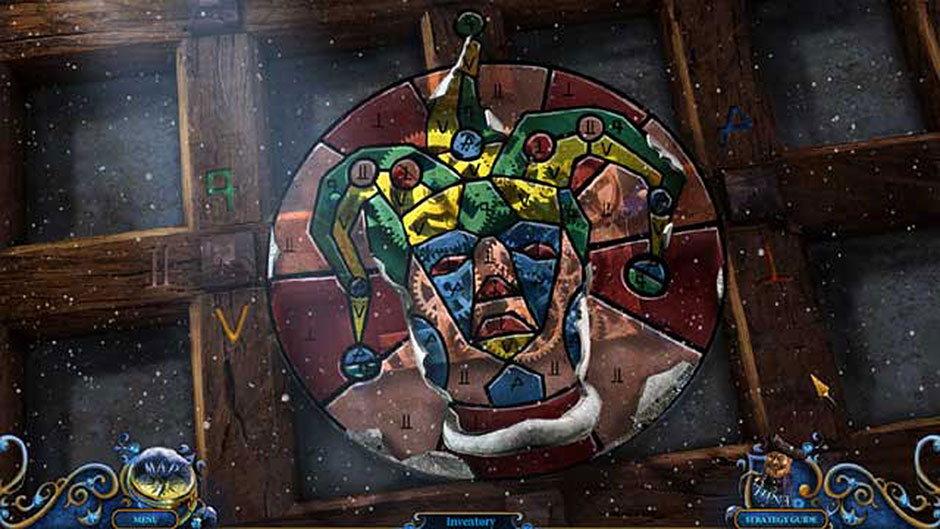
Royal Detective – Lord of Statues Glass Jester Puzzle Solution
Tower
- You can make a cutscene appear by clicking anywhere on the screen. The Miniature 14/26 is next to the barrel in the lower left corner.
- Take a closer look at the statue bust to the left and collect the Ruby sitting in the crown, then go back to the Estate Hall.
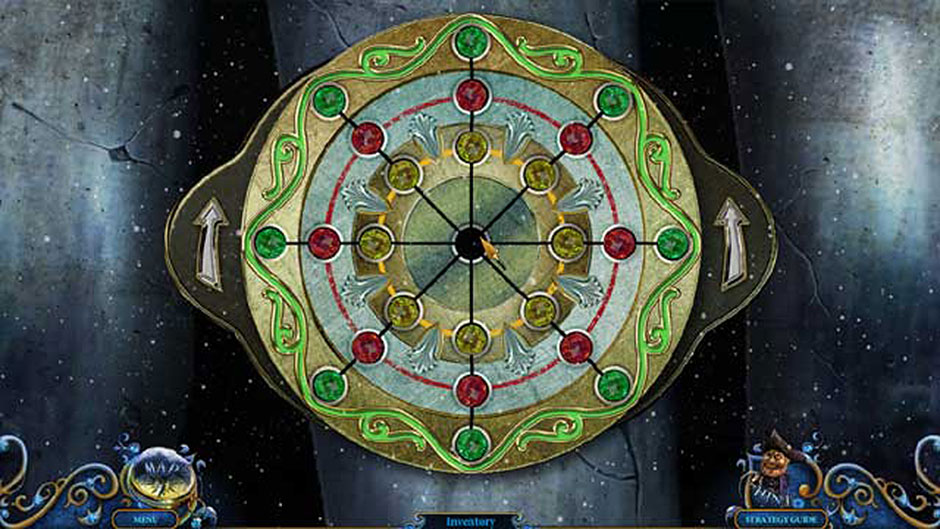
Estate Hall
- Examine the armor next to the staircase. Place the Emerald and the Ruby in the gauntlet slots to make a puzzle appear. Click on rings to make them rotate, and click on buttons to make the jewels swap. Put the jewels in the rings where they belong and adhere to the tip that each color has a specific number of corresponding gems. Finish the puzzle to get the Halberd. The puzzle solution is pictured here:
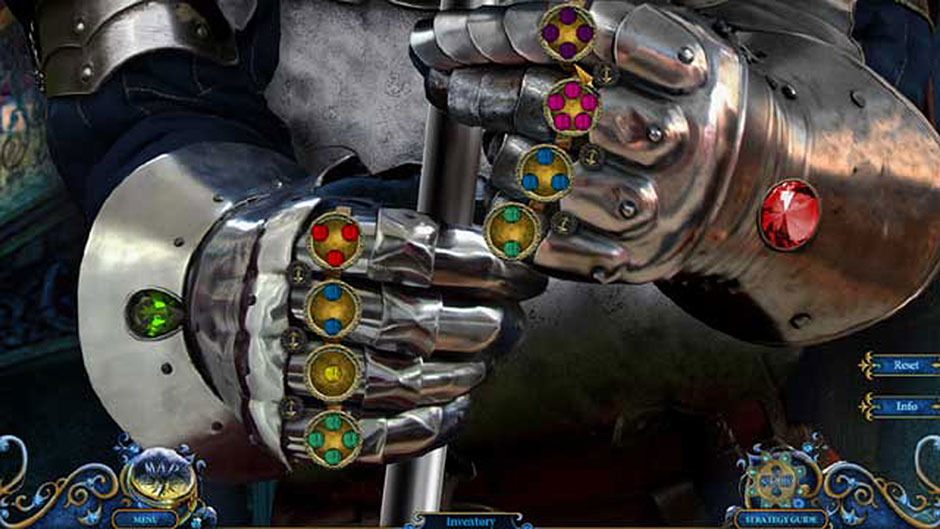
Royal Detective – Lord of Statues Jeweled Gauntlets Puzzle Solution
- Make your way back to the Tower.
Tower
- Examine the spikey orb within the hole in the floor. Remove it using the Halberd. A hidden object scene will be uncovered. Find all the items listed here to collect the Candle.
- Take a closer look at the dark spot beneath the steps and use the Candle on the stand here to illuminate the space. Miniature 15/26 is in the corner. Collect the Crank Handle for your inventory.
- Examine the barred location to the right and use the Crank Handle on the device. Place the Miner here to give it power and acquire access to a newly restored elevator.
- Proceed up to the next level using the elevator.
Chapter 4: Statue Gallery
Tower Top
- After witnessing a cutscene, talk with the Princess. Collect the Amulet she offers.
- Examine the table and open the book lying on it. Collect the Chess Piece 1/2, the Chess Diagram, and the Miniature 16/26, which is just to the right of the book.
- Look at the right window and collect the inventory item Little Anchor. Use the Rooster on the hatch near the ceiling to knock a ladder into position after opening the hatch.
- Go back to the Plaza.
Plaza
- Look at the bottom of the pedestal and fill the slot using the Little Anchor. Collect the Chess Piece 2/2 inside and go back to the Estate Hall.
Estate Hall
- Examine the checkerboard floor at the bottom of the stairs and use the Chess Diagram and Chess Pieces (x2) here. The diagram will show where the pieces should be located. Move the pieces into their correct locations to gain access to a hidden passage.
Hidden Passage
- The Miniature 17/26 is on the steps on the right. Click on the Gnome with Saw toward the left to add him to your inventory.
- Look at the door of the safe to the left and a puzzle will appear. Click circles to rotate them. Restore the complete picture to open the safe. The complete puzzle is pictured here:

Royal Detective – Lord of Statues Circle Rotation Puzzle Solution
- Finishing the puzzle will reveal a new hidden object scene. Find all the items listed, then collect the resulting Bar of Gold.
- Examine the chimera and use the Amulet to send it into a snooze. Head down to the next chamber.
Statue Gallery
- Miniature 18/26 is on a marble pedestal on the left. Use the Rooster to knock down the head on the hook at the top of the screen. Collect the Red Eyes (x2) from the broken head and go to the Tower Base.
Tower Base
- Take a closer look at the tree that’s been knocked over. The Gnome with Saw in combination with the Gnome can uncover a path for you. Re-collect both of them once finished and head into the next location.
Yard
- Examine the gnome with the gold hat and place the Shovel on the stick handle. Put the Gnomes (x2) that can be found in your inventory in the circle here. Look at the river to the right and collect the Fish Mold.
- Proceed straight ahead.
Stone Cottage
- The Miniature 19/26 is sitting in the window on the right. Click on the Horseshoe and the Wooden Hands 1/2 to add them to your inventory.
- Go back to the Optics Workshop.
Optics Workshop
- Look at the stove and place the Fish Mold in the embers. Place the Bar of Gold into the mold, then collect the Golden Carp and go back to the Statue Gallery.
Statue Gallery
- To the left is a statue of a Fisherman. Give the Golden Carp to the Fisherman and collect the Golden Net. Go back to the Yard.
Yard
- Use the Golden Net in the river to the right and the Miner to fetch the resulting chest. Examine it closely and add the Shell to your inventory.
- Go back to the Servant Quarters.
Servant Quarters
- Examine the bed and open the box with the Shell. Collect the Bird’s Head within.
- Use the Bird’s Head on the Mechanical Bird in the cage to complete it and add it to your inventory.
- Make your way back to the Yard.
Yard
- Look at the chest next to the river and use the Mechanical Bird to pry it open, revealing a hidden object scene. Find the objects listed here. Once you’ve found them all, you’ll acquire the Centaur Face Part 1/2.
- Go back to Amadey’s Workroom.
Amadey’s Workroom
- Check inside the corner cabinet and use the Horseshoe at the back. A secret compartment will reveal the Centaur Face Part 2/2. Click on it to add it to your inventory, then go back to the Statue Gallery.
Statue Gallery
- Examine the torso sculpture to the left and use the Centaur Face Parts (x2) on the circle. A puzzle will appear. Complete the statue by rotating and placing pieces at their proper angles. Rotate left and right using the arrows on the left. Completing the puzzle successfully will reward you with the Centaur Torso. The puzzle solution is pictured here.

Royal Detective – Lord of Statues Stone Torso Puzzle Solution
- Make your way back to the Stone Cottage.
Chapter 5: The Stone Cottage
Stone Cottage
- Complete the Centaur by using the Centaur Torso on the body of the horse. This will let you collect it for your inventory.
- Open the front door to get the Door Handle. The door will talk with you, then you should return to the Statue Gallery.
Statue Gallery
- Go straight into the Hidden Room.
Hidden Room
- In the left wall is a groove where you can place the Centaur. Take a closer look at the window that shows up on the right. Once a cutscene has passed, you’ll acquire the Faun with Bagpipes.
- Return to the Servant Quarters.
Servant Quarters
- Look at the basket on the floor and remove the lid using the Door Handle. Collect the Palette Knife within and head back to the Stone Cottage.
Stone Cottage
- Restore the door using the Palette Knife, then the Paint. Collect the Hinge that shows up and enter the cottage.
Foyer
- Miniature 20/26 is toward the back of the room, to the left of the Magic Broom, which you should click to add to your inventory.
- Make your way back to the Servant Quarters.
Servant Quarters
- Take a look beneath the bed and use the Magic Broom to retrieve the sections of wood. Reassemble the Wooden Hands 2/2 using the Glue to collect them, then make your way back to the Statue Gallery.
Statue Gallery
- Take a closer look at the statue of the sculptor to the right and restore him using the Wooden Hands. Collect the Faun with Drum and return to the Tower Top.
Tower Top
- Examine the ceiling hatch from before. Clear the cobwebs using the Magic Broom, and perform additional cleanup with the Rooster. A hidden object scene will show up. Find all the objects listed. Once found, you will receive the Chief Gnome.
- Go back to the Yard.
Yard
- Complete the gnome circle with the Chief Gnome. Examine the statue of Snow White once she’s uncovered. Place the Flowers in her diadem and collect the Little Harp from her hand.
- Go back to the Tower Top.
Tower Top
- Take a closer look at the closet to the left. Place the Little Harp, Faun with Drum, and Faun with Bagpipes into their correct locations to cause the doors to open. Collect the Disk within and return to the Statue Gallery.
Statue Gallery
- Examine the round stone cylinder to the right and use the Disk on it. A puzzle will appear. Click on the sections to move them so that they align and form a complete image. The completed puzzle solution is pictured here:
Royal Detective – Lord of Statues Stone Cylinder Puzzle Solution
- A hidden object scene will show up once you finish the puzzle. Find all the items listed. You will be rewarded with the Minotaur Scheme.
- Return to the Dinette.
Dinette
- Examine the head of the ox hanging on the wall. Place the Red Eyes in their appropriate locations and collect the resulting Minotaur Head.
- Make your way back to the Tower Top.
Tower Top
- Take a closer look at the closet once more and place the Minotaur Scheme in the upper left to restore the torn paper. Put the Minotaur Head on the left shelf to cause a puzzle to appear. Piece together the statue according to the schematic by clicking the lever to swap sections. The puzzle solution is pictured below. Once finished, you will receive the Minotaur.
Royal Detective – Lord of Statues Minotaur Statue Puzzle Solution
- Go back to the Hidden Room.
Hidden Room
- Open the door by using the Minotaur, watch the cutscene, then return to the Statue Gallery.
Statue Gallery
- Take a closer look at the pile of snow and collect the Ice Head.
- Go straight to return to the Hidden Room.
Hidden Room
- Miniature 21/26 is sitting on the small table at the back of the room, beneath the portrait.
- Click on the Hero’s Diagram on the table closest to you to add it to your inventory, then go back to the Optics Workshop.
Chapter 6: The Caravan
Optics Workshop
- Converse with the statue of the Archer, then take a closer look at the hidden object scene behind him. Find all the objects listed. Once found, the Hero’s Shield will be added to your inventory.
- Look at the stove to the left and use the embers here to melt the Ice Head, resulting in the Hero’s Head taking its place in your inventory.
- Examine the left foot of the Archer and collect the Notes 1/ 4 next to it to collect it, then return to the Garden.
Garden
- Proceed straight ahead to the Caravan.
Caravan
- Watch the cutscene, then take a closer look at each cage and click on the Pendant Parts (x4) here to add them to your inventory.
- Miniature 22/26 is sitting on top of a box toward the back of the caravan.
- Use the Pendant Parts (x4) on the box on the upper left. This will cause a puzzle to appear. The triangles here will change colors once clicked. The goal is to cause all the triangles to turn blue. Start in a corner and click to the center. The completed puzzle is pictured below.

Royal Detective – Lord of Statues Colored Triangles Puzzle Solution
- When you finish the puzzle, a new hidden object scene will appear. Find all the objects listed to acquire the Hero’s Sword, then return to the Tower Top.
Tower Top
- Look at the closet again and use the Hero’s Diagram to restore the drawing in the upper right corner. Put the Hero’s Head on the left shelf and a puzzle will appear. Complete the statue using the same tactics as the Minotaur before. Once completed, use the Hero’s Shield and Hero’s Sword to acquire the Hero. The completed puzzle solution is pictured here:
Royal Detective – Lord of Statues Hero Statue Puzzle Solution
- Go back to the Hidden Room.
Hidden Room
- Fight the chimera using the Hero. Once the scene has transpired, collect the Red Eyes 8/12 on the floor.
- Continue ahead via the gap in the wall.
Sanctuary
- Miniature 23/26 is in the bottom left corner of the close-up window when viewing the statue of the bow. Click on the Notes 2/4 at the foot of it to add them to your inventory.
- There’s a puzzle over the organ. When you’re ready to begin, click the Play button. Click on the following buttons I, II, and III in this sequence to complete the puzzle and obtain the Notes 3/4: II, I, III, II, I, II, I, I, III, II, III, I, II, I, II.
- Go back to the Estate Hall.
Estate Hall
- Use the Rooster in defense against the statue of the Angel and continue forward to the Statue.
Statue
- Collect the Notes 4/4 and return to the Foyer.
Foyer
- Examine the music stand and use the Notes to make a hidden object scene appear. Find all the objects here to be rewarded with the Harp String, then go back to the Sanctuary.
Sanctuary
- Restore the Bow by using the Harp String on the statue. It will be added to your inventory. Make your way back to the Optics Workshop.
Optics Workshop
- Pass the Bow on to the statue of the Archer, then after a cutscene, go to the Plaza.
Plaza
- Examine the statue head lying on the ground and collect the Red Eyes 10/12, as well as the Metal Wing at the tip of the hat.
- Go to the Tower Top.
Chapter 7: The Princess
Tower Top
- Look at the mantle and use the Metal Wing and the Spring on the left beast. Afterward, collect the Silver Knight and return to the Hidden Room.
Hidden Room
- Look at the left painting and make a puzzle appear by using the Silver Knight here. Click the buttons with arrows to move the main character, the hero, around the map. The goal is to win over the princess and slay the deadly dragon. You will only be able to carry one item at a time. Complete the puzzle successfully to reveal a hidden object area by following these steps:
- Obtain the Key
- Open the Chest with the Key and acquire the Gold
- Proceed to the old man, giving him the Gold and getting the Sword in return
- Go to the dragon and slay it with the Sword
- Collect the Lever
- Head to the castle and lower the drawbridge using the Lever
- Collect the Water
- Get the Flower by using the Water on the bloom
- Go to the Princess and present her with the Flower
- Once the hidden object area appears, collect all the items listed to acquire the Nitrogen, then go back to the Estate Hall.
Estate Hall
- Take care of the statue of the Angel using the Nitrogen, then look at the stairs where the Rooster is. Collect the Red Eyes 12/12 in the close-up, then go up to the Statue.
Statue
- Repair the door using the Hinge and use the Red Eyes to complete it. Go straight to the Loft.
Loft
- The Miniature 24/26 is on the floor toward the right.
- Click on the Magic Powder on the floor on the other side of the gap to add it to your inventory, then look at the book stand and use the Magic Powder here.
- Examine Amadey and collect the Coins 1/5 and the Cage Key by his hand to collect them, then go back to the Caravan.
Caravan
- Open the cages with the Cage Key and collect the Toad, Cat, Bunny, and Heron within. Go back to the Loft.
Loft
- Use the Toad, Cat, Bunny, and Heron on the white circle at the foot of the book stand. Use the Magic Powder on the book stand again to transfigure the animals.
- Examine each person and collect each of their Coins 5/5. Obtain the Handcuffs off them as well.
- Attempt to use the Miner on the brick wall, but he won’t be able to demolish it. Give the Coins to the Leprechaun that shows up to reveal a new hidden object scene. Collect all the items here to obtain the Cannon. Equip the Miner with the Cannon, then head through the new hole in the wall.
Princess’ Hidden Room
- Miniatures 25/26 and 26/26 are in front of the blue vase toward the left, and over the fabric on the right. Congratulations. If you’ve followed our walkthrough, you will have unlocked the Avid Collector achievement.
- Speak to the Princess and decide her fate: Magic Broom, or Handcuffs? How the game ends is your decision!
Congratulations. You’ve completed the main portion of the game and can now play the Bonus Chapter!
Bonus Chapter
Loft
- Click on Rupert to unlock the Hint function again and receive a briefing regarding what’s happening. The Miner and the Rooster will also be back.
- Go into the Princess’ Hidden Room.
Princess’ Hidden Room
- Enter the hidden object scene on the desk and find all the objects listed. You will be rewarded with the Flute Part 1/2.
- Look at the desk and collect the Colored Rocks 1/3 at the foot of the small pyramid. Return to the Loft.
Loft
- Head across the right beam and down to the Alley.
Alley
- Open the window to the right and collect the Colored Rocks 2/3.
- Remove the debris blocking your way with the Miner, then head to the next area.
Pasture
- Head up and to the left.
Remnants
- Examine the stone henge and retrieve the Colored Rocks 3/3 using the Rooster.
- Look at the stone on the left and use the Colored Rocks to make a puzzle appear. Drop a rock into the chute by clicking on it. The diamond will lift if a rock falls into a hole of a corresponding color. Examine the positions of the chutes and note the wheel will always turn the opposite direction as the position of the chutes. Tip: If a wheel has slots up and left, it will rotate right, etc. If they’re positioned up and right, it’ll turn left. The puzzle solution is randomized, but this should help you solve it. Once you solve the puzzle, you’ll get the Diamond.
- Go back to the Alley.
Alley
- Look at the right window and cut the glass with the Diamond. Collect the Rusty Dagger and the Silver Bone to add them to your inventory, then go to the Pasture.
Pasture
- Examine the windmill and sharpen the Rusty Dagger on the wheel. You will obtain the Sharp Dagger.
- Head to the Remnants.
Remnants
- Examine the statue that’s breathing fire and give the Silver Bone to the silver-collared head. Collect Part of Titan Ring 1/2 on the lower right.
- Look at the stone coffin and get rid of the ivy using the Sharp Dagger. Collect the Chain, then use the Miner to get Part of Titan Ring 2/2 and return to the Pasture.
Pasture
- Place the Part of Titan Ring on the stone hand and a puzzle will appear. Move diamonds by clicking on them. They will move if there’s an empty space for them to move to. Move all green diamonds into the green ring, etc. Tip: Move a yellow diamond to the center hole, then work on the green diamonds, red diamonds, and yellow diamond placing respectively. Upon successful completion, you’ll get the Ring Seal. The completed solution looks like this:
Royal Detective – Lord of Statues Colored Diamond Puzzle Solution
- Look at the well and lower the bucket by using the Chain. Click on the lever to bring it back and obtain the Bucket with Water. Go back to the Alley.
Alley
- Fill the barrel on the left using the Bucket with Water. Collect the Rusty Key and return to the Pasture.
Pasture
- Use the Rusty Key on the windmill door to reveal a hidden object scene. Find all the objects listed to be rewarded with the Bronze Bone.
- Head to the Remnants.
Remnants
- Open the coffin using the Ring Seal and collect the Dragon and Star 1/2 inside.
- Look at the Cerberus statue and give the Bronze Bone to the bronze-collared head, then return to the Princess’ Hidden Room.
Princess’ Hidden Room
- Look at the pyramid on the desk and use the Dragon on the slot. Collect the Piece of Paper and the Star 2/2 inside, then head back to the Remnants.
Remnants
- Use the Star on the indentation on the stone to the left to make a hidden object area appear. Find all the items listed to obtain the Golden Bone, then give the Golden Bone to the final head. Collect the Dragon.
- Go back to the Princess’ Hidden Room.
Princess’ Hidden Room
- Look at the pyramid on the desk and use the Dragon on the other slot. Collect the Flute Part 2/2 and go to the Pasture.
Pasture
- You will enter a cutscene, after which you should use the Flute on the statue. Use the Piece of Paper in the close-up view to make a puzzle appear.
- Solve the code to figure out the melody. Images on the upper left of the page are associated with each flute hole. Select the holes in the correct order to solve the puzzle. The puzzle solution is:
- Skull= Reaper, Cauldron= Sorceress, Moon= Wolf
- Net= Web, Wings= Drake, Teeth= Wolf, Scythe= Reaper
- Spider= Web, Fire= Drake, Broom= Sorceress, Hand= Reaper
- Feline= Sorceress, Trees= Wolf, Treasure= Drake, Fish= Drake, Mushrooms= Sorceress, Butterfly= Web
- Enjoy the final cutscene!
Congratulations! You’ve completed our Royal Detective – The Lord of Statues Platinum Edition Walkthrough! For more great tips and tricks and a selection of other walkthroughs, visit our blog!
- Delicious – Emily’s Hopes and Fears Walkthrough
- Big City Adventure – Shanghai Walkthrough
- Building the Great Wall of China 2 Walkthrough
The Royal Detective – The Lord of Statues Walkthrough is meant as a guide and does not contain cheats, hacks, or serials.