The evil Four Horseman have returned to destroy the Lost Lands! Luckily, a hero has arisen to save the realm from destruction, and that hero is you! Below you will find countless tips and tricks that will help you upon your quest. The Lost Lands is a mystical place that will test your survival skills. But remember, you are not alone! Use this comprehensive walkthrough to provide you with essential tips and tricks to complete the journey in its entirety.
Contents
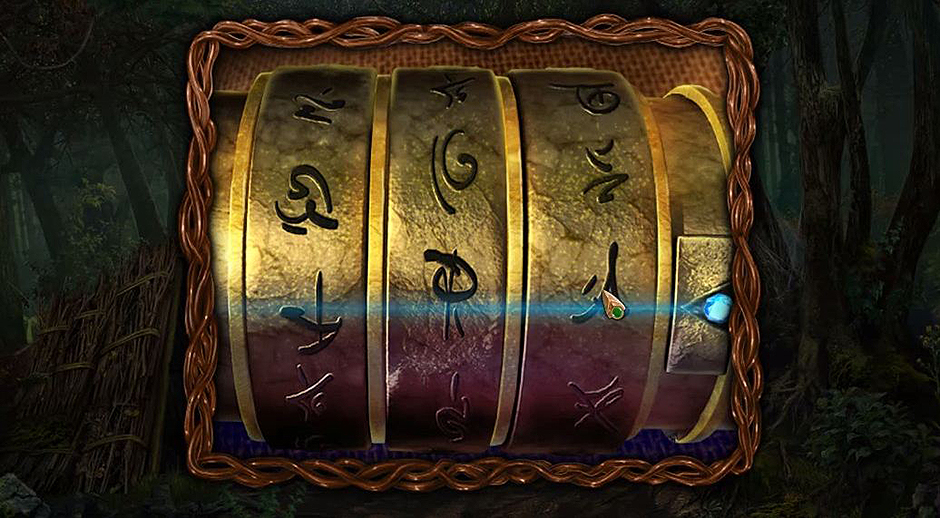
General Tips & Tricks
Lost Lands – The Four Horsemen is an action puzzle game that will take you on an epic journey. The Five Realms can be a very dangerous place for a new adventurer. Lost Lands – The Four Horsemen is a very unique game that presents head scratching puzzles at the turn of every corner.
Your inventory is located at the bottom of the screen. Certain items like the Knife can be used multiple times during your journey. However, you will often acquire items that can be used only once. Single use items usually unlock new areas and sometimes other items. Every item that you pick up will have a use of some kind.
If you are unable to find your way, a simple press of the Hint button will help you discover the correct route. Each location offers a different challenge that will require you to scan the area thoroughly. Quest items can sometimes be hard to find, but a slow approach is often the best. If you find that you are completely stumped, don’t be afraid to read our detailed walkthrough. The Five Horseman are dangerous, but we are here to help you save the Five Realms.
Lost Lands – The Four Horsemen Walkthrough
Chapter 1: The Glades
Pick up the Ladder from the base of the cottage.
The Ladder will be added to your inventory at the bottom of the screen.
Place the Ladder on the side of the cottage to reach the room above.
Enter the room above and grab the Knife Handle.
Leave the room after you have inspected it.
Locate the Knife Blade, which is impaled into a piece of paper on a tree stump.
Attach the Knife Handle to the Knife Blade and pull it free.
Read the document about Maaron the Hermit.
You will discover that Maaron is responsible for the safety of the Five Worlds.
Collect the Shovel, which is located next to the Magical Blue Orb.
A Monk Figurine can be found to the left of the wagon.
Use your Knife to cut the sack located on the wagon.
The birds located in the room above the cottage will eat the grain spilled from the sack.
Re-enter the room above the cottage and grab the Key from the empty bird’s nest.
A Monk Figurine is also retrievable from the shelf now.
Insert the Key into the door handle of the cottage.
Open the door and enter.
Once you are inside of Maaron’s Cottage, click the Glowing Sun Sphere.
A short video will play, and then Maaron will appear.
Speak to Maaron.
You will discover that you’re the chosen one, and it is up to you to save the Forgotten Lands!
Maaron hands you a Rune so that you can teleport between locations.
Once Maaron has left, search the room for important items.
Click the Hay Bale twice to reveal a Sickle.
Search the draws to the right of the fireplace to retrieve a Candle and Manuscript.
Open the top draw and remove the cloth to reveal a Fuel Oil Can.
The third and fourth Monk Figurines are located in Maaron’s cottage as well.
The third Monk Figurine can be found on the bookshelf to the left.
The fourth Monk Figurine can be found on the chair in front of the fireplace.
Exit the cottage.
Insert the Rune into the rock located in front of the cottage.
The rock will glow purple, and you will be teleported to a new location.
Once you have arrived to the tower, grab the Hammer from the rock to the left.
Walk down the path to the left.
You will come upon a beach with a Mermaid.
Speak to her.
The Mermaid reveals the ancient history of her lake, and she forbids you from taking water from it.
Search the boat to the left.
The items located on the boat are missing important pieces.
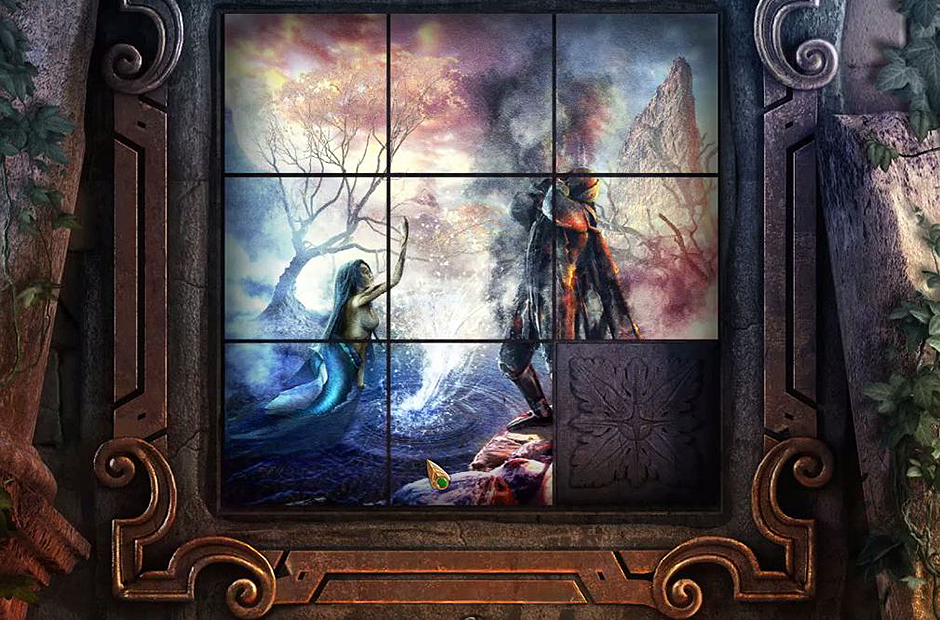
Click on the Box near the top left of the boat.
Put the picture back together and grab the Scissors.
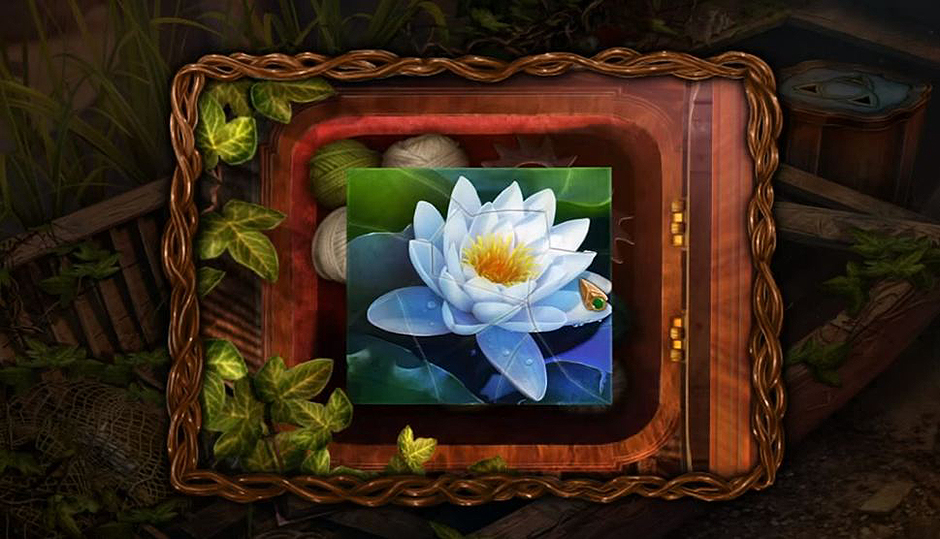
Lost Lands – The Four Horsemen – Mosaic1
Another Hammer can be found on the boat as well.
A Dragon Figurine is located on the ground to the side of the boat.
It can be used to open a box which reveals an Amulet.
Use the Amulet to reveal a piece of the missing Triangle.
There is also a Key located to the bottom left of the boat.
It will unlock the small brown box to reveal an Angel Figurine.
You can use the Scissors to cut the Angel Figurine free from the net.
The two Angel Figurines open the Silver Box, which reveals a Magnifying Glass.
Use the Magnifying Glass to reveal the Puzzle Code of the locked box.
Insert the Puzzle Code into the box to retrieve another piece of the Missing Triangle.
Lost Lands – The Four Horsemen – Puzzle Code
Insert both Triangle Pieces into the box to reveal a Stopcock.
Use your Hammer to break the encasing of the Stopcock to free it.
Click on the Thorny Thistle Bush.
Cut down the Bush using your Sickle to reveal the fifth Monk Figurine.
There is a Key on the shore in front of the mermaid’s rock.
You will also discover that something had been dug up in that location as well.
Use the Shovel to reveal a Music Box Drum.
Exit this area for now and return to the start of the level.
Insert the Strange Key into the gate to the left.
Enter the new location to the left.
Look to your right and collect the Pitchfork, the Fishing Net, and the sixth Monk Figurine.
Use the Pitchfork on the large bay of hale to reveal the seventh Monk Figurine.
Click on the Lantern to the left of the moose head to retrieve a Blue Energy Sphere.
Find the red Music Box and click on its handle.
Insert the Music Box Drum into the red Music Box.
Leave this area for now and return to Maaron’s cottage.
Click on the carpet in front of the fireplace and remove the nails with the Hammer.
A Saw will be revealed.
Insert the Stopcock into the box beneath the Purple Window.
A mini game will begin once the Stopcock is inserted.
Rotate the images so that they match the background.
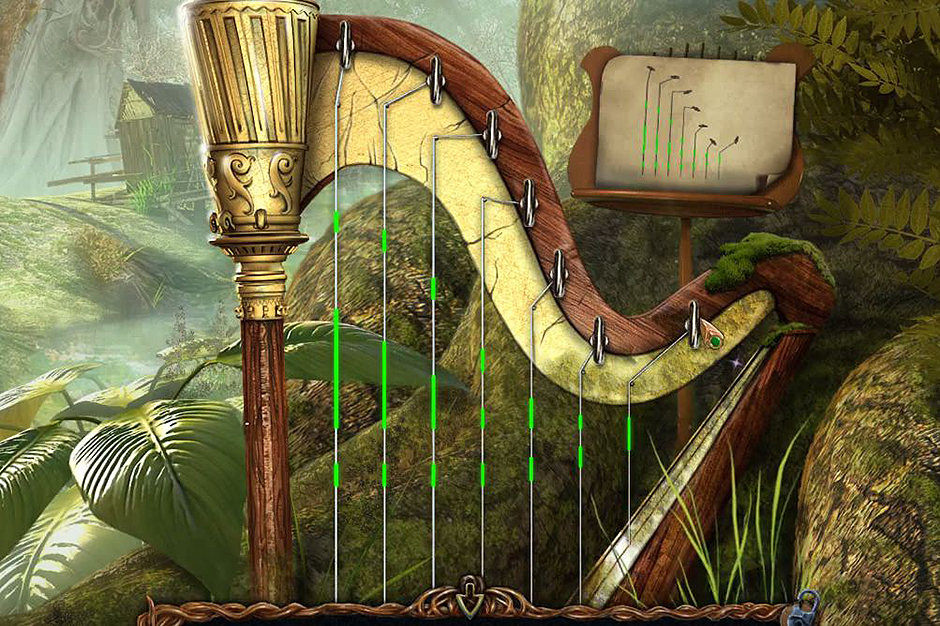
Lost Lands – The Four Horsemen – Blue Energy Sphere
Once the puzzle is complete, you will be rewarded with a Blue Energy Sphere.
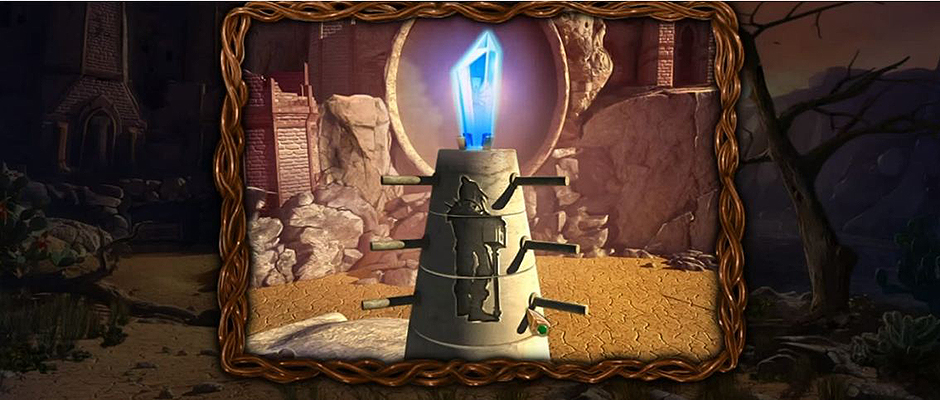
Exit the cottage and enter the purple portal.
Insert the Blue Energy Spheres into the pedestals in front of the tower.
A short cutscene will follow.
Use your Saw on the branches to the bottom left in order to retrieve the 8th Monk Figurine.
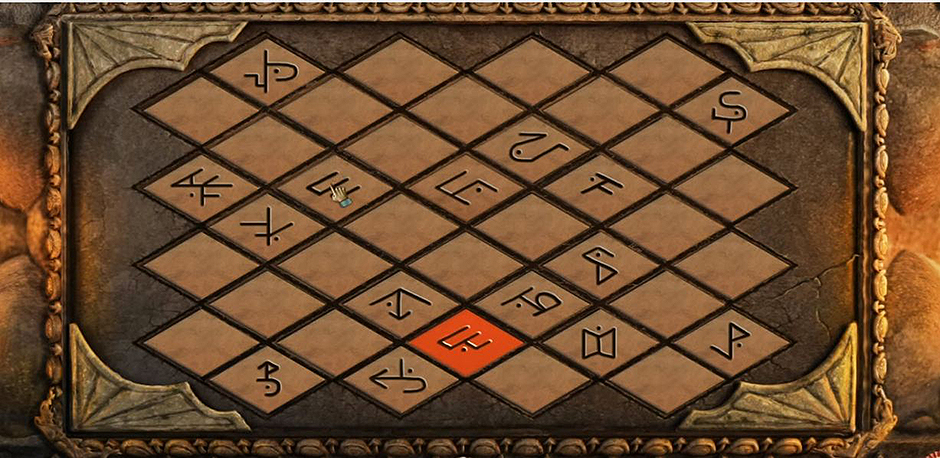
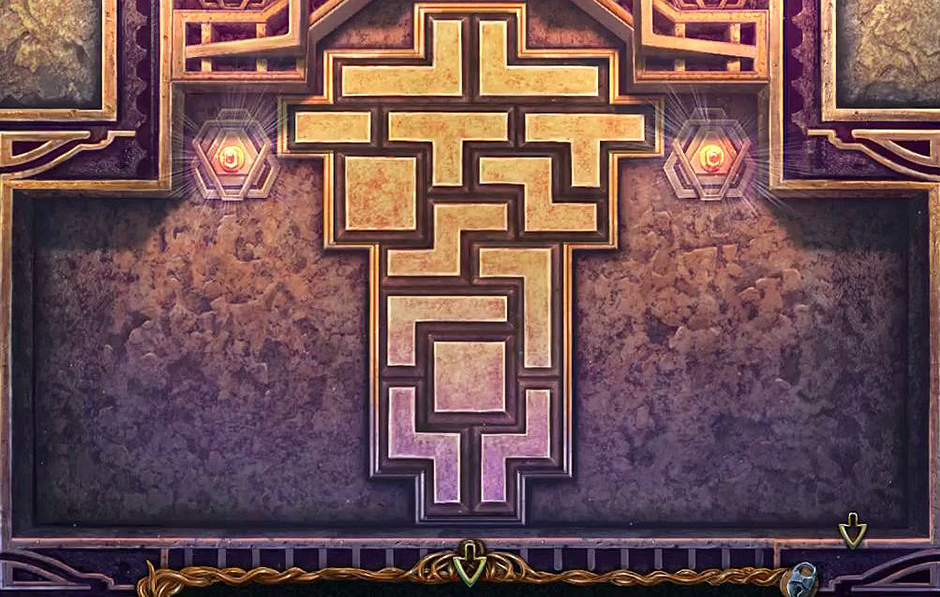
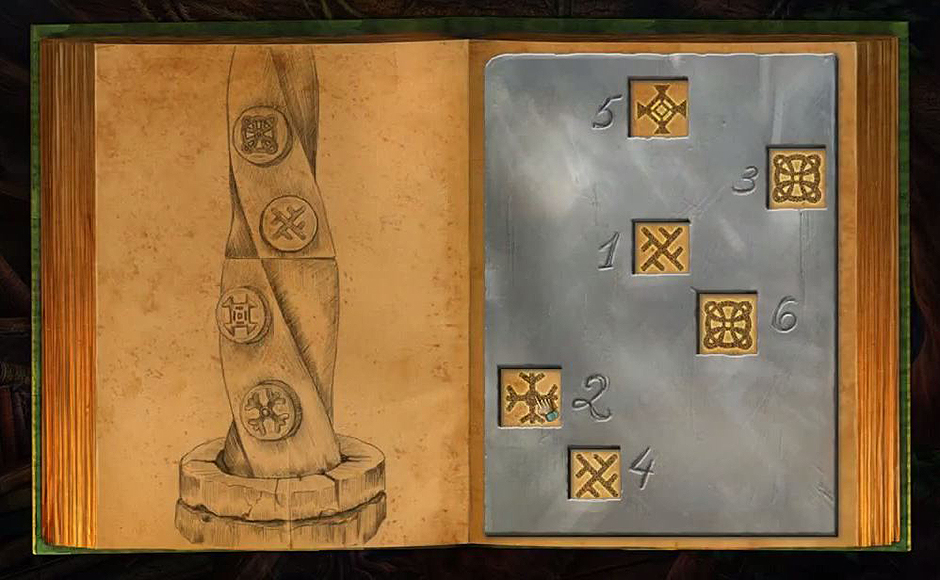
Insert the 8 Monk Figurines into the tower door.
A short mini game will begin, and you will need to link the Monk Figurines together correctly.
Once you complete the puzzle, the door will open.
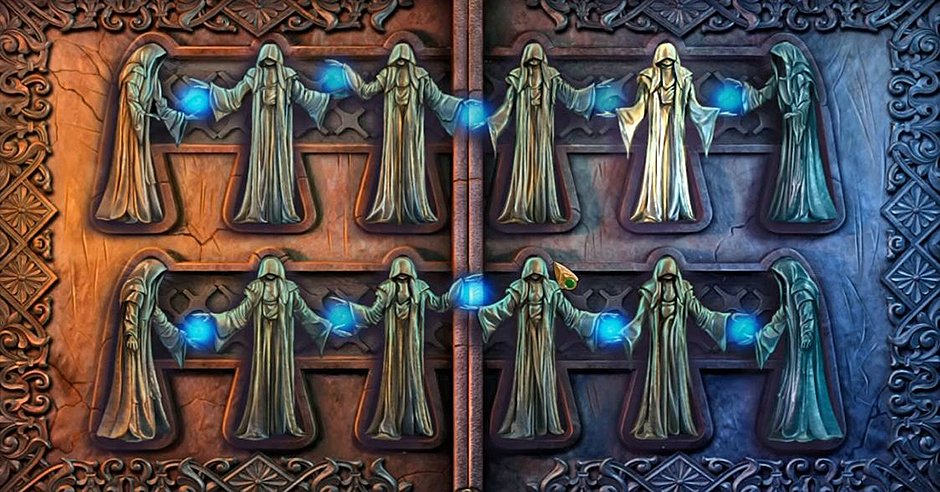
Lost Lands – The Four Horsemen – Monk Figurines
Enter the tower.
A Matchbox can be found in front of the well.
A floorboard to the left can be lifted with your Knife.
Once you have done this, a Mosaic Fragment will be revealed.
Place a Candle into the empty hood of the statue to the left.
Light the Candle with the Matchbox.
A jar of Purple Essence will be revealed.
Click on it and cut off the Tassel from the curtain to the right.
Leave the area and return to the mermaid lake.
Use the Net in order to collect the Duckwood near the shore.
Return to Maaron’s cottage, and examine the table to the left.
You will be making a water portal.
Place the Duckweed into the mortar and crush it up using the pestle.
Next, put the mortar onto the burner and then pour the Purple Essence into it.
Click on the mortar to collect the Powder of the Flying.
Exit the room and enter the area to the left.
Clean off the Music Box Drum using the Tassel.
Close the box and then turn the lever of the Music Box.
Collect the Phoenix Feather and return to the tower.
Insert the Power of the Flying and the Phoenix Feather into the well.
You will then be transported to a new location.
Chapter 2: The Corridor
Collect the Wooden Gear to the right.
Click on the Pile of Stones to reveal a Key.
Collect the Key and return to the area with the Music Box.
Once you have returned to the halfling settlement, click on the pulley system to the left and insert the Wooden Gear.
Click the Wooden Handle to reveal a Wooden Plank.
Take the Plank.
Insert the Key into the wooden door to the right.
This is a hidden items area.
CashRegister
Find all of the items and complete the puzzle to collect the Stone Chip.
After you have completed this area, travel to the area where you first encountered the mermaid.
Place the Wooden Plank across the water.
Return to the upper corridor.
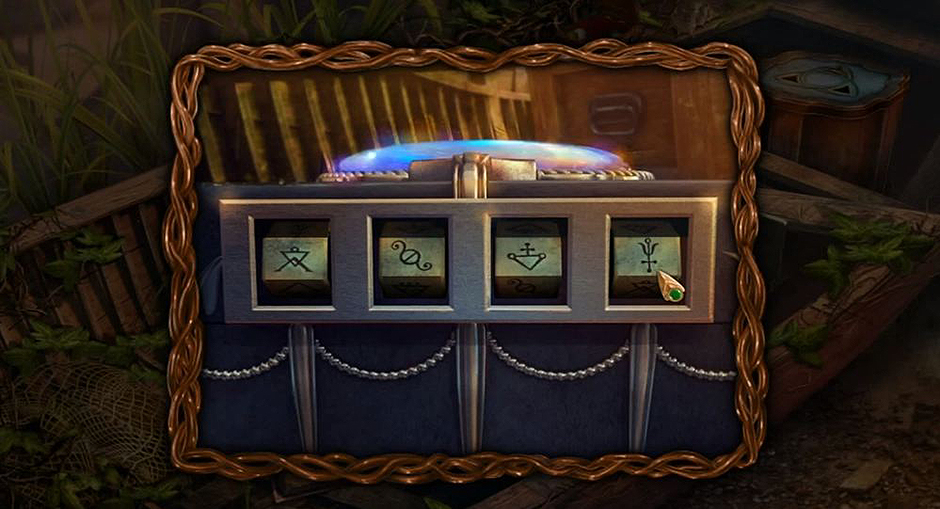
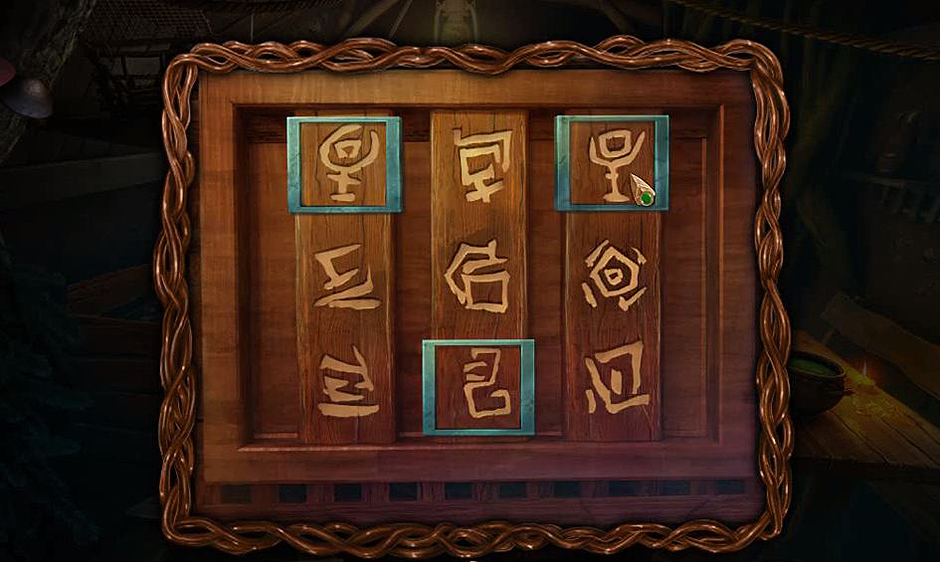
Place the Stone Chip into the pedestal in the room ahead.
A mini game will unlock, and you must complete it by matching the highlighted symbols.
Lost Lands – The Four Horsemen – Match The Symbols
Once you have solved the puzzle, you will be rewarded with a Rune.
Return to the lake of life.
Maaron will be there waiting for you.
He will give you a Mosaic Fragment, and he will ask you to find a very important Compass.
Insert the Rune on the island to the right.
You will be transported to a new location.
Find the Whale Rib, Stone Rune, Plank, Jar of Flies, and the Gaft.
Use the Oil Can to lubricate the Rusty Crank.
Place the Wooden Planks onto the base of the tree.
You will notice that you are missing Nails to fasten them.
Move ahead to the next area.
Retrieve the Nails from the small well and insert the Stone Rune into the pyramid to the left.
To the left, there’s a small room blocked by a large boulder.
Use the Whale Rib to remove the boulder and click the door to enter a hidden objects area.
Locate all of the hidden items to reveal a very important Handle.
Return to the previous area.
Attach the Handle to the small well and then click on the bucket of soil twice to reveal Dynamite.
Grab the Dynamite and return to the area with the Whale Skeleton.
Return to the tree and fasten the planks with the Hammer.
Climb the tree and retrieve the Tongs.
Travel to the ship and place the Dynamite in front of the Wooden Planks.
We don’t have a fuel source right now, and we must return to the tower entrance.
Use the Tongs to retrieve the Tower Figurine from the campfire.
Return to Maaron’s cottage.
Use the Gaft to open the trap door located in the top left of the room.
You will receive a Crystal for your troubles.
Place the Tower Figurine onto the shelf on the right of the room.
Exit out of the room and return to the area with the Music Box.
Use the Jar of Flies to retrieve the Snake from the glass container.
Return to the Halfling’s settlement.
Click on the tree to the right and let the Snake loose to scare away the scorpion.
Use the Knife to cut the stone free from the rope.
Grab the Monocle from the skull of the skeleton.
Move the skeleton’s hand to collect the Mosaic Fragment.
Exit the area and return to the broken down pirate ship.
Place the Monocle in front of the Dynamite.
There will be a massive explosion, and then you can collect the Ship’s Wheel.
Travel to the new area to your right.
Use the Stone on the Rope to pull down the tree branch with the nest on it.
Retrieve the Mosaic Fragment, Stone Rune, and Brush.
Hit the return button once, and then click on the rock that is located in front of the Cactus to the right.
Use your Brush to clean the rock.
An important image is revealed.
This will come in handy later.
Exit the area and move to the left.
Place the Stone Rune into the pyramid and travel to the canyon.
Click on the Crystal, and then move the base around until it creates an image.
Once the correct image is displayed, a beam will shine into the room to the left.
Lost Lands – The Four Horsemen – Crystal
Enter the doorway to the left.
Chapter 3: Temple
Click the chain on the floor, and then attach it to the statue to the left.
There’s also a Stone Rune located underneath the statue.
Place the Ship’s Wheel onto the stone column to the right.
Retrieve the Gear from the base of the statue.
Place it onyl the mechanism to the right near the Ship’s Wheel.
You will unlock a mini game, and you must solve this puzzle by placing the Gears in the correct positions.
Once you have completed the minigame, click on the Ship’s Wheel.
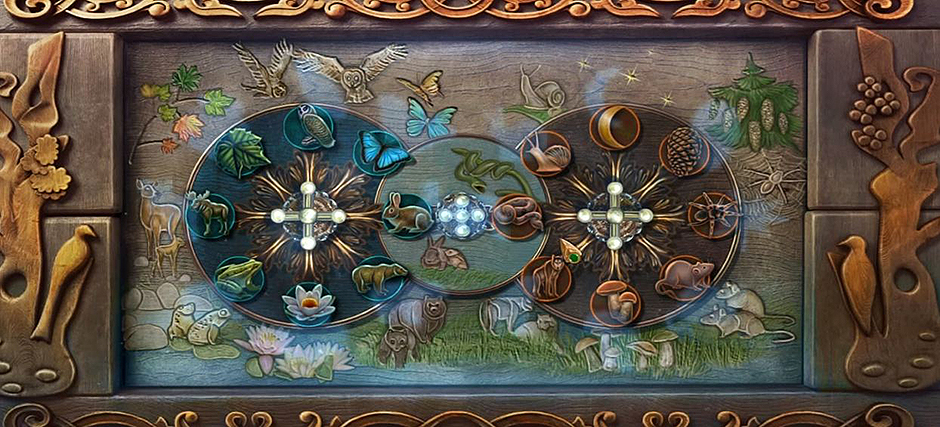
A Spear will be revealed, and you can use it to retrieve a Mosaic Fragment from the Canvas hanging above.
Place the five Mosaic Fragments into the pedestal up ahead.
This will trigger a mini game.
Solve the puzzle by placing the symbols into the correct locations.
You can also use a hint to solve this puzzle rather easily.
Lost Lands – The Four Horsemen – Mosaic Fragments
Enter the room ahead and collect the Note With Symbols.
Return to the Halfling Settlement.
Click on the pyramid structure and insert the final Stone Rune.
Once the Pyramid is open, use the Note With Symbols to create an exact replica of the image.
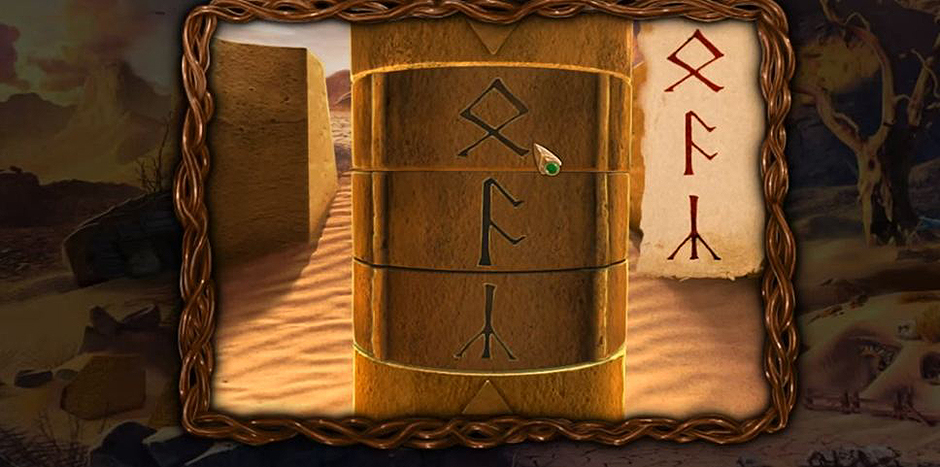
Lost Lands – The Four Horsemen – Pyramid
Retrieve the Device that emerges once the puzzle has been solved.
Once you collect the item, a short clip will play.
You’ll meet a dwarf that will tell you more about the Horsemen.
Retrieve the Leather, Rope, and Two Steps.
Exit the area to the right.
Collect the Flywheel and the Glove, and attach the Lever to the Trigger nearby to start a minigame.
Lost Lands – The Four Horsemen – Mini Game
Place the correct images in the right locations to solve the puzzle.
Exit the area by pressing the return button.
Use the Glove in order to connect the Crystal.
Exit the room to the right.
Insert the Crystal into the component to the left.
Click on the lid and then move ahead.
Talk to the dwarf once more to find out more information about the area ahead.
Use your Knife to cut the bottle of Cold Water free from the rope.
Attach the Flywheel to the mechanism and click on it.
Retrieve the Yield Remover which can be found underneath the waterfall.
Exit the room and head downstairs.
Click on the Corkscrew and the Bowl in order to add them to your inventory.
Click on the Green Fountain in order to unlock a hidden items area.
Be sure to collect each and every item located on the bottom of the screen, and don’t forget to collect the Hammer.
Click the Chain twice, and then retrieve the Circle Sector before leaving.
Hit the return button three times.
Use the Corkscrew to remove the Jammed Cork, and then place the bowl down to retrieve the powder.
Exit the room to the square.
Use the Powder to create a chain of powder.
Exit to the right twice.
Grab the Crowbar, click on the Stones, and then retrieve the Medallion and the Sieve.
Place the Medallion into the statue’s belt.
Hit return once, and then use the Crowbar to pry free the boards in order to reveal a hidden items area.
Retrieve all the items located at the bottom of the screen, and be sure to collect the Emerald.
Exit the area by hitting return once.
Insert the Emerald Key and move to the right twice.
Chapter 4: The Village
Insert the Emerald Key into the gate up ahead.
Walk ahead and begin the hidden objects area.
Find all of the items listed below, and then collect the Hidden Symbol.
Move to the next area.
Use the Feather to tickle the sleeping man’s foot.
Retrieve the Meat, and use the Knife to cut open the tent to the left.
Travel to the left.
Throw the meat to the hungry wolf, retrieve the Step and the Trough.
Place the Circle Selector in the pedestal, and hit return once.
Use your Knife to cut the Leather Sack free from the pull handle.
Hit the return button 4 times.
Place the Trough into the box to the right of the waterfall.
Click on the mechanism to begin a mini game.
Correctly adjust the weights in order to solve the puzzle.
You can also use a hint if you’re having trouble.
Exit the area to the right.
Speak to the man who is waiting for you, and then collect the Step.
Be sure to click on the flowers and collect the Circle Selector hidden underneath them.
Return to the marquee.
Place the Circle Selector in the pedestal up ahead to begin a minigame.
Match all of the images correctly in order to solve the puzzle.
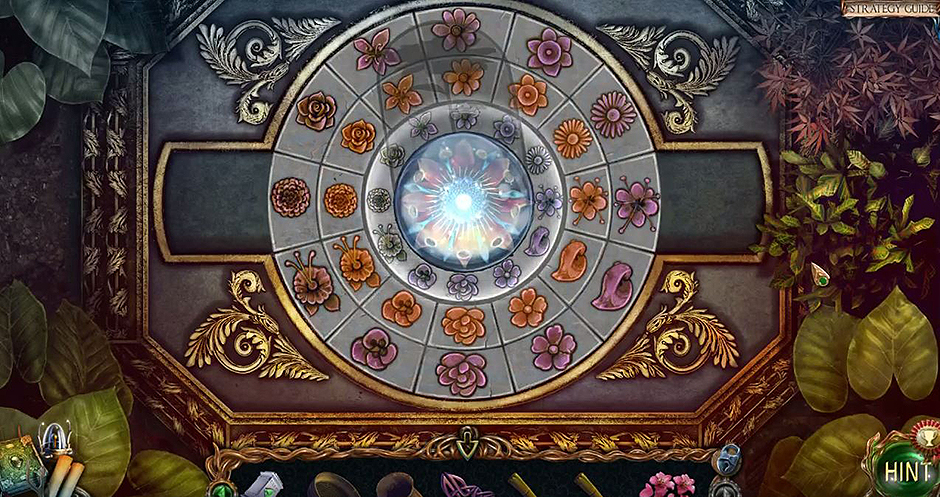
Lost Lands – The Four Horsemen – Flower
Use your Knife to retrieve the Flower.
Travel to Mountgore’s Temple.
Hand the flower to the spirit of Mountgore.
Use the Yield Remover to retrieve the Apple from the tree above.
Travel to the mines.
Click on the Four Steps and reinforce them with the Rope Selection.
Retrieve the ladder and position it onto the wall.
Exit to the canyon.
Use the sieve to retrieve the Gold Ore.
Select the Hammer and use it twice to collect the Hearts of Stone.
Retrieve the Key from the sand and exit to the left.
Use the Leather Sack to retrieve the Ashes.
Hit the return button four times.
Use the Hammer and click on the chain.
Retrieve the Horn that appears, and then return to Maaron’s Cottage.
Give Maaron the Stone Hearts, and you will be awarded with a Dwarf Figurine.
Hit return once and then travel to the left.
Use the Dwarf Figurine in the box to the left to begin a mini game.
Place the correct shield and swords together in order to complete the puzzle.
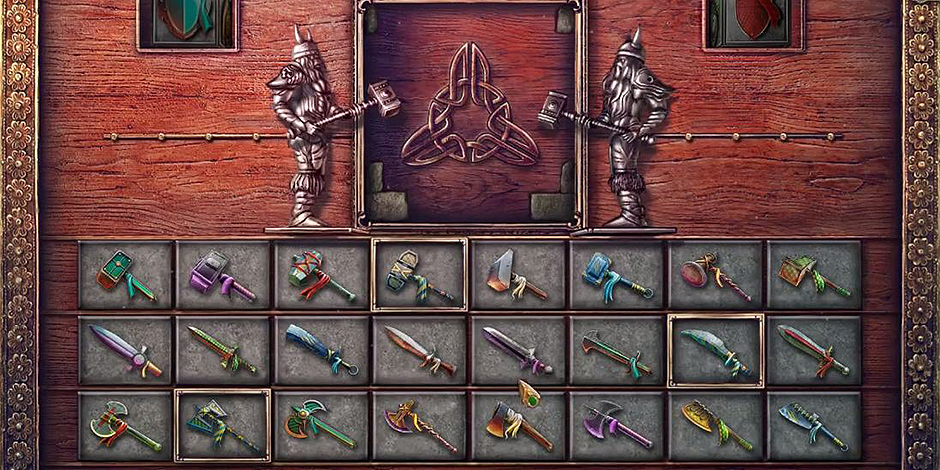
Lost Lands – The Four Horsemen – Shields and Swords
You will receive a Symbol.
Place the Symbol into the pedestal, and then collect the Rune Stone.
Place the Rune Stone into the slot up ahead.
Move ahead.
Retrieve the Basket and the Bottle.
Use your Knife to open the locked door and enter.
Chapter 5: The Hut
Talk to the werewolf.
He will tell you more about the Four Horsemen.
Retrieve the Wool, the Scoop, and inspect the Recipe.
Click on the oven, and then zoom in.
The wall to the right will trigger a mini game, and solving this puzzle requires you to rotate the Discs similar to the image on the oven door.
You can also click the hint button to solve the puzzle rather easily.
Lost Lands – The Four Horsemen – Discs
Click on the cover to the left to receive the Medallion.
Return to the temple of the dwarves.
Place the Medallion into the pedestal to the right, and then click the armor and retrieve the Medallion.
Return to the mines.
Insert the key into the stone door. Move ahead into the Fire’s Dwelling.
Retrieve the Door Figurine from the hole in the floor, and then exit to the Dwarf cemetery.
Place the Medallion into the head of the statue.
Retrieve the Urn and move forward.
Click on the Boiling Pot of Water and insert the Scoop.
Retrieve the Saucepan and pour the Boiling Water onto the frozen statue.
Place the Horn into the statue to receive a Puzzle.
Exit to the area to the left.
The Berries to the left can be collected with the Basket.
Insert the Basket of Berries and the Bottle of Bubbles into the pressure machine.
Crush the Berries, and then fill the Bottle with the Sack of Ashes and Urn of Ashes.
Close the lid of the Bottle to receive the Turning potion.
Return to the Fire’s Dwelling.
Click on the throne and insert the Puzzle Piece to begin a mini game.
Connect all the puzzle pieces correctly to solve the mini game.
Lost Lands – The Four Horsemen – Puzzle Pieces Solution
You will receive Moondust once the mini game has been solved.
Return to Maaron’s Cottage.
Insert the Door Figurine onto the shelf to the right.
Return to the Werewolf’s Hut.
Use the Turning Potion on the werewolf, and then retrieve the Key to open the trap door above you.
Head upstairs, and you will begin a hidden items area.
Find all of the items located at the bottom of the screen and retrieve the Lantern.
Move to the next area, and collect the mechanism Gear and Brush.
Use the Brush to remove debris from the compartment.
Click on the blanket to retrieve the Lantern Potion Recipe.
Click on the Weight to retrieve a Vial.
Hit the Return button once.
Click on the debris to collect a Stone Flower.
Hit the Return button once.
Click on the mechanism gear and then retrieve the Lever.
Return to the area up ahead.
Connect the Lever to the panel on the wall to the right.
Hit the return button once and move to the right.
You’ll enter a hidden items area.
Once you have found everything, you will recieve a Weight.
Move to the next area and retrieve the stone of fire.
Examine the Note and the hanging Lantern.
Insert Wool into the Lantern.
Return to the halfling settlement.
Place the Weight onto the moose head and collect the handle.
Return to Maaron’s Cottage.
Click on the mantle above the Fireplace and place the Vile and lantern potion recipe down.
Follow the directions of the potion recipe from the nearby diagram.
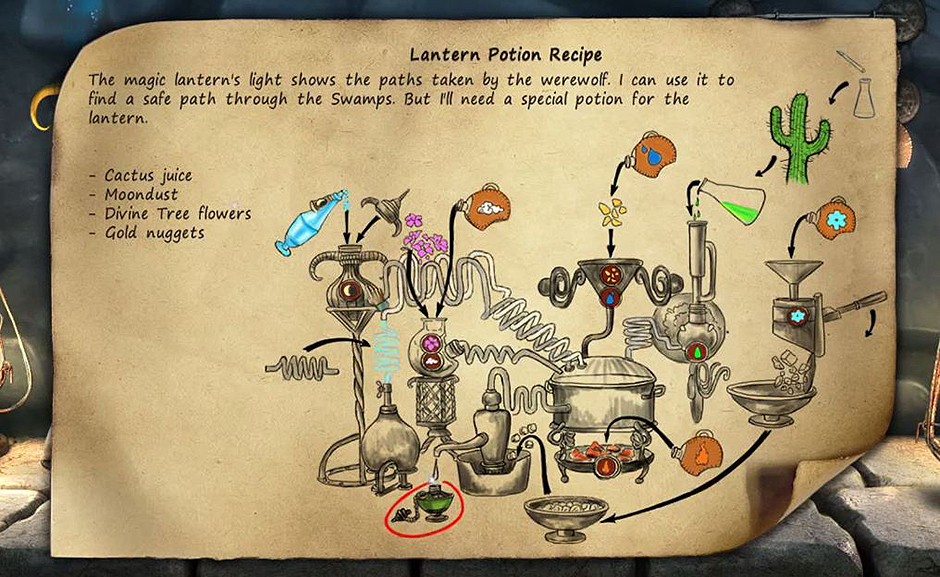
Lost Lands – The Four Horsemen – Latern Potion Recipe
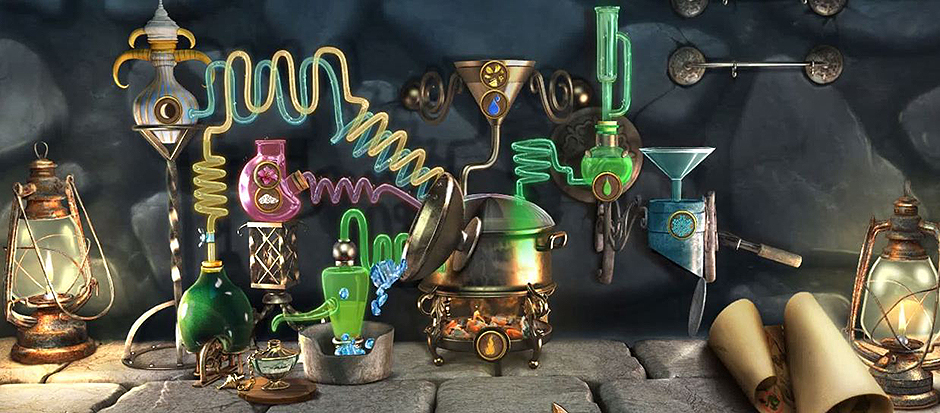
Lost Lands – The Four Horsemen – Potion Recipe
Exit to the corridor.
Place the Stone Flower into the pedestal to the left, and then collect the Glass Pipe and the Flask.
Return to the Forsaken Sea.
Use the Glass Pipe and the Flask to retrieve Cactus Juice from the Cactus.
Return to the Fire’s dwelling.
Place the Stone of Fire into the statue to the right and return to Maaron’s Cottage.
Use the Cactus Juice to complete the Lantern Potion.
Exit to the swamps
Use the Lantern Potion to light the Lantern to the left.
Move to the area up ahead.
Retrieve Alcohol Soaked Cloth, and examine the Mirror.
Click on the Satchel and enter the Correct Code.
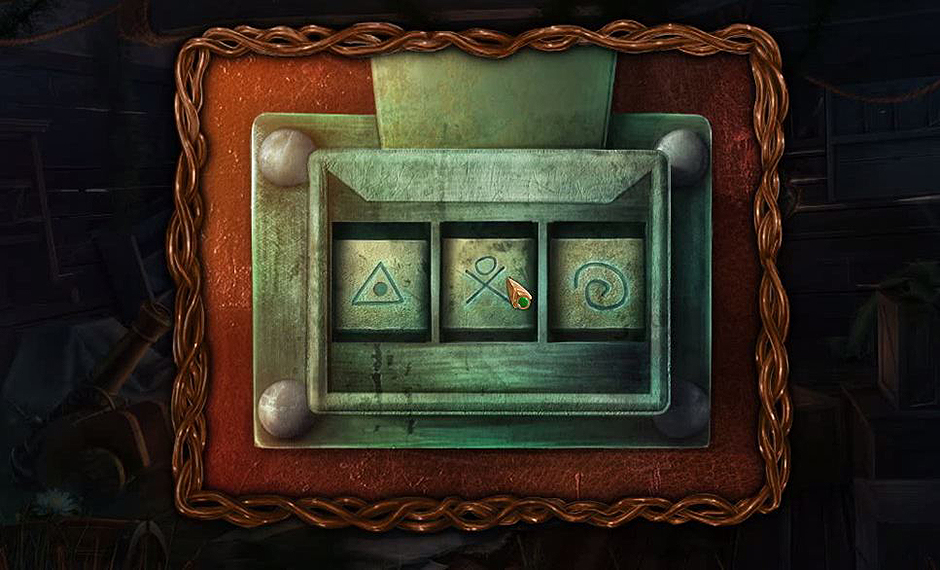
Lost Lands – The Four Horsemen – Correct Code
You will receive a Precious Stone.
Click on the Cannon and use the Hammer to retrieve a Cork.
Chapter 6: The Lake
Place the Cork into the bottle of Rum and take it.
Dust off the Mirror and collect it.
Move forward.
Retrieve the Scissors and click on the Chain twice.
Place the Precious Stone into the slot to receive the Tuning Table.
Click on the Rope and then hit return twice.
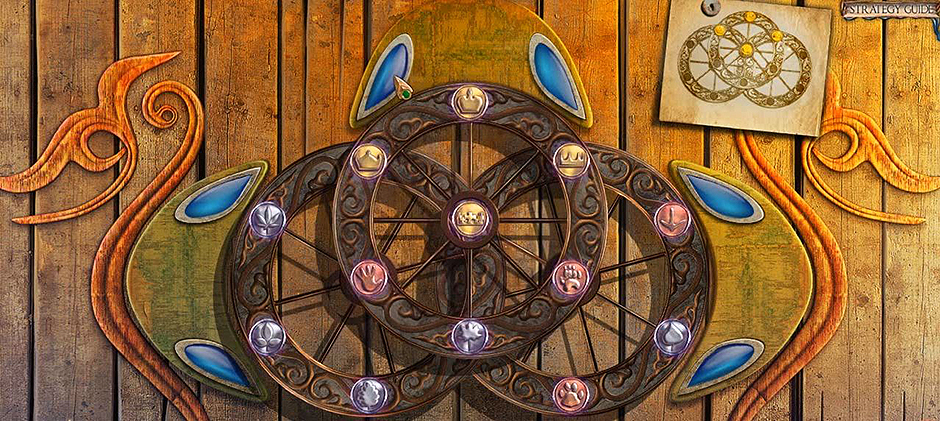
Use the Tuning Table to begin a mini game.
Place the markers in the correct position as shown by the diagram to the right.
Lost Lands – The Four Horsemen – TuningTable
Once the mini game is completed correctly, you will receive the Fresco Detail.
Move forward twice.
Use the Fresco Detail on the door to the right to enter the dwarf slums.
Put the Scissors near the Tapestry.
Examine the Recipe on the oven door.
Put the Coal inside of the oven, and insert the bottle of Rum.
Return to the marquee.
Place the Handle under the trap door below and click on it.
Retrieve the Red Stone from the package and examine the Note.
Hit the return button three times.
Place the Red Stone into the compartment.
You will then retrieve a Jack.
Move to the right.
Use the Jack to retrieve the Parcel, and then use the Knife to open the parcel.
Collect the Punch Card.
Return to Maaron’s Cottage.
Click on the book in the corner, and insert the Punch Card.
Remember the symbols that are displayed on the Punch Card.
Return to the abandoned halfling settlement.
Click on the statue in the back, and enter the correct sequence similar to the one displayed on the Punch Card.
Lost Lands – The Four Horsemen – Punch Card
Retrieve the Key and return to the canyon.
Click on the red tent and insert the Key. You’ll receive a Chimera Head.
Return to The Swamp.
Place the Chimera Head on the statue to the right to retrieve the Fresco Detail.
Move forward twice.
Place the Fresco Detail into the gate to the right.
This will begin a mini game that can be solved by rearranging the image correctly.
Lost Lands – The Four Horsemen – Fresco
Once the mini game is solved, you will receive a Vial For Living Water.
Return to the lake of life.
Talk to the mermaid, and then retrieve the Living Water with the Vial For Living Water.
Return to the canyon.
Click on the Code to begin a mini game.
Place the snakes in the correct positions in order to solve this puzzle.
You can also use the Hint button to easily solve this mini game.
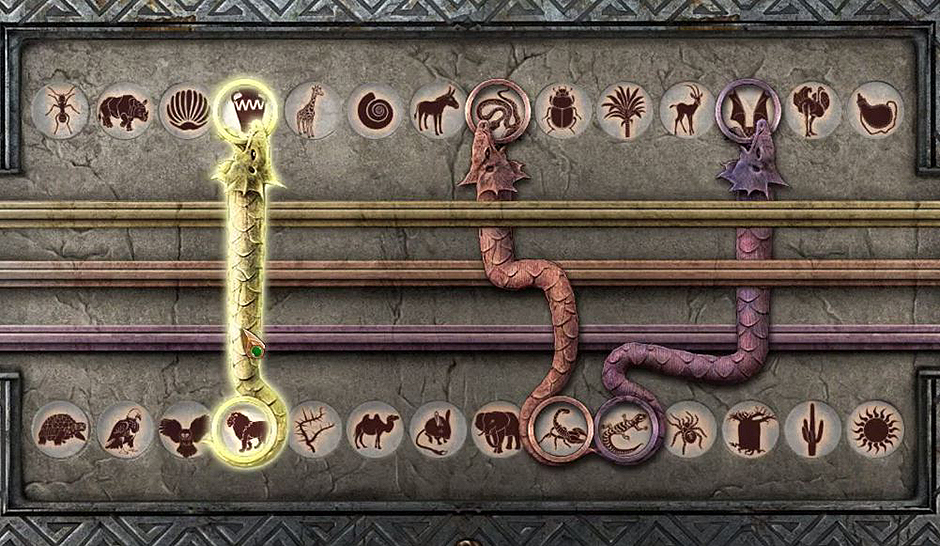
Lost Lands – The Four Horsemen – Snakes
You will receive a Boomerang for your troubles, and then you can return to the swamps.
Throw the Boomerang at the cage hanging above.
Retrieve the Note and Key.
Hit the return button once.
Open the locked door with the Key, and collect the easel.
Return to the tower.
Place the Easel and the mirror in front of the blanket to the right.
Click on the blanket to receive a Rune.
Hit the return button twice.
Place the Rune into the rock to the left.
This will begin a hidden items area.
Lost Lands – The Four Horsemen – Solution
Find all of the items and retrieve the Colorful Threads.
You’ll then be taken to a new area.
Retrieve the Boreskin, the Ram, and you use your Knife to cut the rope.
Click on the patch and retrieve the Wolf Figurine.
Move forward.
Chapter 7: The Junction
Retrieve the Tongs.
Put down the Ram and click on the rope.
Hit return once.
Look at the trap and use the Tongs to collect the Wheel.
Move forward.
Click on the Rod and place the Wheel on it.
Then click on the Ram and the Rope.
Move up into the attic.
Insert the Wolf Figurine into the chest lock and retrieve the Needle.
Return to the dwarf slums.
Look at the Tapestry, and then use the Colorful Thread and Needle to begin a mini game.
You must recreate the image to solve this puzzle.
Use your Scissors to retrieve the Tapestry.
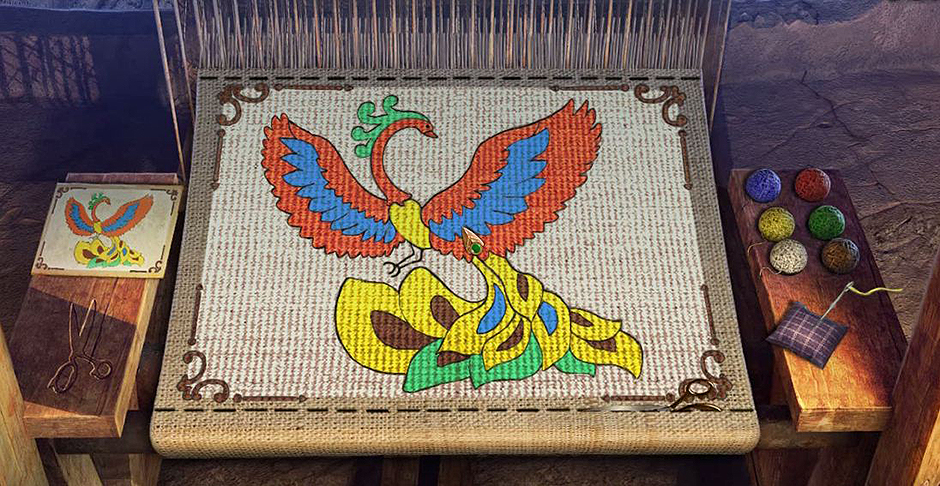
Lost Lands – The Four Horsemen – Tapestry
Head over to the junction.
Fasten the Tapestry to the post to the right.
Head over to the left, and this will begin a hidden items area.
Find all of the items listed below, and retrieve the Pendulum Figurine.
Retrieve the Medallion in the next area, and click on the statue to begin a mini game.
Place all the Puzzle Pieces into the correct location to solve this puzzle.

Lost Lands – The Four Horsemen – Hunter’s Star
Retrieve the Hunter’s Star, examine the Note, and then place the Hunter’s Star into the pedestal.
Retrieve the Axe and hit the return button once.
Use the Axe to cut down the branches, and now you can enter the area to the right.
Talk to the Centaur, and retrieve the Comb and Pincers.
Look at the compartment and retrieve the Stone of Fire.
Return to Maaron’s Cottage.
Insert the Pendulum Figurine onto the shelf to the right.
Return to the Fire’s Dwelling.
Place the Stone of Fire into the column to the right and travel to the Dwarf Cemetery.
Use the Pincers to retrieve the dwarf shield and move to the Centaur’s village.
Hand the Dwarf Shield to the centaur and retrieve the Crystal Key.
Also, give the Boar Skin to the centaur as well.
Hit the return button once and head to the left.
Place the Crystal Key into the slot, and use the Staff to raise the Hunter’s Star.
Retrieve the Bird from the cage.
Hit the return button once.
Use the Bird on the blocked area.
Head to the left.
Place the medallion into the Stone to the Right and then move forward.
Retrieve the Venom and use the leaf to retrieve the fish.
Return to Mountgore’s Temple.
Use the Venom on the vines.
Retrieve the Pattern Fragment by clicking on the bag, and insert the Pattern Fragment into the mechanism to begin a mini game.
Rotate the Discs in the correct positions to solve the puzzle.
Lost Lands – The Four Horsemen – Pattern Fragment
Retrieve the Ontus Figurine.
Return to Maaron’s Cottage.
Place the Ontus Figurine on the shelf to the right to retrieve a Key.
Return to the dead Lake.
Use the Key and retrieve the Hook from the boat.
Return to the waterfall.
Throw the Hook at the tree and climb up.
Retrieve the Sword Hilt, and use the Knife to cut free the red tree wing.
Give the Fish to the Eagle and retrieve the Feathers and Sapphire Symbol.
Hit the Return button once.
Reattach the Hilt to the Sword Blade and pull it from the tree.
Hit return once.
Insert the Sword and retrieve the Chip.
Return to the Centaurs village.
Use the red tree wing on the Centaur.
Retrieve the Door Knocker and Stone of Fire.
Create arrows using Leather and Feathers.
Return to the Fire’s Dwelling.
Insert the Stone of Fire into the statue to the right.
Click on the dirt and insert the Alcohol Soaked Cloth.
Retrieve the Torch and put it into the flames.
Retrieve the Burning Torch and return to the square.
Place the Sapphire Symbol onto the Spear Tip and retrieve the Key.
Exit to the right.
Insert the Door Knocker into the Drum and open the chest.
Retrieve the Screwdriver and Roller Shaped Seal.
Return to the Fire’s Dwelling.
Use the Key to open the chest and receive the Pickaxe.
Return to the red tree top.
Place the Chip into the pedestal to begin a mini game.
Match the correct images to solve the puzzle, and then use the Screwdriver to remove the Screws.
Lost Lands – The Four Horsemen – Chip Mini Game
Retrieve the Cheese and the Lens from the sack.
Hit the Return button twice.
Use the Cheese to retrieve the Mouse.
Click the return button twice.
Use the Mouse and Comb to retrieve the Comb with Thread.
Move forward and then to the right.
Insert the Comb with Thread onto the Loom and press the handle.
Retrieve the Bow String and insert it onto the Arrow Kit.
Return to the abandoned farm.
Place the Lens into the telescope and return to the Fire’s Dwelling.
Use the Pickaxe to retrieve the Metal from the rock and return to the Dwarf Slums.
Use the Burning Torch and Metal to retrieve the Melted Metal.
Use the Melted Metal on the mold.
Use the bottle of Cold Water on the mold and retrieve the Unfinished Arrowheads.
Place the Unfinished Arrowheads onto the grindstone and retrieve the Arrow Heads.
Return to the Centaur’s village.
Put down the Arrow Heads and then retrieve the Bow and Arrow.
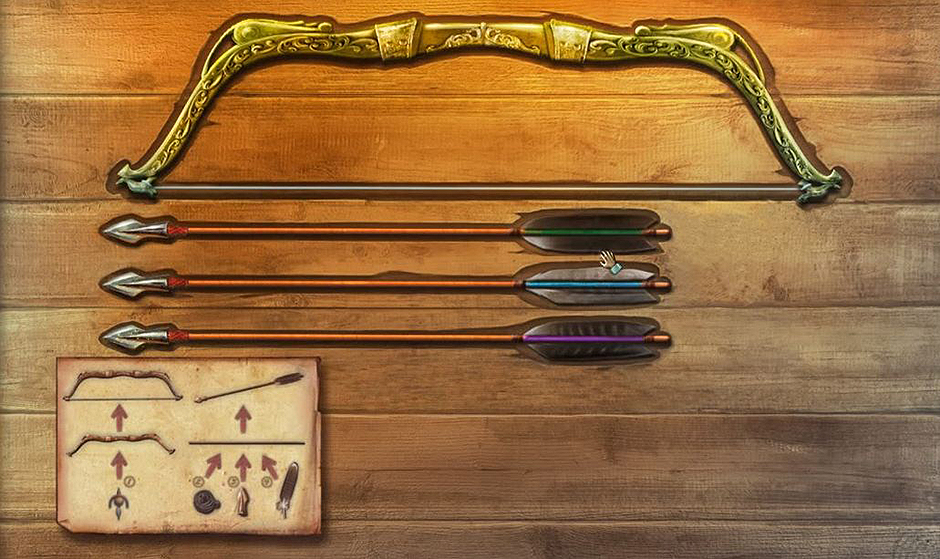
Lost Lands – The Four Horsemen – Bow and Arrows
Return to the dead lake.
Fire an Arrow towards the Floating Horseman in the sky.
Chapter 8: The Castle
Talk to the dwarf and hand him Mountgore’s Apple.
After you’re done speaking with the dwarf, move forward.
Click the dough roller on the chest.
Press the two boxes and retrieve the Spinning Top.
Click the three stones and retrieve the Armored Glove and place it onto the Glowing Orb.
Retrieve the Skull Figurine and hit return once.
Insert the Spinning Top and click on it once.
Retrieve the Petrified Eye with your Hammer.
Place the Petrified Eye into the guillotine and click the rope.
You will retrieve the Dragon Eye.
Hit return once.
Insert the Dragon Eye into the telescope and remember the Symbols.
Move forward twice.
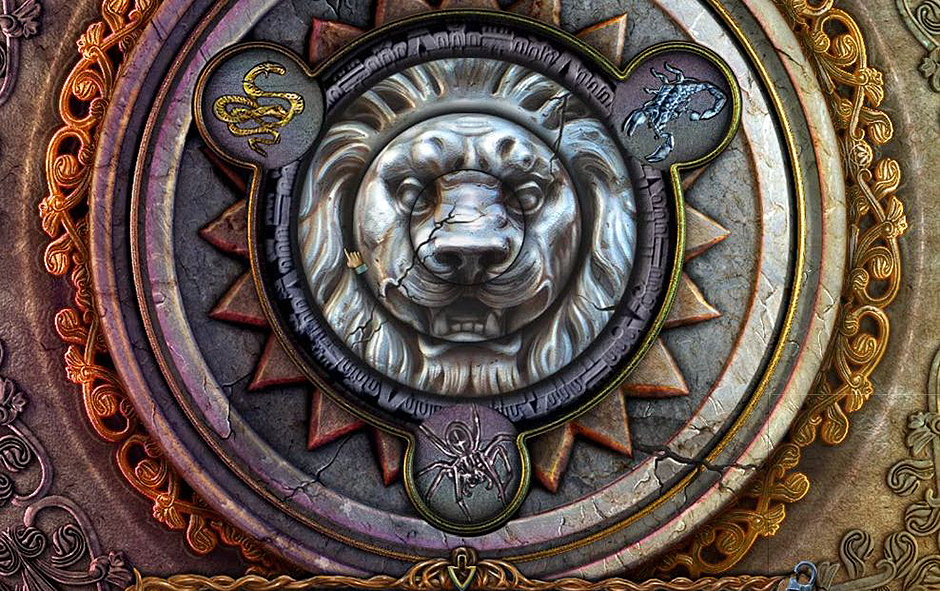
Insert the Skull Figurine into the door to begin a mini game.
The puzzle can be solved by placing all the Symbols onto the center line.
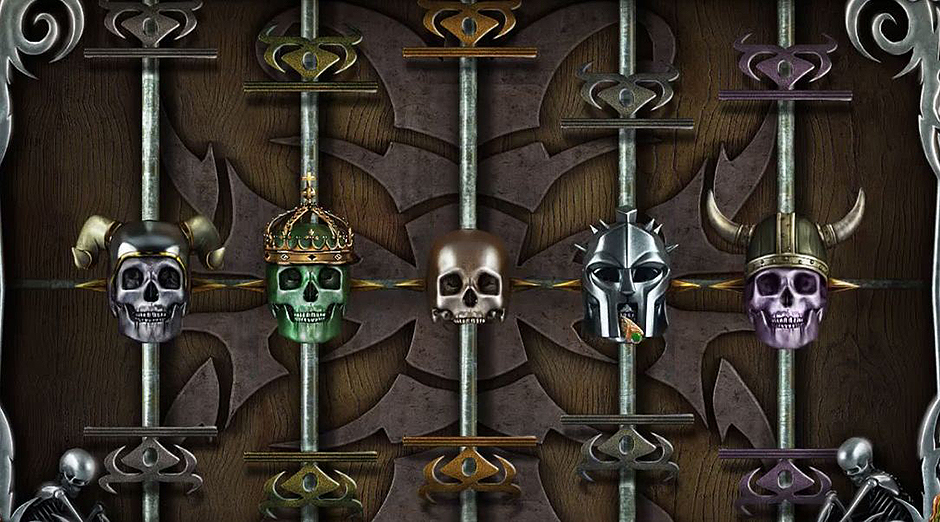
Lost Lands – The Four Horsemen – Skull
Use the Hammer to retrieve the Stone Heart.
Return to Maaron’s Cottage.
Give him the Stone Heart and receive the Spray and Key.
Hit return once.
Use the Spray to retrieve the Flower and move to the left.
Click on the net and place the Symbols into the correct locations.
Lost Lands – The Four Horsemen – Symbols
Next, read the note and then move to the waterfall.
Click on the bag near the tree.
Collect the Wooden Disk and the Wrench.
Hit the Return button once.
Place the wooden disc into the stone tablet.
Move forward twice.
Use the Wrench to retrieve the Bolts and open the door.
Use the Brush to clean the dirty sheets off of the book.
Travel to Folnur’s Refuge.
Put the Brush on the mechanism.
Use the Key to begin a hidden items area.
Find all of the items listed below to retrieve the Old Lens.
Place the Old Lens onto the mechanism and click on the handle to retrieve the Lens.
Return to Mountgore’s Temple.
Hand the Flour to the man to retrieve the Wooden Part.
Use the Clean Sheet on the fountain.
Retrieve the Spell Scroll and travel to the Ontus Glades.
Place the Wooden Part onto the Stone Tablet to begin a mini game.
Lost Lands – The Four Horsemen – Wooden Part
Rearrange the pattern to solve the puzzle, and then insert the Lens to retrieve the Light-Filled-Lens.
Return to the tower hall.
Talk to the man who waits for you, and then move ahead.
Use the Light-Filled-Lens on the barrel and press it once.
Next, use the Spell Scroll.
Finally, you have done it! You have returned the realm to safety and stopped the Four Horsemen.
Congratulations! You’ve completed our Lost Lands – The Four Horsemen Walkthrough! For more great tips and tricks, visit our blog!
Delicious – Emily’s Hopes and Fears Walkthrough
The Lost Lands – The Four Horsemen Walkthrough is meant as a guide and does not contain cheats, hacks, or serials.