In a small town, the citizens are at a loss. People are just disappearing and it appears to be all happening in the same mansion. It appears an evil villain is using these people for some secret rituals. You are an unassuming person who is looking for a new place to explore. You stumble upon the mansion with a room for rent, and the affordable price lures you in and now you need to find a way out.
In Twilight Phenomena – The Lodgers of House 13, you are trying to figure out what exactly is happening in the mansion. You need to figure it out before you become the next victim. The tips and tricks in this walkthrough will help you navigate the mansion and find the solutions to the tougher puzzles.
Contents
- General Tips & Tricks
- Twilight Phenomena – The Lodgers of House 13 Walkthrough
- Chapter One: House 13
- Chapter Two: The Forbidden Right Wing
- Chapter Three: The Angry Landlord
- Chapter Four: The Second Floor
- Chapter Five: Ruth Hamilton
- Chapter Six: The Bomb Shelter
- Chapter Seven: The Cabin
- Chapter Eight: The Garage
- Chapter Nine: The Tree House
- Chapter Ten: The Gym
- Chapter Eleven: The Greenhouse
- Chapter Twelve: The Finale
General Tips & Tricks
In this adventure game, there is a standard main menu. Here, you will able to change players so that you can save multiple games. You will also be able to determine your level of difficulty: hard, advanced, or casual. If you find the level too complicated or too easy, you can always head back to the main menu and change the difficulty. You can also adjust basic settings, such as the screen resolution and volume of the game.
In terms of controls, there is the eye and hand. The hand allows to you to pick up the objects you need while the eye allows you to zoom in to find items you need. Throughout the game, you will be picking up notes, so this comes in quite handy. These notes are important clues about the house, and you can consult them if you get stuck.
Twilight Phenomena – The Lodgers of House 13 Walkthrough
Chapter One: House 13
To start, you will need to locate and talk to the owner of the house. Find the Broken Pencil and the Bonfire Emblem on the table. Eat the chocolate candy after unwrapping it. Retrieve the Lighter from the potted tree, then place the Broken Pencil into the sharpener and take the new Pencil. Grab the Dry Flowers from the pod, go back to the table, and sign the agreement with the Pencil. Retrieve the Room Key and the note before going to the door.
Go into the next room, grab the note and head to the top door, then use the Room Key to enter the room. Look at the window, move the curtains and retrieve both the Stained Glass and the Metal Gladiator. Head to the bed, pick up the pillow, and grab the Monkey. Retrieve the Passport from the table, place the Dry Flowers in the ashtray, light them with the Lighter, and pick up the Ashes. Grab the Champagne from the bucket and leave the room. Put the Monkey into the niche to activate the first puzzle. Move the puzzle pieces to complete the puzzle and receive the Metal Horse.
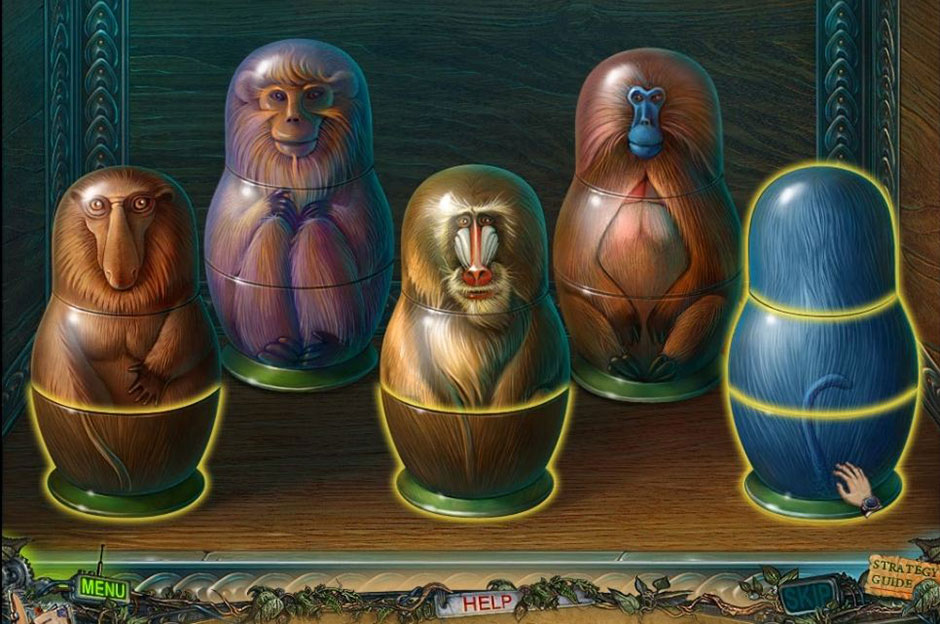
Twilight Phenomena – The Lodgers of House 13 – Monkey Puzzle Solution
Go back to the table, light the candle with the Lighter, and place the Champagne Bottle in the holder. Grab the Opened Champagne and go to the mirror. Grab the Stained Glass and the Iron before moving on to the outlet. Plug the Iron into the outlet, put the Hot Iron into your inventory and go back to your room. Place the Hot Iron into your ice bucket and retrieve the Water. Go downstairs, locate the pod and pour the Water and the Opened Champagne in. Retrieve the Wooden Cat from inside of the pod before heading back to your room.
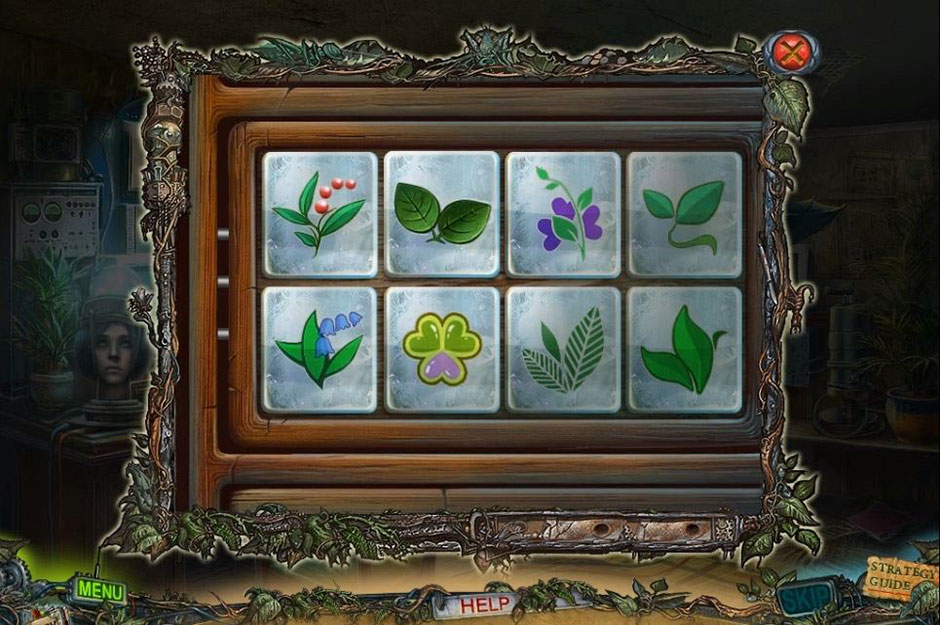
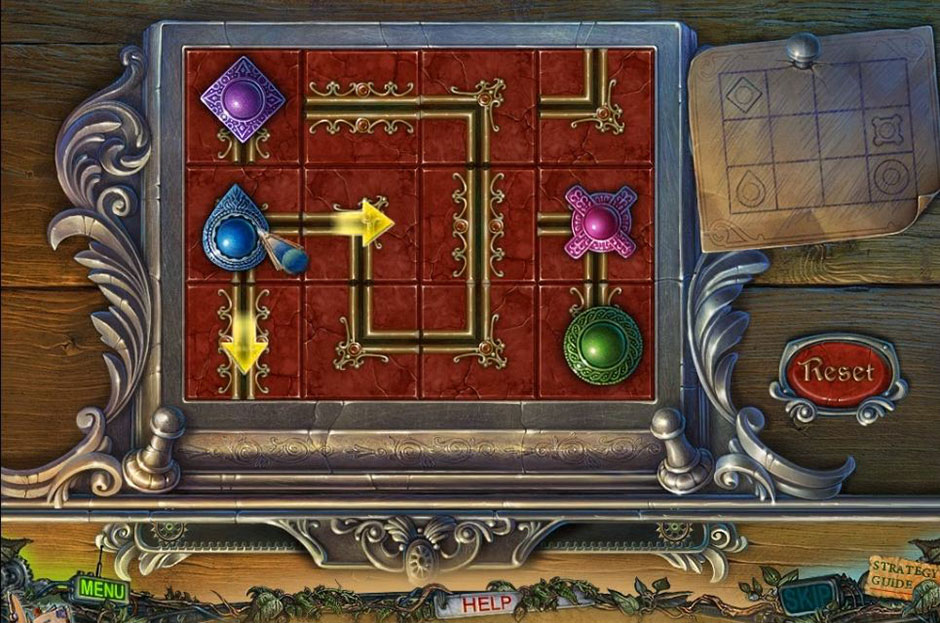
Go to the stained glass window and place your two pieces of Stained Glass into the door. Go to the box, put the Wooden Cat on it to open it, and grab the Remote Control. To start the Cat Hologram, turn on the Remote Control and go to the window. Grab the Seed Button, take it to the pod, and put it in there to activate a puzzle. Move the seeds around to get the worm in the hole and receive the Worm and the Golden Symbol.

Twilight Phenomena – The Lodgers of House 13 – Worm Puzzle Solution
Go downstairs, locate the picture and place both the Metal Horse and the Metal Gladiator on it. Rub the Ash on the side of the board before inserting the Golden Symbol on the niche. Push the symbols into the right order to get the Bronze Leaf. Go through the door and into the forbidden right wing.
Chapter Two: The Forbidden Right Wing
Take the Sharp Glass from the ground before placing the Bronze Leaf on the door. Put the Worm in the pond to receive a Butterfly Wing. Head down the stairs, grab the Net, and cut the doll with the Sharp Glass to get the Shovel Handle. Chase the mice away by using the Cat Hologram and grab the Clover from the sewing machine. Locate the plaque and retrieve the Bat from it by putting the Clover on it.
Go to the basement, obtain the Mustache Part by hitting the ball with the Bat. Go towards the door, place the Mustache Part on the door and go in. Receive the code from the talking head and grab the Nail File from the controls. Go through the next door and open the cabinet door with the Nail File. Grab the Needle and an Empty Cup before walking away. Look in the pond, place the Empty Cup into the water to fill it, and place the Cup with Water into your inventory.
Walk to the porch, look at the tree, and pour the Cup with Water into the base around the tree. Put the shovel head onto the Shovel Handle, use the Shovel to get the Dirty Bone. Walk to the pond, clean the Dirty Bone with water and place the Clean Bone into your inventory. Go back to the basement, go to the safe, give the dog the Clean Bone, and take both the Drumsticks and the Fire Emblem. Place the Needle on the sewing machine to activate a new puzzle. To receive both the Spool of Thread and the Butterfly Wing, you need to sew a single, non-overlapping line through the design.
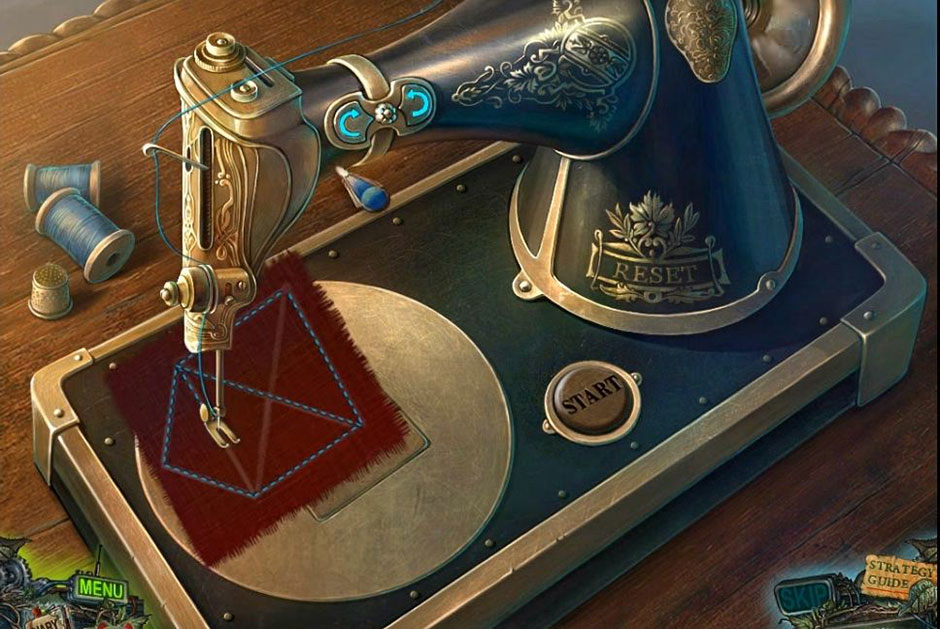
Twilight Phenomena – The Lodgers of House 13 – Sewing Machine Solution
Return to the porch, locate the birdcage, and use the Cat Hologram on the cage. Retrieve the Moon from the cage and walk away. Locate the panel and start the next puzzle by placing the Butterfly Wings on it. Click on the wings until they are in the correct position.
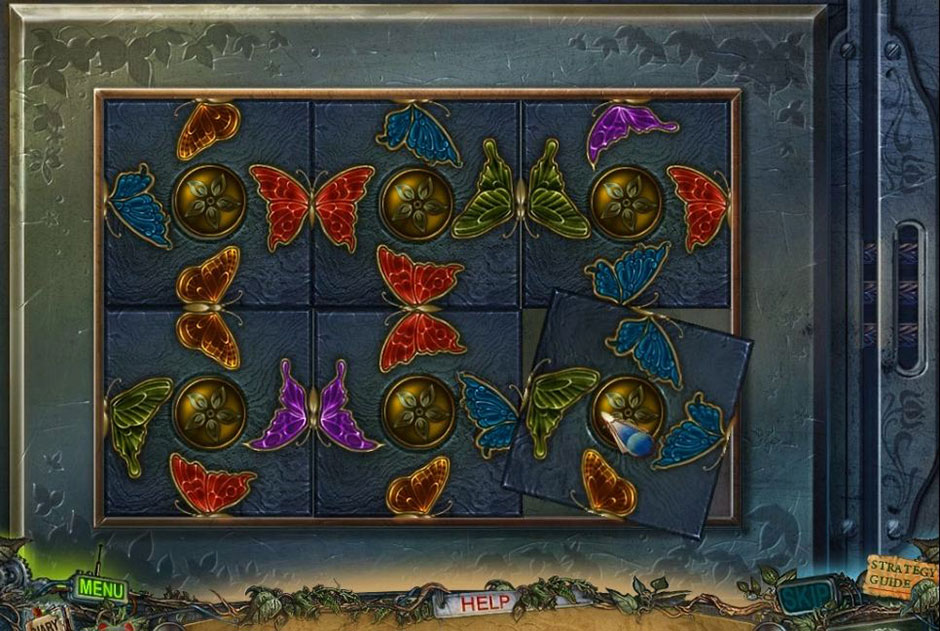
Twilight Phenomena – The Lodgers of House 13 – Butterfly Wings Solution
Look at the box, put the Moon in, and get the Chain and the Anchor Emblem. Head back to the porch, grab the note from the ground, and put the two shards together. Go to the box, place the Fire Emblem, Anchor Emblem, and the Bonfire Emblem in to start a new puzzle. Move the tiles to obtain the Activator. Go to the control panel, place the Activator in it and punch in the code you received from the talking head. Go into the door.
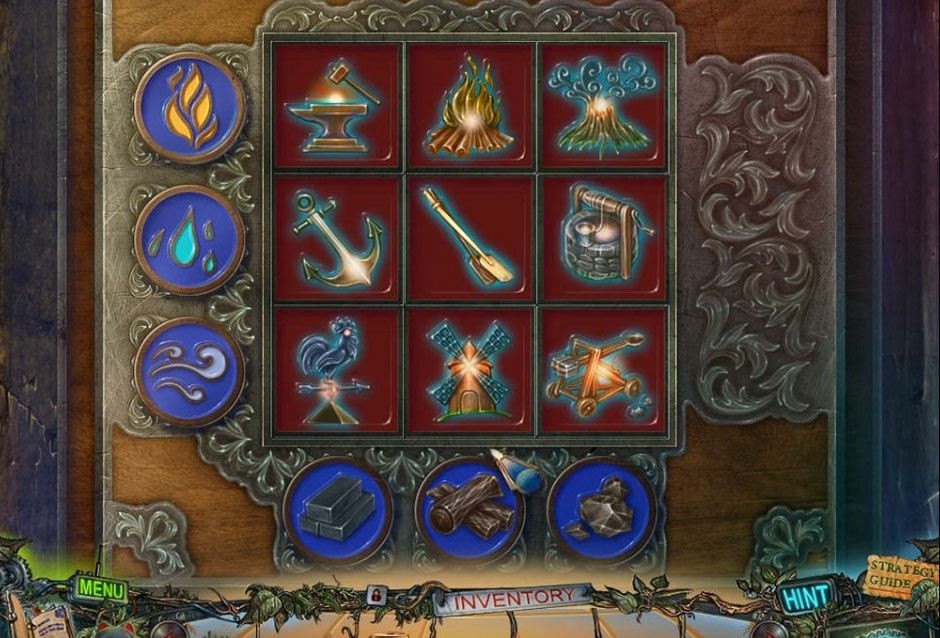
Twilight Phenomena – The Lodgers of House 13 – Tiles Solution
Chapter Three: The Angry Landlord
Locate the drum, place the Drumsticks on top, and receive both the Pearl and the Spiral. Place the Chain on the mechanism, pull the lever, and go into the hatch. Grab the Scarf, locate the dolls, and use the thread on the dolls to get the Feather. Obtain the Earring by using the Cat Hologram and throwing the Net on the cat.
Take the Net and place it in your inventory again. Look at the back door, place the Spiral into the lock and tug on the feather before opening the door. Talk to the owner. Grab the Nut from the stand and place the Pearl in the shell to obtain the Bottle with Note. Go to the desk and grab the note. Grab the Clock Hand from the case. Look at the computer and turn it on. Move the arrows to look at the different sections of the house. Locate the clock, replace the Clock Hand and take the Golden Semicircle. Look at the drum, place the Bottle with Note on it and place the Drumsticks next to it. Retrieve the note and the Cameo.
Return to the plaque, put the Earring and Golden Semicircle on it and grab the Record and the Fly. Go in the hatch, look at the cell, and place the Fly in the niche to go into the next door. Speak with Dizzy, use the Cat Hologram and scare the bats. Retrieve the Mask from the eagle statue and open the curtains to find the shield. Activate the puzzle by placing the Cameo on the shield. Move the cameo to the correct spot to obtain the Button.

Twilight Phenomena – The Lodgers of House 13 – Cameo Puzzle
Look at the wall of masks and place the Mask on it to activate puzzle. Move the eyes to the correct masks in order to beat the puzzle. Receive the Shield Part before heading down the hatch.
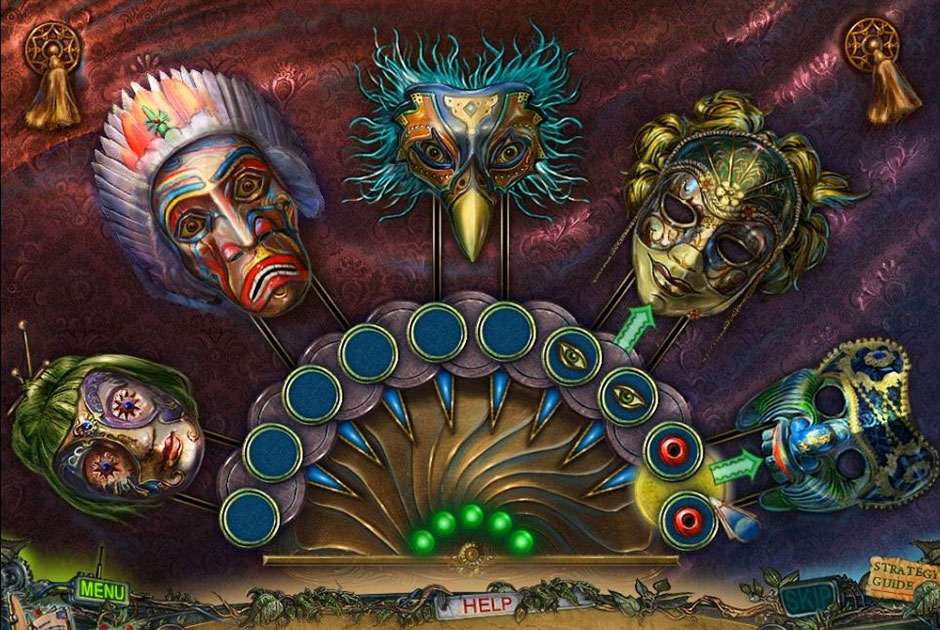
Twilight Phenomena – The Lodgers of House 13 – Masks Solution
Find the lion statue, place the Shield Part on the shield and use the Scarf to wipe off the dust. Ring the bell, find the eagle statue and put the Feather into the slot before pulling the lever. Go into the elevator, grab the Ring, and place the Button on the spot to move up. Leave the elevator on the second floor.
Chapter Four: The Second Floor
Look in the first door, grab the Credit Card before moving to the gramophone, and take the Solvent. Grab the Suction Cup from the piano. Head into the next room. Grab the Fish Tail from the table and locate the hamster. Put the Suction Cup on the glass and give the Nut to the hamster. Collect the Hamster and the Picture Tile. Go back through the door. Look at the guillotine to retrieve the Handkerchief. Move the stones around to place the Fish Tail on the mechanical fish and grab the Corkscrew. Go back to the gramophone, place the Record on it and then place the Hamster on the record.
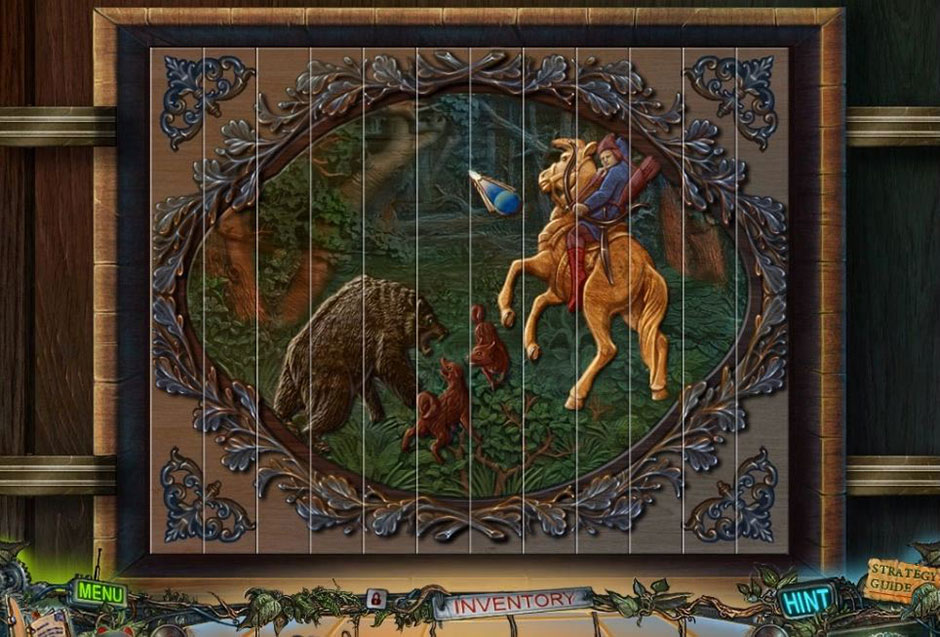
Do not forget to use the Cat Hologram at this point and then take the Neanderthal. Find the calendar and pull it from the wall. Remove the board with the Corkscrew and retrieve the Picture Tile. Look at the frame; place the 2 Picture Tiles on the picture to play the next puzzle. Flip the tiles to solve the puzzle and receive the Lampshade.
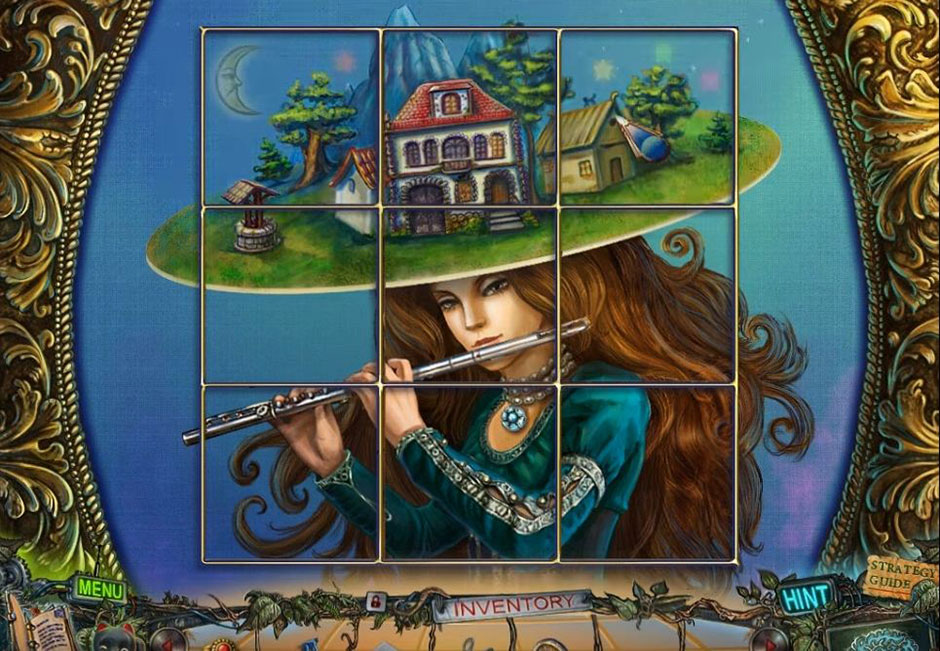
Twilight Phenomena – The Lodgers of House 13 – Lampshade Puzzle Solution
Go back to the guillotine room and place the Lampshade on the lamp. Move the light around to match the symbols on the wall. Retrieve the Ring, locate the poster on the wall and put the Neanderthal on the poster to activate puzzle. To win the puzzle and receive the Scissors and Wheel, arrange the tiles for human evolution.
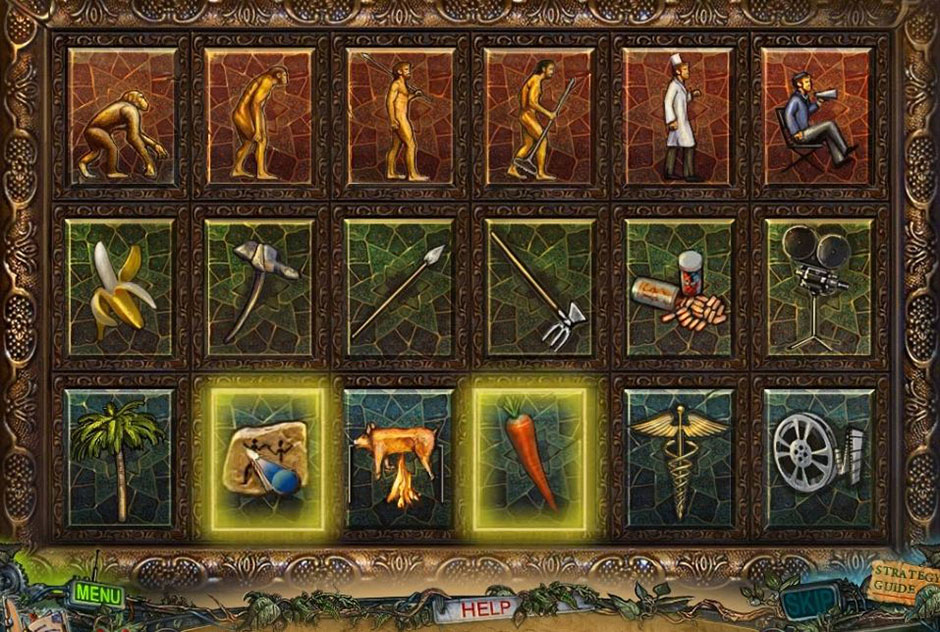
Twilight Phenomena – The Lodgers of House 13 – Human Evolution Solution
Walk out of the room and focus on the door. Place the 2 Rings on the fingers to enter. Look at the head, read the message featured on the monitor, and then move to the plant. Retrieve the Wrench from the plant by using the Scissors. Go to the piano, remove the Blue Bolt with the Wrench and go to the door on the right. Focus on the steam pipe, place the Blue Bolt on the pipe and turn the bolts to create the same color. Clean the mirror with the Handkerchief.
Chapter Five: Ruth Hamilton
Pull on the lever after placing the green pin in the correct hole. Move the rope twice and move it towards the second lever. Pull rope and go down into the lab. Grab the Cane from the mirror and then go through the left door to exit outside. Push over three pots with the Cane and take the Bear from the window. Use the Solvent with the Mop before you take a left. Retrieve the Umbrella before moving on. Move past the dog after using the Cat Hologram and retrieve the Jack from the dog house.
Go to the bench and extract a Brick with the Jack. Place the Wheel on the bolt. Go to the tree and obtain an Orange. Retrieve the File from the wheel and also retrieve the Tape. Look at the window, break the bars with the File and then break the window with the Brick. You will also use the Brick to break into the piggy bank to get the Zipper Pull. Look in the container; place the Zipper Pull on the zipper. Retrieve the Leaves before going into the guillotine room. Put the Orange on the guillotine and pull the lever. Put Half an Orange on the juicer to receive Orange Juice. Go through the left door and locate the pipe.
Place the Umbrella on it. Clean up the water near the wires with the Mop before placing Tape on the wires. Give Ruth the orange juice and look for the solution on the monitor. Place the Leaves on the tiles to activate a puzzle. Move the tiles to look like the monitor’s picture and then receive the Sleeping Mixture.
Twilight Phenomena – The Lodgers of House 13 – Monitor Picture Solution
Go to the fountain, find the dog house and place the Sleeping Mixture in the bowl. Take the Dog Bowl after the dog uses it. Head to the pond and use the Cat Hologram to grab the Comb. Follow the path behind the fountain and locate the gnomes. Retrieve the Brush from the larger gnome and the Purple Mermaid from the smaller gnome. To get the Turtle Symbol, comb the gnome’s beard with the Comb. Keep going down the path, grab the Hose and locate the pump. Retrieve the Carrot and inspect the pump. Clean it out with the Brush and attach the Hose. Push the handle and then look at the door. Activate the next puzzle by putting the Bear on the door. Move the planks to solve the puzzle.
Twilight Phenomena – The Lodgers of House 13 – Bear Puzzle Solution
Go through the door and retrieve the Bananas and the Pruners. Go to the bush and retrieve the Tusk from the bush by using the Pruners. Go back to the pond.
Chapter Six: The Bomb Shelter
Place the Tusk on the elephant; locate the turtle and take both the note and the Matches. Go to the pile of leavers, burn them with the Matches and retrieve the Shell Part. Locate the grid and use the File on it. Place the Purple Mermaid on the board to start the next puzzle. Retrieve the Scale from the mermaid’s tale and go back to the path.
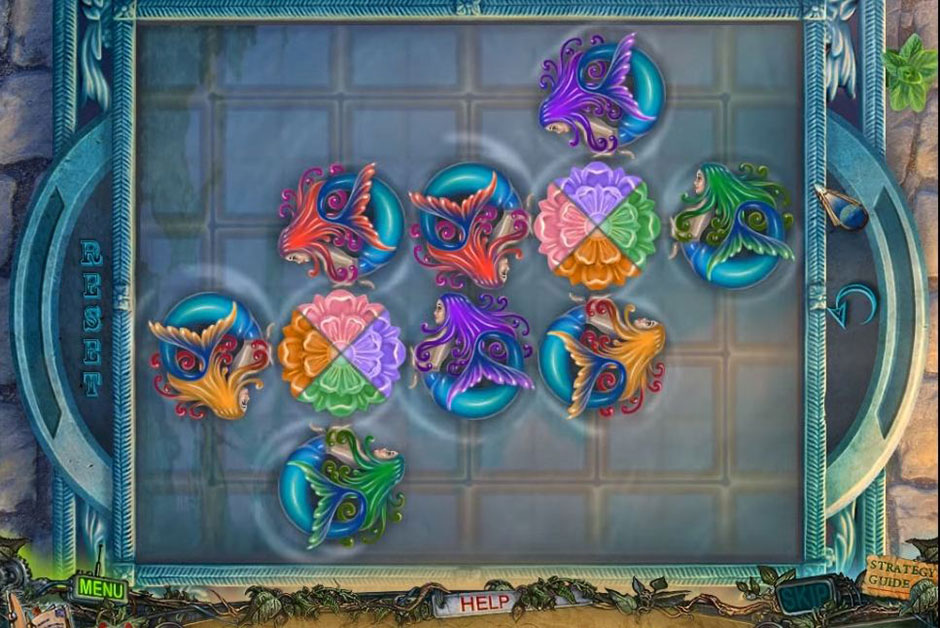
Twilight Phenomena – The Lodgers of House 13 – Mermaid’s Tale Solution
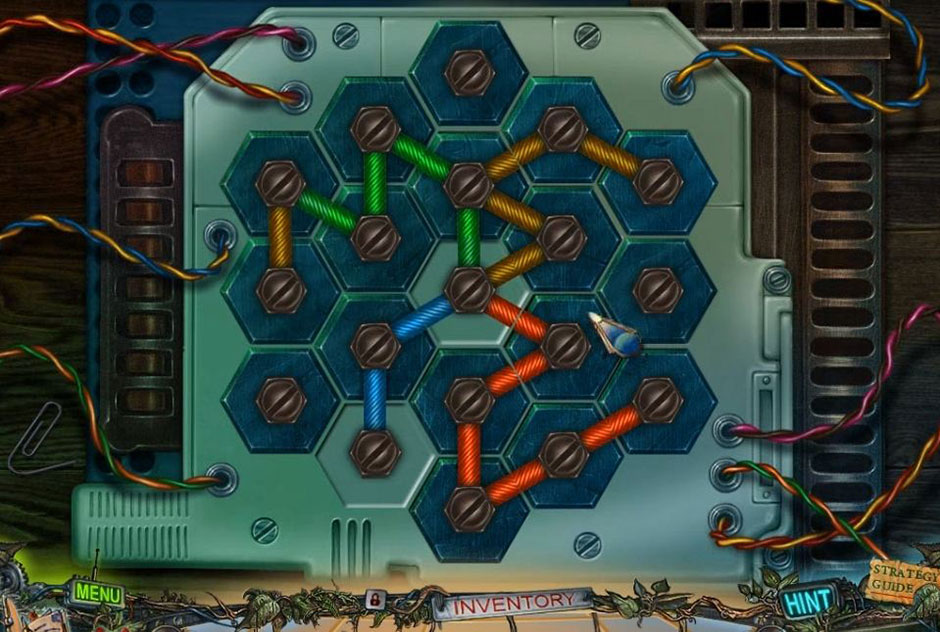
Look at the mermaid and replace the Scale to receive the Lightning. Go back to the turtle, replace the shell with the Shell Part and place the Turtle Symbol on top. Go into the hatch to locate the bomb shelter. Look in the fridge to grab both the Cream and the Monkey Spoon. Look in the power box to put the Lightning in. This will activate a puzzle where you need to place all the bulbs correctly into the wire connectors.
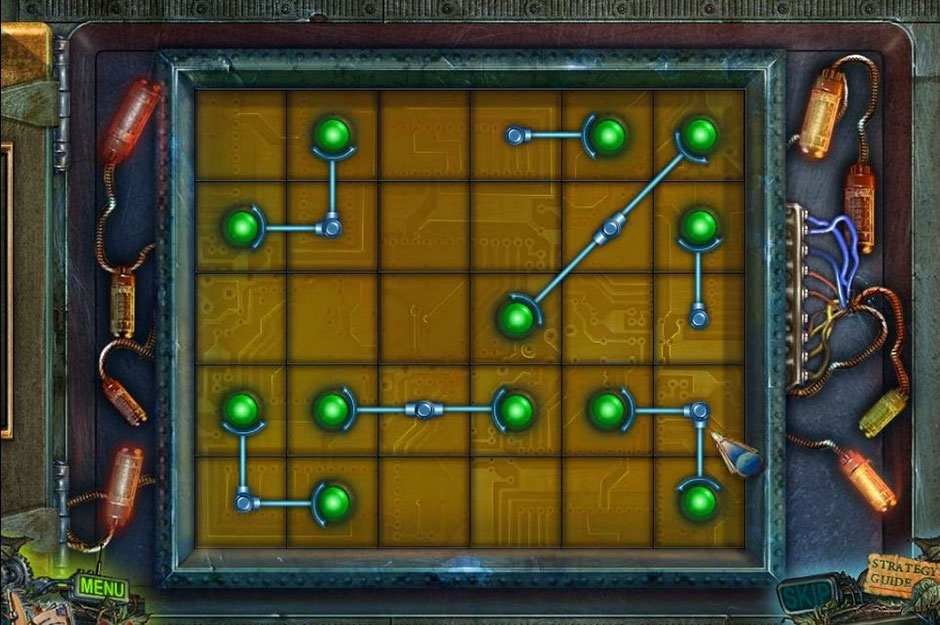
Twilight Phenomena – The Lodgers of House 13 – Wire Connectors Solution
Go to the gazebo, find the hedgehog, place the Dog Bowl in front and pour the Cream in. Retrieve the Apple before moving away. Look at the large gnome and place the Apple, Bananas, and Carrot into the basket to get the Fish Symbol. Go back to the bomb shelter. Look at the panel and put the Fish Symbol on it to receive a note, Horseshoe and Valve. Locate the chair and place the Valve on the slot to turn. Retrieve the Mesh Sponge on the pipe before walking away. Find the bomb, cut the wires with the Pruners and walk across the small bridge. Look at the door, place the Horseshoe on the door and knock. Go into the cabin.
Chapter Seven: The Cabin
Speak with the head before obtaining the Arrow from the press. Go to the birdhouse and retrieve the Palm Trees before heading to the playground. Find the archer and retrieve the Rake. Go to the cage and locate the Pump with the Rake. Walk to the boat, place the Pump on the boat and push the lever three times. Retrieve the Oar before going to the alligator. Open its mouth; place the Oar in its mouth to retrieve the Whisk and Oar Part and remove the stick from the mouth. Go to the shed, find the mixer, add the Cream and the Whisk and make Butter.
Go back to the playground. Look at the windmill, place the Oar Part in it and move the blades to receive a piece of paper and the Control Knob. Go to the bomb shelter, put Butter on the valve and turn it. Go back to the pond, grab the Monkey Fork from the bag and take it to the small bridge. Use the Monkey Fork and Monkey Spoon in the slots to enter the cage.
Look in the pot to retrieve the Medal. Place the Palm Tree in the lock to open and grab the Arrow. Go to the ditch and receive the Fishing Rod. Walk away to start a cut-scene. Take a left once the scene ends. Find the archer and place the Arrow in the bow. You will need to use the Cat Hologram in this location as well. Go to the window and enter the garage’s upper space.
Find the Christmas tree and retrieve the note. Grab the basket with the Fishing Rod and retrieve the Pen and Lantern. Grab the Vacuum Hose from the hay and leave. Use the Pen to create a note with the paper before heading into the garage. Put the Medal on the chest to start a puzzle. Move the medals into the correct line to solve the puzzle and receive the Fire Extinguisher. Put out the fire with the Fire Extinguisher and place the Arrow on the control panel to move into the garage.
Twilight Phenomena – The Lodgers of House 13 – Medals Puzzle Solution
Chapter Eight: The Garage
Take the Saw from the shelf, take the Dirty Toy and place the Control Knob in the correct spot to start a puzzle. Finish the puzzle to receive the Laundry Detergent. Go to the Christmas tree and retrieve the Snowflake with the Saw.
Go to the shed, attach the Vacuum Hose to the vacuum and put the Vacuum Cleaner plus the Sun Symbol to your inventory. Go in the cage, place the Dirty Toy and Laundry Detergent into the pot and clean the toy with the Mesh Sponge. Put the Wet Toy in your inventory. Look in the tree hollow using the Lantern to grab the Blade. Look at the box; place the Sun Symbol and Snowflake in the spots to activate the puzzle. Place all the warm weather icons on the left and all the cold weather items on the right to solve the puzzle and receive the Hairdryer.
Twilight Phenomena – The Lodgers of House 13 – Weather Icons Solution
Go to the lower side of the garage, go to the motorcycle and open the bag with the Blade to retrieve the Playing Card. Plug in the Hairdryer, place the Wet Toy on the shelf and dry it. Take the Toy and go into the cage. Find the monkey and place the Toy with him to get the Bug. Go out and to the right to see the scarecrow. Put the Bug on the box to start a new puzzle. Put the bugs in the right order to get both the Rubber Gloves and the Tin of Fish.

Twilight Phenomena – The Lodgers of House 13 – Weather Icons Solution
Chapter Nine: The Tree House
Go to the shed, place the Tin of Fish on the press and create a Fish. Go to the birdhouse and give the Fish to the birds. Retrieve the Egg and another Playing Card. Add the Playing Cards to the others to start a puzzle. Place the cards in order to win the puzzle and go into the tree house.
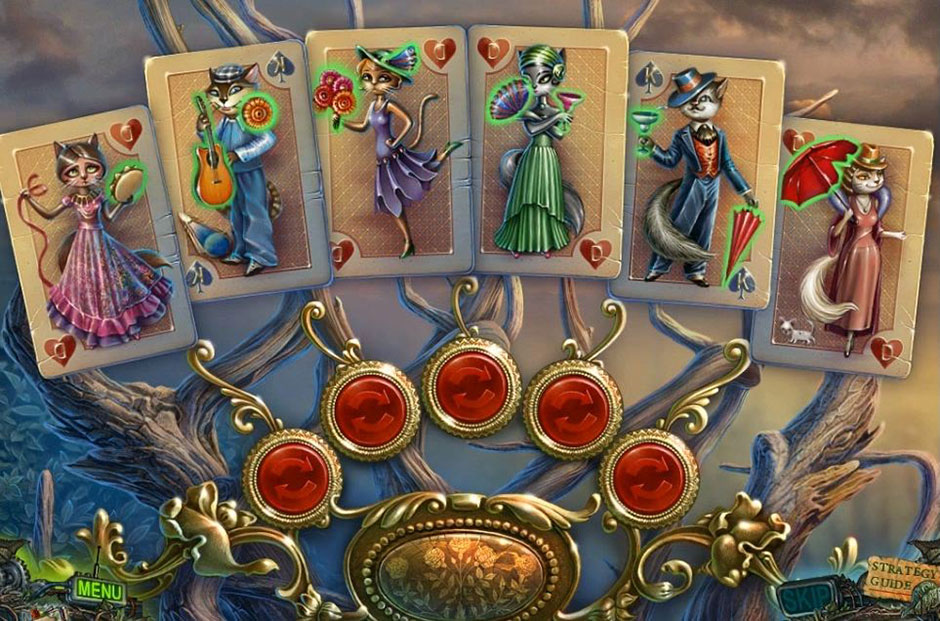
Twilight Phenomena – The Lodgers of House 13 – Cards Puzzle Solution
Open the control panel with the Rubber Gloves, connect the wires and swap out the plates. Push a button and take the Hook. Clean up the sand with the Vacuum Cleaner. Go to the door on the right and pick up a Glass Shard. Cut the ribbon on the table with the Glass Shard and receive both the Ribbon and Magnetic Card. Go to the left door and use the Magnetic Card to open the door. Receive the Malachite Stones from the tree. Keep moving through the door, go to the table and grab the Brush from it. Head up the ladder, retrieve the Boxing Gloves, place the Ribbon on the wig and receive the Eye. Look in the hamper for the next puzzle. Collect the clothes and put them in the right order to finish the puzzle and get the Belt.
Twilight Phenomena – The Lodgers of House 13 – Wires Puzzle Solution
Chapter Ten: The Gym
Put the Eye on the book located on the stool, retrieve the Rotor Blades and view the instructions. Head up the ladder and place the Rotor Blades on the helicopter. Obtain the Knight from the parachute and head back down. Locate the chessboard and place the Knight on it to start the puzzle. Move the knight around the board until it touches every space on the board and collect the Razor.
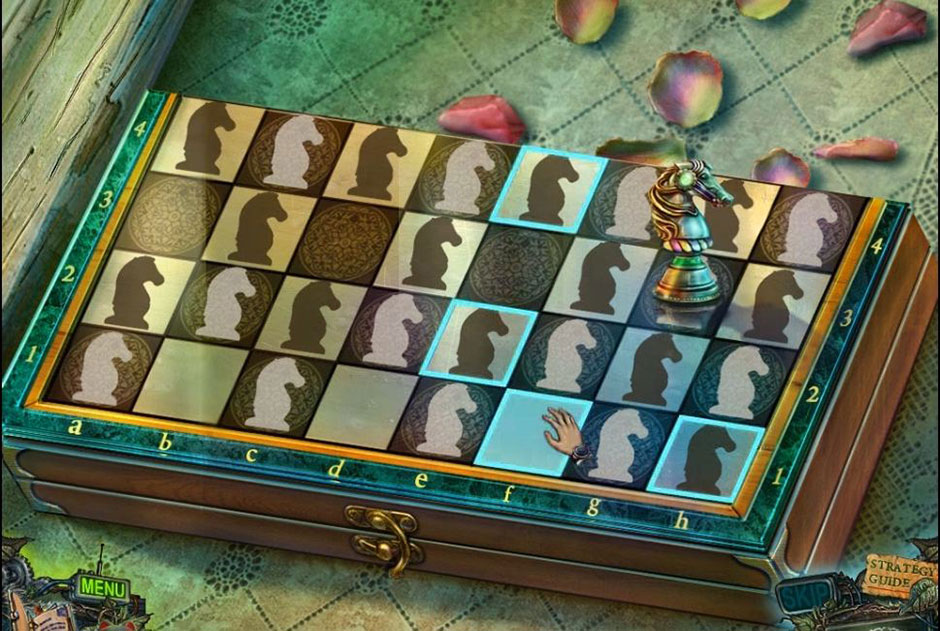
Twilight Phenomena – The Lodgers of House 13 – Chessboard Puzzle
Go back to the monkey, shave his wrist, and get the code. Type the code into the control panel to receive a Ring. Go in the left door, take the Hammer from the picture and place the Ring on the door to go into the gym. Retrieve the Flute by using the Boxing Gloves on the punching bag. Retrieve the Flail from the ladder and place the Hook on the ladder. Look at the weight and put the Belt on it. Find the strength machine and use the Hammer on it. Take the Weight and go up to the roof using the ladder.
Look in the nest; retrieve the Hockey Player and the note. Place the Hockey Player on the hockey table to start the next puzzle. Place the players in the correct positions in order to receive the Knife. Head back to the roof, cut the rope with the Knife and go into the dove house. Use the Stepladder to look into the trough. Use the Cat Hologram and retrieve the Crank. Find the winch, attach the Crank and place the Weight on the antenna.
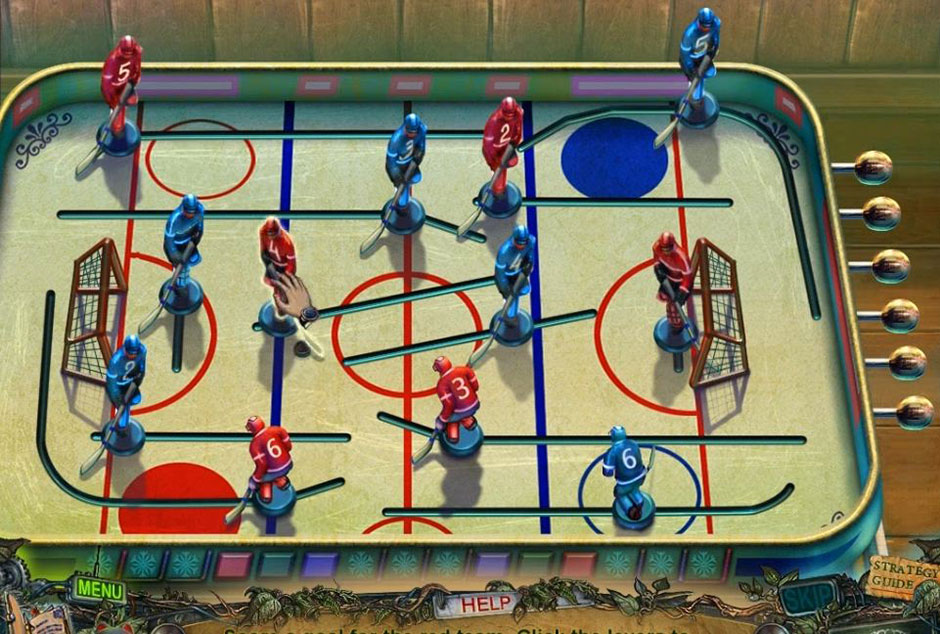
Twilight Phenomena – The Lodgers of House 13 – Hockey Table
Chapter Eleven: The Greenhouse
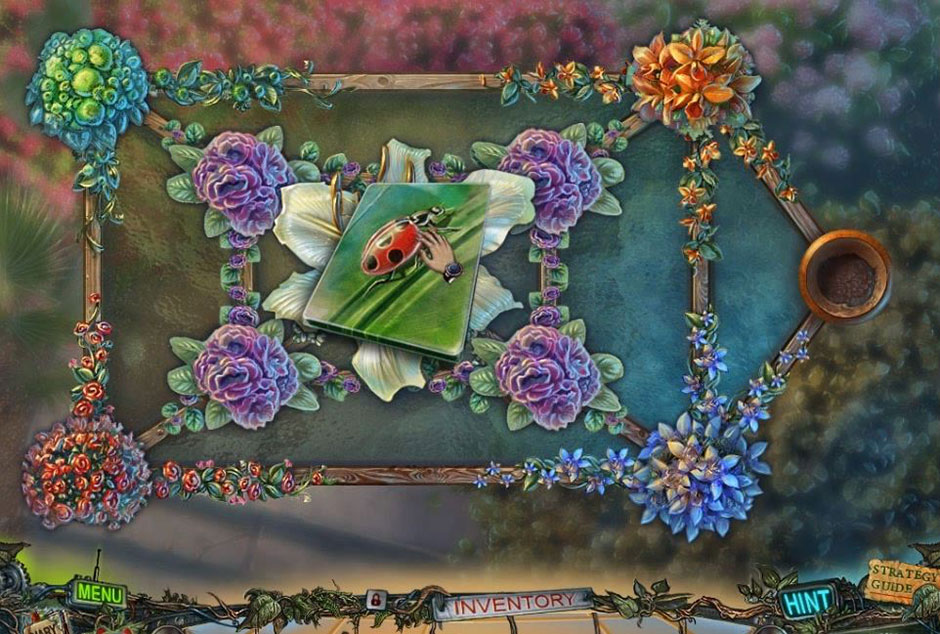
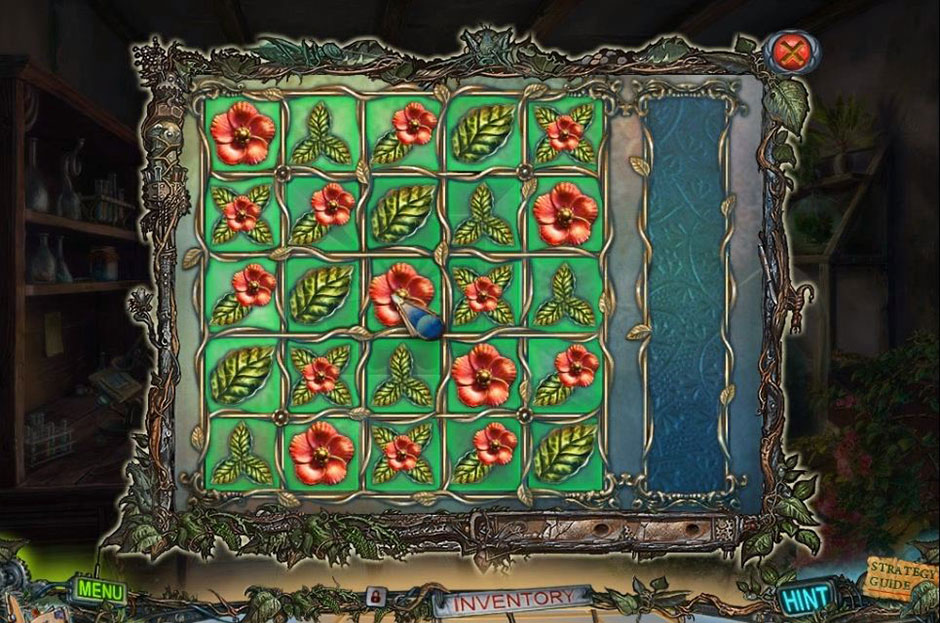
Retrieve the Mirror from the peacock before heading down to the stone path. Play the Flute to go around the snake and retrieve the Stone Cobra and Pesticides. Place the Stepladder on the steps to see the flower pots and activate the puzzle. Move the flower pots next to the matching plants and take the Ladybug Tile.
Twilight Phenomena – The Lodgers of House 13 – Flower Pots Solution
Use the Pesticides on the tree trunk to receive the Harp. Go to the sculpture and place the Harp with it and receive the Paw Print. Head back to the dove house, look in the cage and take out the broken mirror. Retrieve the Shark Tile and head back to the greenhouse. Clean the mossy area with the Brush. Place both the Shark Tile and Ladybug Tile on the board and play the puzzle. Place all of the animals in their correct environments. Collect the Magpie Charm.
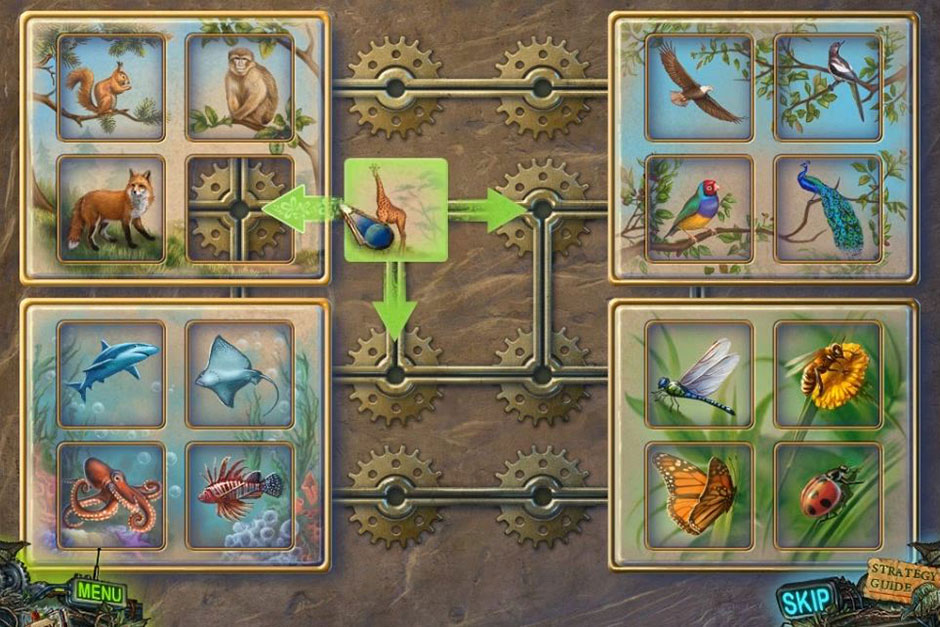
Twilight Phenomena – The Lodgers of House 13 – Animals Puzzle Solution
Go back to the dove house. Place the Magpie Charm in the cage and retrieve the Amber Necklace and the Drinking Bowl. Go into the greenhouse; water the plants with the Drinking Bowl on the plants to collect the Dew. Look at the cactus and place the Dew on the cactus to get a flower. Retrieve the Cactus Flower by using the Razor. Place the Cactus Flower with the stone peacock. Grab the Paintbrush from the grounds and use the Flail on the Wheat Grains. Go to the nest, place the Wheat Grains in and retrieve Bird’s Foot. Head into the dove house, go to the chest, and place the Paw Print and the Bird’s Foot on it to activate the puzzle. Place the doves away from cats by placing them in the correct spots. Receive the Lazurite Stones.
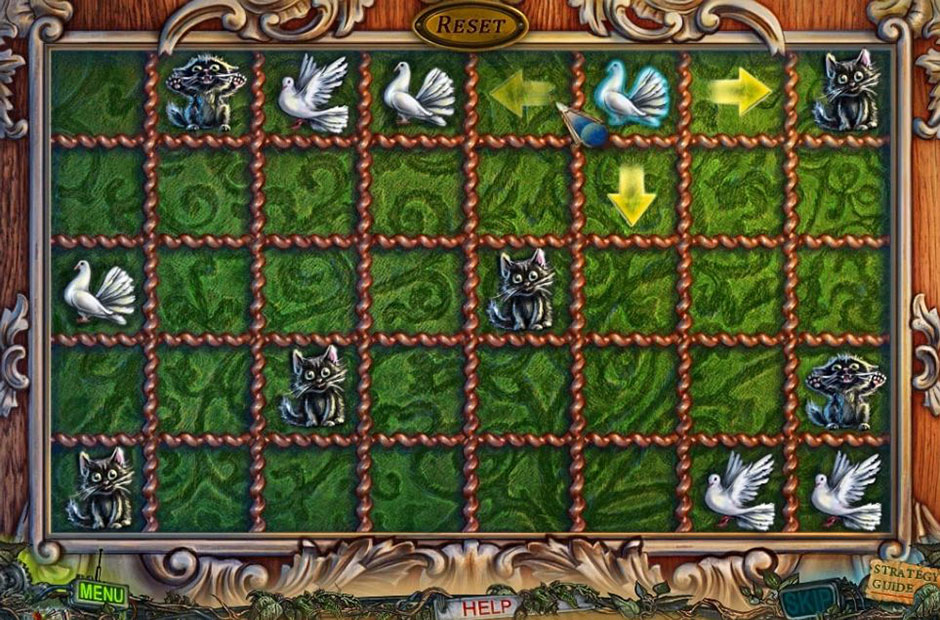
Twilight Phenomena – The Lodgers of House 13 – Doves Puzzle
Go to the lower door and walk to the round table. Place the Malachite Stones in the mortar and use the pestle to grind the stones. Place the paint on the palette. Put the Amber Necklace in the mortar, grind the stone and put the yellow paint on the palette. Finally, grind up the Lazurite Stones and transport the blue paint onto the palette. Place the Palette in the inventory.
Go back to the peacock statue and place the Egg on the slot. Place the Palette and Brush to activate the puzzle. Color the egg to receive the Ink pot and Triangle Stamp. Go to the right door and place the Triangle Stamp on the lock before heading to the hatch. Use the Rope Ladder and go through the left door.
Chapter 12: The Finale
Retrieve the Heart from the microscope and head to the table. Retrieve the Ruler and Clear Tape. Locate the tile and lift it with the Ruler. Retrieve both the Apple and the Key. Head through the right door, head into the hatch, and unlock the lock with the Key. Lift the board and retrieve the Soldering Iron and the note. Go to the monkey, take his fingers in the Ink pot and get his Fingerprints with the Clear Tape. Head to the right door, place the Fingerprints on the machine. Speak with Dizzy before taking the Circuit Board Part from the pillow.
Place the Circuit Board Part in the machine and obtain the Broken Circuit Board. Take the left door to go into the lab. Head towards the microscope and place the Broken Circuit Board on it. Fix the Soldering Iron to fix the Circuit Board. Go through the right door, put the fixed Circuit Board on the machine and pull the lever. Place the Heart on the hammer and retrieve the Triangle. Look at Dizzy’s wrist and bracelet. Place the Triangle on the bracelet to activate a new puzzle. Fix the snake puzzle to remove the bracelet on Dizzy’s wrist.
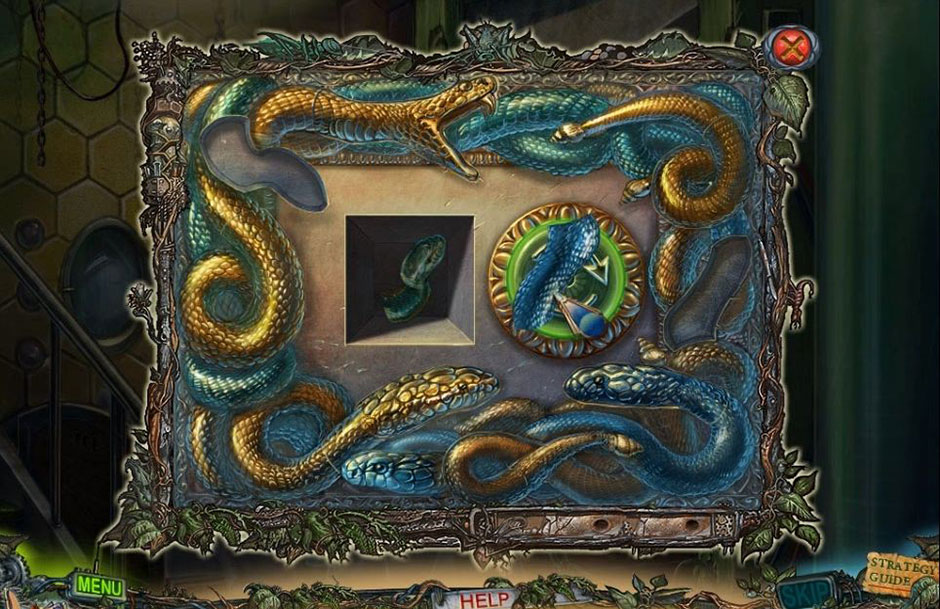
Twilight Phenomena – The Lodgers of House 13 – Snake Puzzle Solution
Keep talking to Dizzy and then go to the bed. Retrieve the Stone Sword and Pliers. Continue through the right door, remove the broken lever from the machine and place the Pliers on the stick. Go into the secret rituals room by using the Rope Ladder in the niche. Look at the female statue, place the Apple in her hand, and retrieve both the Apple Slice and Stone Cobra. Place the Stone Sword in the next statue before heading back to the lab. Place the Apple Slice on the apple. Look in the jar to activate the next puzzle. Move the plants to retrieve the Iron Monkey.
Twilight Phenomena – The Lodgers of House 13 – Iron Monkey Solution
Look in the small fish tank and place your Fish in the tank to play the next puzzle. Match the environment to the fish. Receive the Aromatic Oil from the game and go into the secret rituals room.
Place the Iron Monkey on the hand and retrieve the Green Cobra. Place the Aromatic Oil in the snake’s mouth and the melted gold. Look for a clue on the wall. Place the Gold Cobra and Green Cobra on the device to initiate the final puzzle. Move the cobras around following the clues along the wall. When you have them in the correct order, push the button and solve the mystery.
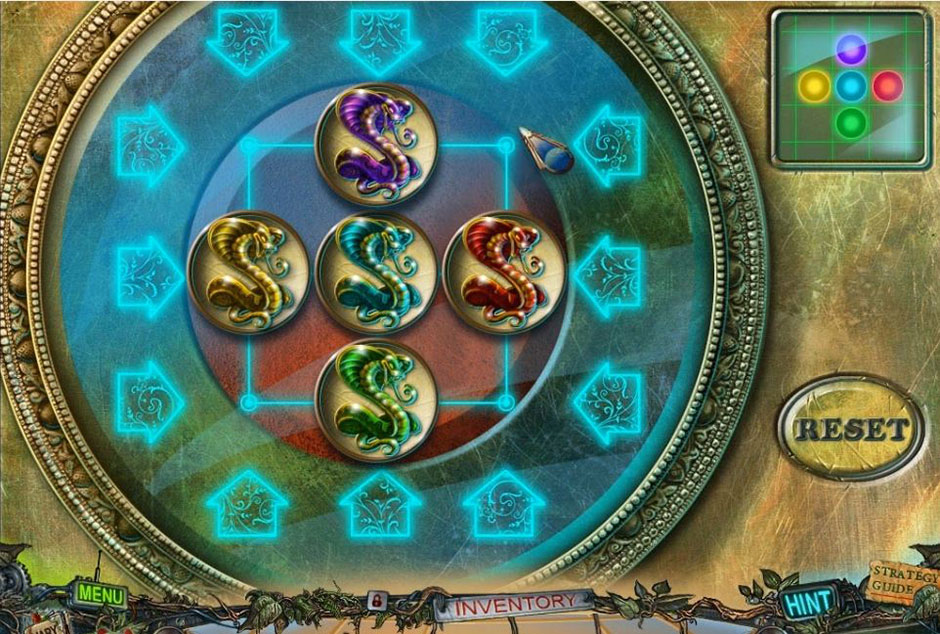
Twilight Phenomena – The Lodgers of House 13 – Cobras Solution
Once you have solved the mystery, you are free to leave the mansion. The victims of the villain are free as well. The mansion will go back to normal and Dizzy can live her life as freely as she wants. Or can she? Congratulations! You have survived Twilight Phenomena – The Lodgers of House 13. This comprehensive walkthrough has shown you the necessary hints to survive the evil that lurked there.
For more great tips and tricks, visit our blog!
Delicious – Emily’s Hopes and Fears Walkthrough
The Twilight Phenomena – The Lodgers of House 13 Walkthrough is meant as a guide and does not contain cheats, hacks, or serials.