Stoneville is in peril! The evil Stone Queen is terrorizing the town, turning all its residents to stone and ruining what was once a prosperous mining community. Search the city for clues, travel to the underground Stone Castle, encounter ice wolves in an enchanted forest, and save the day!
Grim Tales – The Stone Queen is a hidden-item adventure game. Use your mouse to move from place to place and search the area for helpful items. Complete hidden-object scenes to get important items, and complete challenging puzzles to move forward through the story.
This walkthrough covers the game in its entirety, but is not a straightforward path to the end. There are many other ways to complete the game, and you can do it on your own if you follow the advice in the Tips and Tricks category.
Contents
General Tips & Tricks
Gameplay
The mouse is used for everything in this game. There are four types of cursors:
The Blue Arrow is the standard cursor. It doesn’t mean anything, and it can be changed in the Options menu. It may also show that you can walk in a certain direction.
The Hand with Gears implies that an action can be performed.
The Open Hand shows that an object can be picked up and put into the Inventory.
The Magnifying Glass implies that you can take a closer look at an item or area.
There are several tools available to help you on your quest.
Click the Compass on the bottom right to access the map. This can be used to fast-travel back to a location. However, it is recommended that you walk through each screen, in case you see something you’d missed before.
The Blue Crystals at the bottom left are the Hint button. Click this to show a hint, what to do next or where an item might be. The Hint button recharges slowly and disappears entirely in Hardcore mode.
Sparkling implies that an item or area on screen is important. It disappears entirely on the hardest difficulty.
Your Inventory is at the bottom of the screen. Items you collect throughout the adventure are stored here for later use.
Throughout the game, you will encounter Hidden-Object Scenes. In these scenes, search and collect every item in the list at the bottom. Some objects have multiple steps. For instance, you may need to assemble an item before it can be collected, or you may need to look inside a container.
You will also encounter many puzzles. On all but the hardest difficulty, puzzles can be skipped after a certain amount of time has passed.
Tips and Tricks
This is a hidden-object game. Remember to look absolutely everywhere and collect any item you can find. You will need every single item available to save Stoneville.
There is a great deal of backtracking needed to finish the game. Always remember to return to previous screens and keep and eye out for any subtle changes there. For this reason, it is recommended that you travel screen by screen, instead of using the fast-travel feature on the map.
There is no shame in using the Hint button. It can be a great help when you are stuck. Don’t forget about it.
Be patient and have fun! There is no time-limit and nothing bad will happen if it takes you fifteen or fifty tries to get past a certain puzzle.
Grim Tales – The Stone Queen Walkthrough
Chapter One
After the opening scene, in which you watch a helpless, living woman be turned to solid stone and learn the history of Stoneville and the Stone Queen, your quest begins with you near your unusable car.
At the Stoneville Gate, open the driver’s door and take the Screwdriver from the dashboard. Use it to remove and gather the Screws. You will also need the Coin. Then, check the paper on the ground near the gate and find the Bronze Button with a number 9 on it. Find the brochure and take the Mine Key out of it. Zoom in on the cabinet door and grab the Drill Bit. Now you can use the Mine Key to open the door for the first hidden object scene. Find all the items and claim the Pincers as your reward. You can now use the Pincers to break the chain on the gate and enter the town!
The Town Square is chaotic! That poor uniformed man is made of solid stone! The town is in disrepair. Such a sad scene. Grab the Statue Head Piece and the Battery out of the leather bag, then read the journal and take two Coins from its pages. Find the Oil Can behind the sign on the gas pump, and go back out to the Stoneville Gate.
The stone woman is holding a Flower in her hand, but you can’t get it out! Use the Oil Can to lubricate her stone fingers and take the Flower. Go back to the Square.
Time to save the stone guard. Place the Flower in his chest, and free him from his bonds. When he leaves, you will see a hatch under him. Open it up and take the Stone Lizard. Place the Lizard in his spot on the drilling machine and take the Coin. In the salesman’s stall there is a coin slot. Place all three Coins in the slot and then find all the pairs of items in the pile. There is no pair the to Coat of Arms, so let’s take it! Head back to the Stoneville Gate.
Place the Coat of Arms in its spot on the sign, and a Stone Frog will be revealed to you. Grab it and go back into the Town Square.
Place the Frog in the drilling machine to start a puzzle. The object of this puzzle is to place the four different-colored stars onto the grid so that no beams hit a star of a different color.
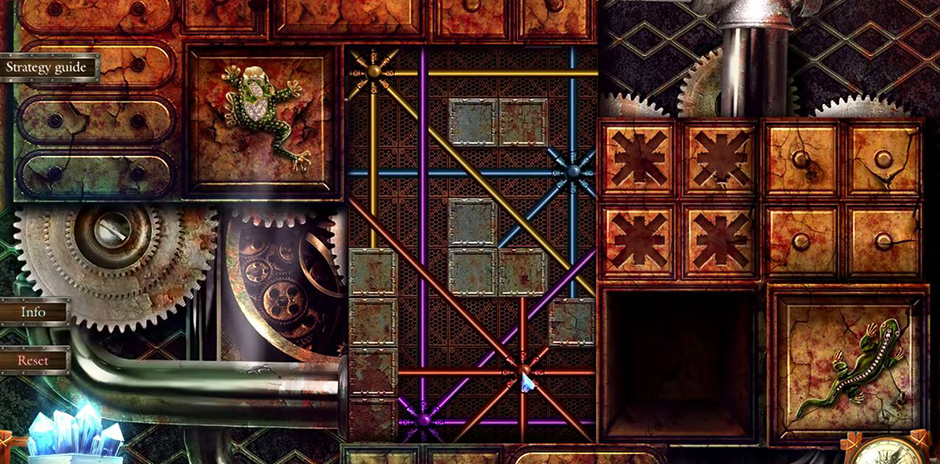
Grim Tales – The Stone Queen – Frog Puzzle
In the Town Square, walk forward.
Oh my gosh the path is blocked! You need to drill through that crystal to continue. Take the broken drill bit out of the rock drill and place the good Drill Bit in the machine. Use the rock drill the open a path through the crystal. Head forward to the Hospital Door.
Look at the paper in the window. Grab the Monocle and the Emerald. Have a look at the door. There are three monkey heads. Place the Monocle on the proper monkey head to reveal a Toy Monkey Head, which you should pick up. Go back to the Square.

Grim Tales – The Stone Queen – Monkey Head
In the vendor’s stall, there is a broken monkey toy. Repair it using the Toy Monkey Head, and take the Spider that appears. Put the Spider on the hatch to start another puzzle.
The object here is to move the spider so that he walks on all strands of the web without repeating any strand. Go to the top-left notch, then follow the edge two places counter-clockwise. Go back up to the top-left notch, then right one, then back to center. Travel left, then counter-clockwise one notch, then back to center. Go right, then to the top-right notch, and then clockwise three notches.

Grim Tales – The Stone Queen – Spider Puzzle
Complete the hidden-object scene under the hatch to receive the Earring. Head back to the Hospital Door.
Put the Earring on the proper monkey head and find a Bronze Button with a number 6 on it. Place the Bronze Buttons on the keypad in the drain to start another puzzle.
For this puzzle, the answer is carved in stone under the grate. Just dial the buttons in the order shown to open the grate and take the Fang.
Grim Tales – The Stone Queen – Keypad
Put the Fang on the final monkey head and enter the Hospital Hall.
Talk to the gentleman in the suit and hat, and he will give you a Card. Take the Blue Crystal and the Camera from the man in the crystal and then find the Cross-Shaped Key on the table. You may want to read Brandon’s note and have a look at the photo he is holding before you go back outside.
At the Hospital Door, use the Cross-Shaped Key to open the luggage compartment on the bus and take the Jack and the Gas Can. Back inside.
Use the Jack to raise the bars on the window so you can reach the Scalpel, which you can then use to cut the rope and grab the Oil Lamp. Exit the Hospital.
Use the Scalpel to remove a loose brick and find a Piece of Amulet. Cut open the luggage and take the Funnel. Head back to the Square.
Use the Card to fill up the Gas Can and go on back to your car.
Fill up with gas and place a Brick on the gas pedal. Boom! You smashed your way into the mine!
Place the Oil Lamp on the table, grab the Handsaw, and find all the objects on the trolley to receive the Coil with a Hook. Go to the Square.
Use the Coil to open the shop’s window and find a Piece of Amulet under the television. Go back into the Hospital Hall.
Saw open the medicine chest and take the Sal Ammoniac. Pour that into the bucket and take the Ammonia Rag. Place the two Pieces of Amulet in the card catalog for another puzzle.
This puzzle is randomized, but the main idea is to open continuous blocks of drawers in either rows or columns based on the number that are not crossed out. Take the Stone Flower. Head back to the Mine.
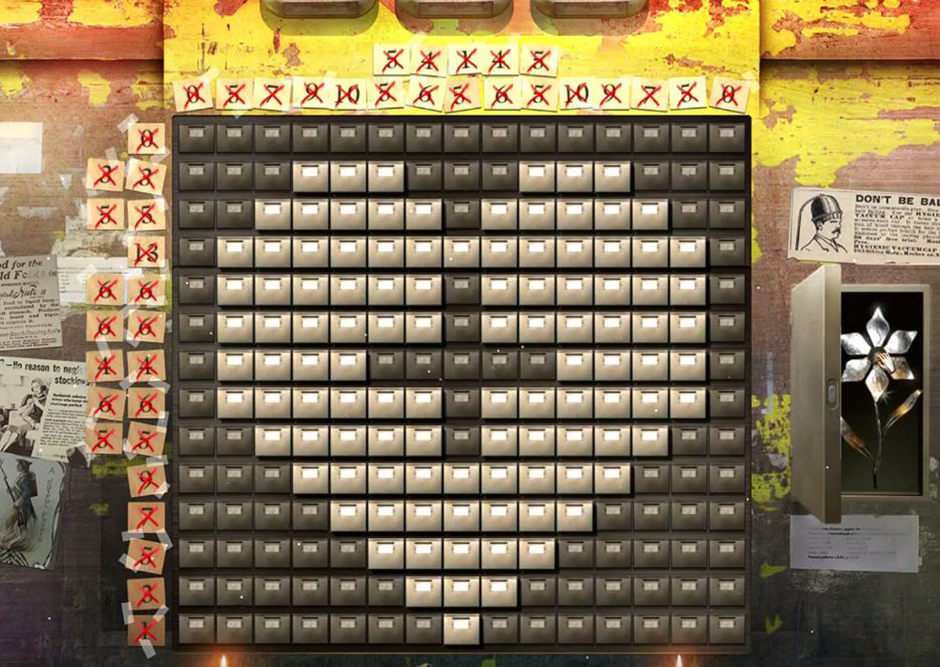
Grim Tales – The Stone Queen – Drawers
Free the miner the same way your freed the stone guard, and take his Pickax in thanks. Use it to open the cracked wall. A troll! Oh my! Use the Ammonia Rag to knock him out. Go on to the Castle Gate.
Find the Diamond and the Valve and go back to the Mine.
Use the Valve to open the compartment and take the Amulet. Go back to the Castle Gate.
Use the Amulet on the place where you found the Valve to open the door and take theHeart Key. Go all the way back to the Square.
Use the Heart Key to open the box in the vendor’s stall and take the Stone Queen Emblem and the Relief Jewel. Go back to the Castle Gate.
Install the Stone Queen Emblem and talk to the Goblin. Have him widen the crack to the left of the gate and find the 9 Button. Place the Jewels on the gate and take the 3 Button and the 4 Button, then go back to the Square.
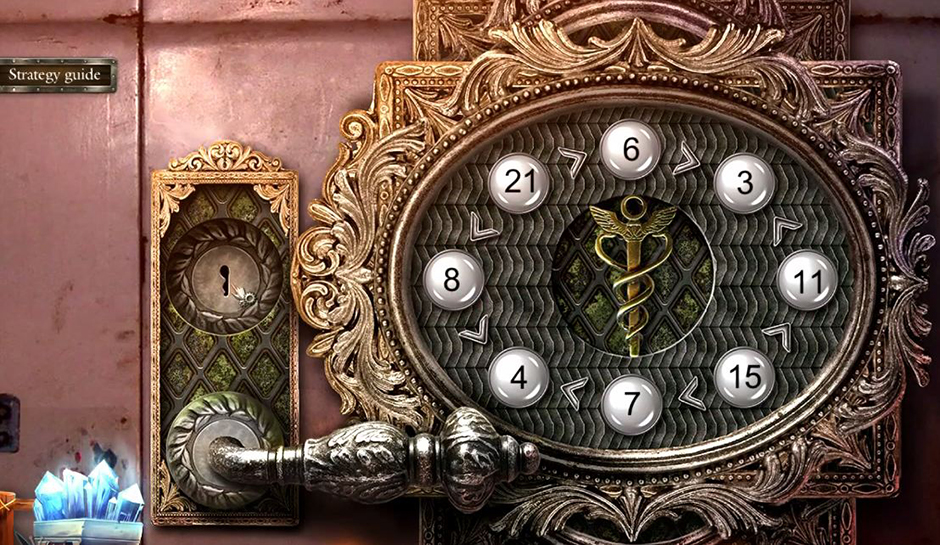
Place the Buttons on the keypad by the television and then press the buttons in the order written above the keypad. Take the Net back to the Castle Gate.
Fish the Jewel out of the water and place it in its slot on the gate. In the puzzle, move the pearls across the board. Place a pearl on a gemstone to open a gate of the same color as the gemstone.
Go into the Castle.
Chapter Two
At the King’s Tomb, have the Goblin destroy the bear so you can get the Sword. Earn the Golden Orb, and then give both items to the king in the sarcophagus in exchange for the Coat of Arms and the Letter. Take the Handle from the painting and then take a picture of it. Use the Coat of Arms on the hidden door to start a puzzle.
In this puzzle, you move your pieces, the Warlock, the Archer, and the Warrior, to the end of the board. Destroy the creatures along the way and take the gold. At least the Warlock has to survive.
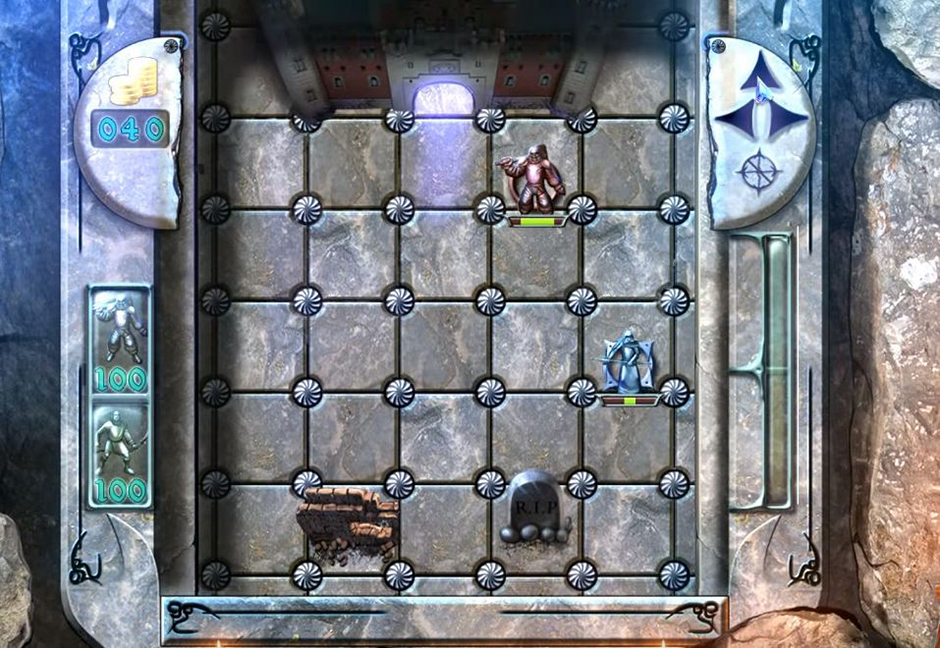
Grim Tales – The Stone Queen – Warlock
The ferryman will want a Potted Sprout. Get a flower from the flowerbed at the Hospital Door into the Pot and give it to the ferryman so he will take you to Stone City.
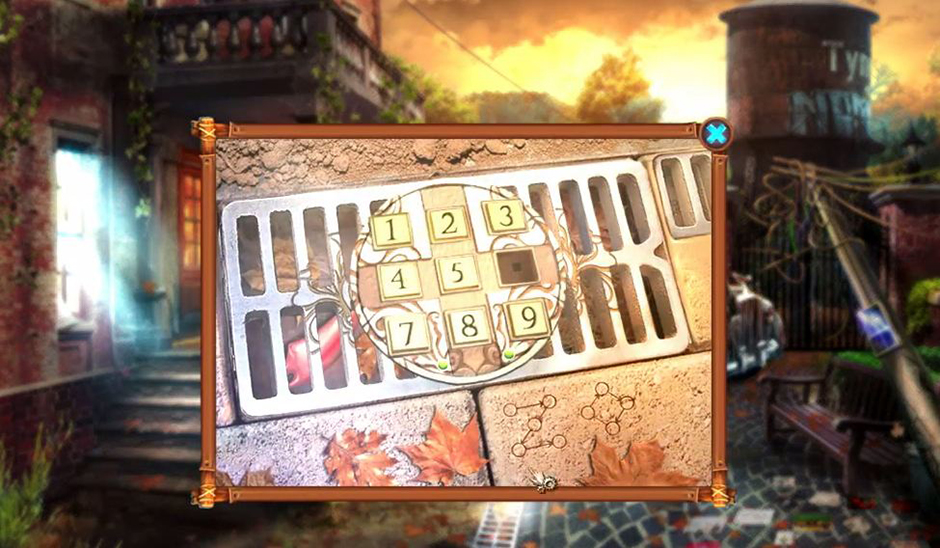
In Stone City, place the Three on the mailbox for another puzzle.

Grim Tales – The Stone Queen – Mailbox Puzzle Solution
This is a long, hard, randomized puzzle, but it is a lot of fun if you have the endurance. Move the numbers until they are in order. Then, take the Bronze and the Statue Head Piece. Use the Statue Head Pieces to open the basement and complete the hidden-object scene to receive the Rubber Glove.
Once in the Water Tower, the Goblin can tear up the floor, revealing the Bronze and the Fire Cabinet Key. Get the Mallet from the cabinet.
The trader will give you the Chisel for Bronze, the Stem for Silver, and the Wrench for Gold.
Use the Mallet and Chisel to sculpt a Golem’s Hand from the crystal and attach it to his body. Continue forward.
The woman at Stoneville Gate can be saved using the Ruby Flower. She will give you the Ambulance Keys.
On the back of the ambulance is another puzzle. The signs between the numbers are ‘greater than/less than’ symbols. Select two numbers to trade their places, and place them so that every ‘greater than/less than’ is true. Use the Ambulance Keys to open the door. Find $10 in the robe and cut the Key Card out of the pocket. Also grab the Hammer and the Pills. Cut through the window to get the Silver. Open the medical kit with the Key Card and take the Tweezers and Oil.
Grim Tales – The Stone Queen – Ambulance Solution
The mayor can be saved with the Stone Flower, which is earned by returning the Hammer to the blacksmith and placing the Petals and Stem on the anvil.
To repair the king statue’s face, you need to get the Nose from the mole by trading him the Flashlight, the Ears from waking the bat, and the Eye, which is simply found. Place the Photo next to the king statue to start a puzzle. Adjust the statue’s face to match the photo, and it will open up. Take the Scepter and give it to the Golem on the castle door. Head into Stone Castle.
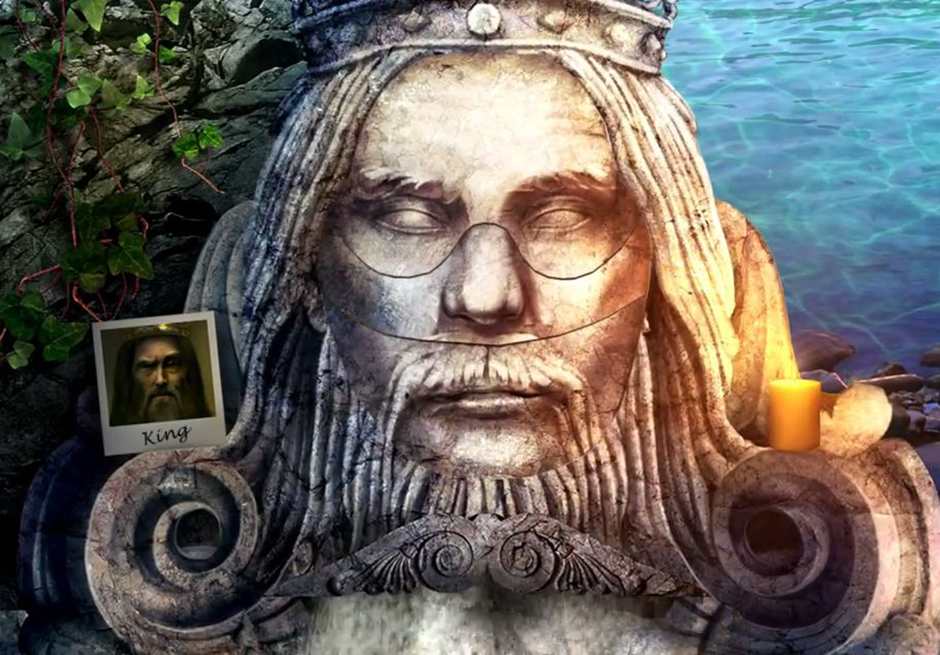
Grim Tales – The Stone Queen – King Statue’s Face
Chapter Three
Finally you get to meet the Stone Queen! She stands before you, guarded by two huge stone men. Find the Topaz and the Molecule and then give the Queen the Letter. Take the Letter of Powers and go to the Waterfall.
Find the first Head by the Waterfall, and the second by winning the claw game in the Water Tower. Place the Heads on the Waterfall door to start a puzzle. Moving on head may also move another, and you need to get them all aligned in the center. Try this order: Goat, Cat, Rabbit. Go through the door into the Halfling’s House.
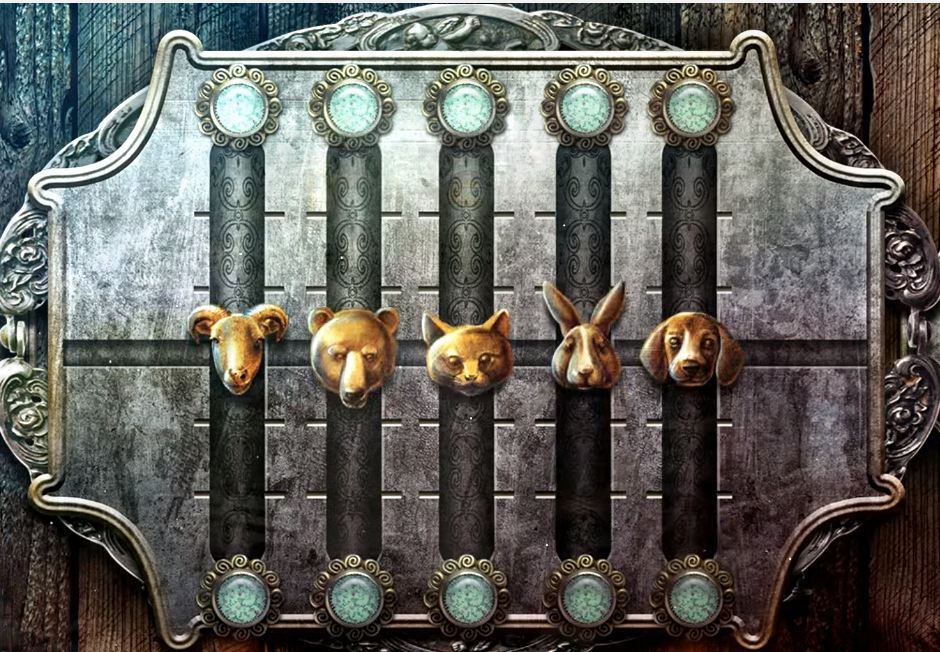
Grim Tales – The Stone Queen – Animal Heads
Deliver the Letter of Powers, then check in the stove. Read the directions.
Find the Coal in Stone City, and have the Welding Mask repaired by the blacksmith.
Find the Crescent Tile in the Halfling’s house, then use it on the calendar for another puzzle. Change the date to that which is carved on the calendar and then press the green button.
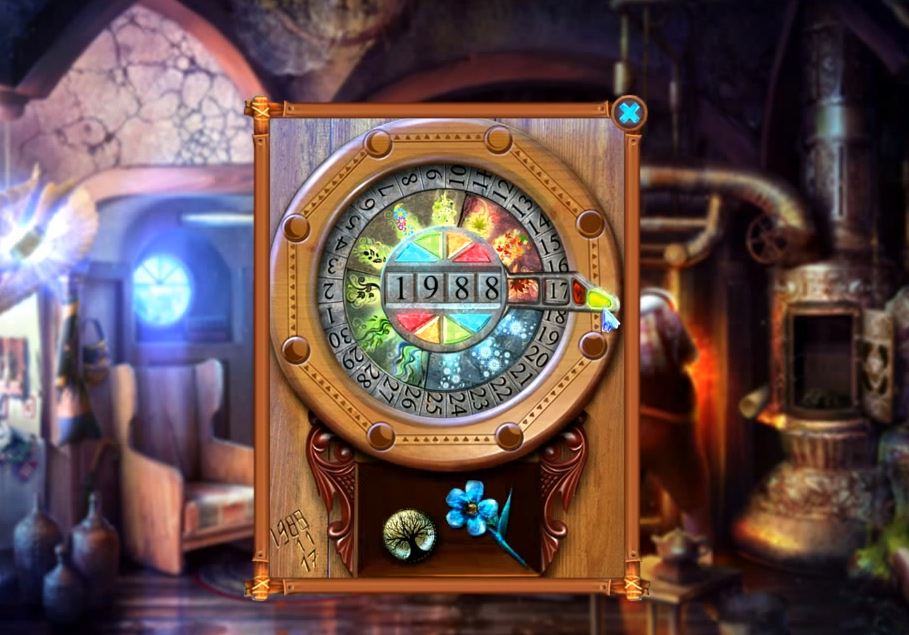
Grim Tales – The Stone Queen – Calender
Free the stone man in the Carnival Room using the Servant’s Stone and he will give you the Hex Key. Use the new Key to get a Red Light Bulb from the ambulance, and use the Bulb to develop the Photo in the Carnival Room.
(picture of the photo development area would go well here)
The Photo shows the combination to the bus locks. In the Bus Laboratory, mix the Valerian with the Milk and the Pills in the blender.
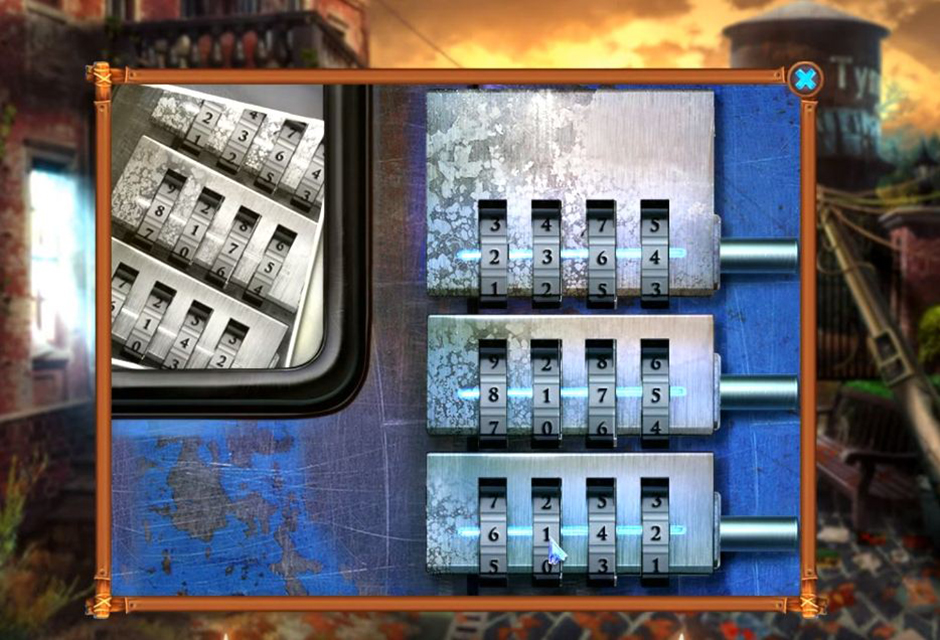
Grim Tales – The Stone Queen – Locks
When you have lighted the halfling’s stove and repaired the pump, take the Knowledge Amulet.
The solution to the rune puzzle by the Waterfall is: Tree, ax, man, logs, ship.

Grim Tales – The Stone Queen – Rune Puzzle Solution
The Goblin can open the statue’s head in the Old City.
The bird in the Halfling’s House changes the Ruby Heart to a Crystal, which is put into the statue’s eye in the Old City after you’ve used the Slingshot to scare away the bat.
Take the Rifle Stock to the Carnival Room to start a rifle-building puzzle. Use the flashing hints as a guide for this puzzle. Insert the Ampule, the combined Sleeping Potion and Syringe, into the Rifle.
Shoot the monkey and free the goblin.
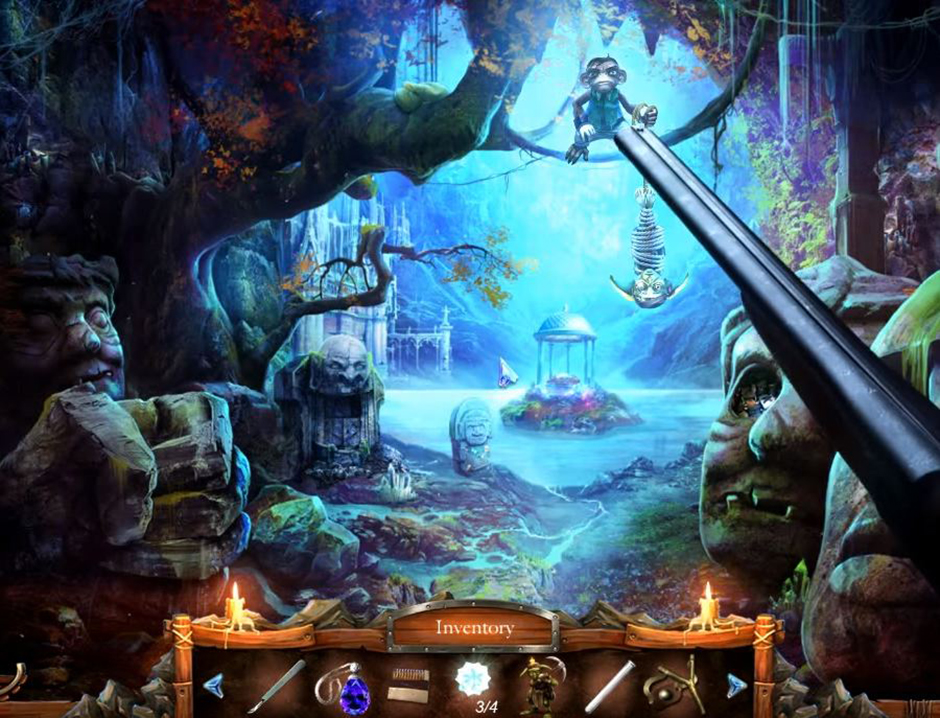
Grim Tales – The Stone Queen – Shoot The Monkey
The Spider Amulet operates a puzzle in the Laboratory. In this puzzle: Look at the numbers on the left, and then press the triangle that lights those three numbers up. This puzzle is randomized, but give it your best.
Grim Tales – The Stone Queen – Laboratory
The octopus puzzle in Old Town requires four Stars. One was found in the spider amulet puzzle, one was in the carousel, one was statue’s mouth, and one was in the halfling’s stove. This puzzle has a clue in the upper right corner. Put the tentacles in order according to the red tentacles in the clue.
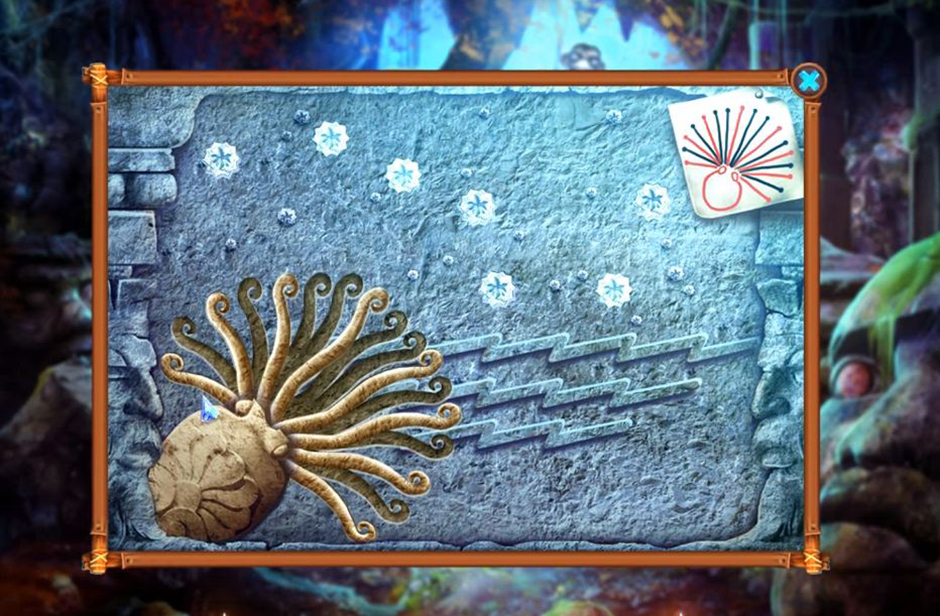
Grim Tales – The Stone Queen – Octopus Puzzle
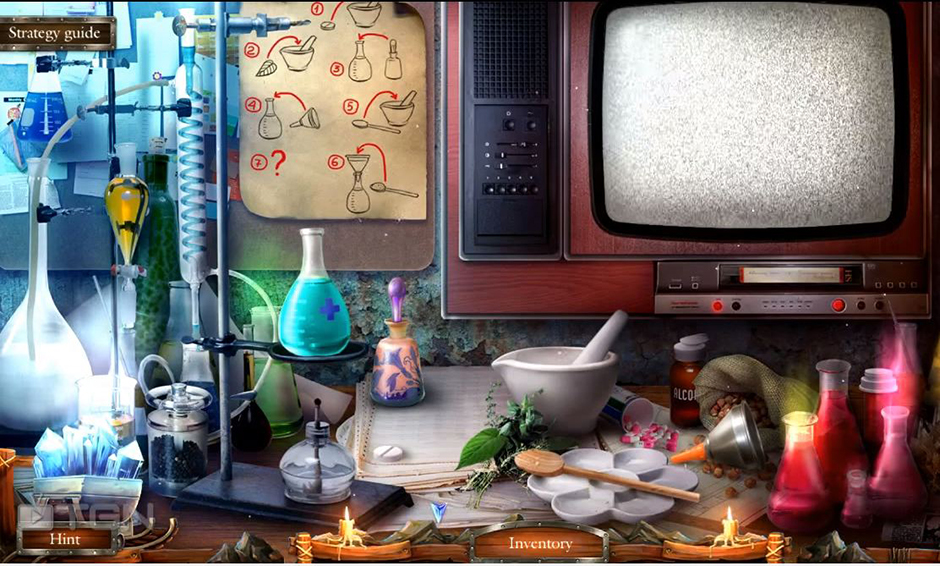
Once you’ve collected the Pollen in the Test Tube, go back to the Laboratory to make the Healing Potion. The Videotape should help walk you through it. Put the tablet and leaf into the mortar and pestle, use the dropper on the flask, place the funnel in the flask, use the spoon on the mortar and pestle, then stir the flask, then use the pollen on the flask. Give the Healing Potion to Brandon, in the Hospital. Meet him where you got the pollen.
Chapter Four
Take the Fur Coat to the mole in the forest. Find the Bone under the Foliage and give it to the dogs in Stone City. Dig up the Whistle and use it to get rid of the wolf in the forest. The Goblin can get in the den.
Stack Lumber and Foliage under the scarecrow and light him on fire. Get the Palette Knife from the tent. The blacksmith will repair the Bent Saw Blade, which can then be used to repair the Chainsaw. Use the Chainsaw to clear the log from your path.
Use the Palette Knife to clear away the moss on the golem and insert the Queen Amulet. In this puzzle, connect all of the Molecules so that all the connections are used.
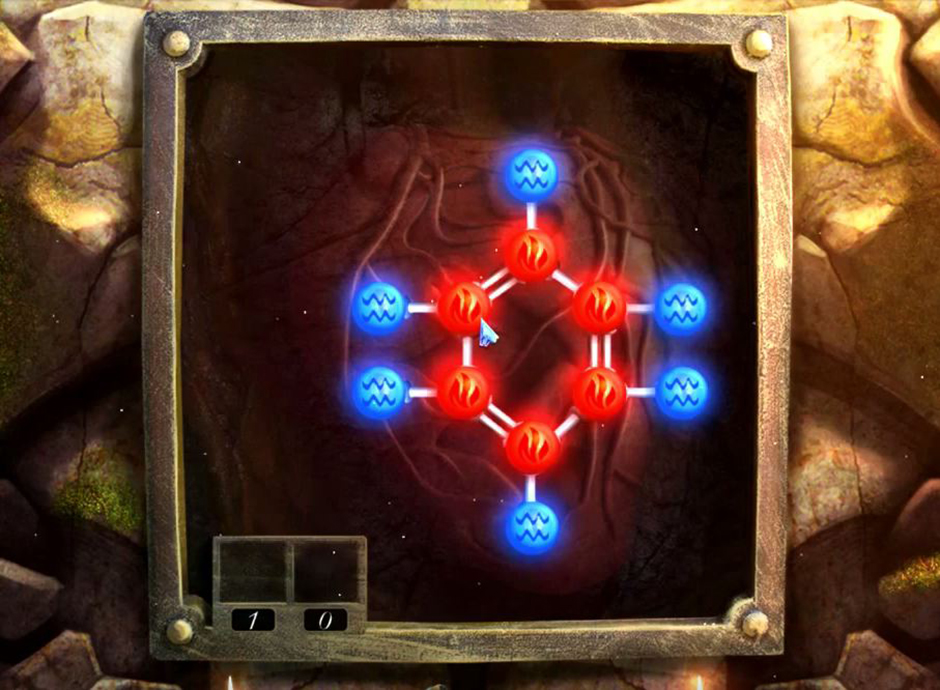
Grim Tales – The Stone Queen – Molecules
Get the Windup Key and the Gaff from the Square before going back to the Old City. Get the Glove out of the tree, then go to the Forest’s Edge and windup the doll to get the Biker Amulet. In the Forest, use the Palette Knife to pry the Sparkplug from the skull’s mouth. Wear the Glove and pick up the Petal.
Back in the Hospital, use the Biker Amulet to open the pocket and take the Jacket. Go to the Square and find the last Emerald. Use the Glove to get the Petal out of the broken glass, then cover the broken glass with the Jacket. Grab the Net Gun from the excavator.
In the Water Tower, shoot the blue monkey with the Net Gun, then find the last Topaz and the third Petal. The Diamonds, Topaz, and Emeralds start a puzzle in the Stone Castle. This puzzle is essentially the same as Candy Crush, simply swap the gemstones to make chains of three or more until the meter fills up.

Grim Tales – The Stone Queen – Gems Puzzle
Equip the Goblin with the Pickax. The Titanium Goblin can break through the wall by the Water Tower.
Find the Plunger and the Nozzle before returning to the Water Tower. Use the plunger to empty the sink and get the Cabin Key. Attach the Nozzle on the Fire Hose and the pick up the Hose. Take the Mug, too.
Use the Palette Knife on the tree at the Forest’s Edge and collect Pitch in the Mug. Go back and attach the Fire Hose to the Firetruck, and plug the hole in the pipe with Pitch. Turn on the valve and open up the truck with the Cabin Key. Repair the wires with Insulating Tape. Look under the hood and place the Sparkplug in the engine. Start up the truck. Start the pipe puzzle on the side of the truck. Swap pipes until they are all connected. Use the Glove to pick up the fourth Petal.
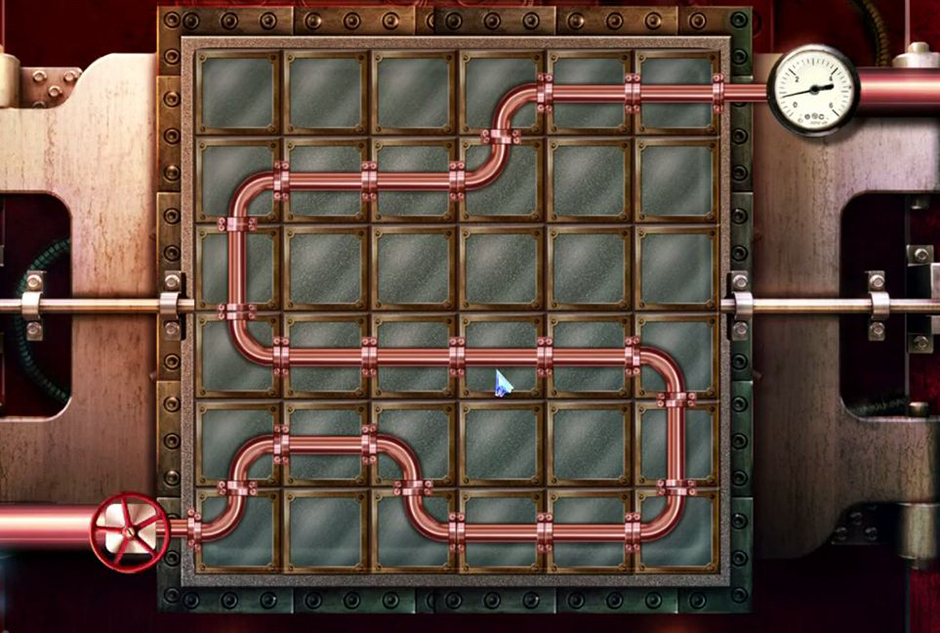
Grim Tales – The Stone Queen – Pipe Puzzle
Run back to Brandon! Place the four Petals on the stem and then use the Blue Crystal on the flower.
You’ve saved the day! Congratulations, you’ve completed our Grim Tales – The Stone Queen Walkthrough! What a hero!
For more great tips and tricks, visit our blog!
This Grim Tales – The Stone Queen Walkthrough is meant as a guide and does not contain cheats, hacks or serials.