The “Haunted Halls” games are known for their creepy, atmospheric artwork and haunting stories. If a good Halloween tale is what you want, then you have definitely chosen the right game. “Haunted Halls – Fears from Childhood” will place you up against the evil Blackmore. With Tim, a young boy and your sole ally, you must travel the haunted passages of Blackmore’s domain to free trapped children.
Contents
General Tips and Tricks
A few tips and tricks never go amiss. The rules of “Haunted Halls” are fairly easy to remember, but sometimes a simple mechanic will be looked over. While playing, remember the following:
- The eye is your friend. He can zoom in if needed.
- Many objects will be added automatically to your inventory.
- It is not necessary to complete hidden object puzzles. Make sure you find and take the item if it is indicated in the guide.
- The Hint button must recharge between uses.
- You can always use the strategy guide button for extra help.
- Paths and doors may be blocked off or hidden at first.
Haunted Halls: Fears from Childhood Walkthrough
Chapter 1: The Metro
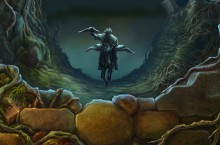
You will be in a broken metro tunnel surrounded by an eerie cosmos. Advancing forward will bring you into the midst of terrors unknown, and this is your last chance to turn back before it is too late.
- Click on the ghostly girl.
- Take the pickaxe on the top right.
- Take the suction cup on the bottom left.
- Zoom in on the pipe near the center left.
- The pick will break the pipe.
- Place the suction cup on the pipe.
- Travel to the distant door and place the suction cup on the door.
- Travel through the door.
- Select the television and listen to Blackmore.
- Select the ground and take the tile.
- Select the table and take the tile.
- Select the cabinet to open a hidden object puzzle!
The puzzle requires you to find numerous hidden objects within the scene. Only a few of them are tricky. However, if you get stuck, refer to our solutions image.
Haunted Halls Fears from Childhood Wrench Location
- Take the lighter to the pipe and take the smoking pipe.
- Select the pot and take the gopher.
Go to the escalator on the right and select the lever.
- Take the fishing rod to the right of the bridge.
- Select the ground and take the lever.
- Select the birdbath and take the tile.
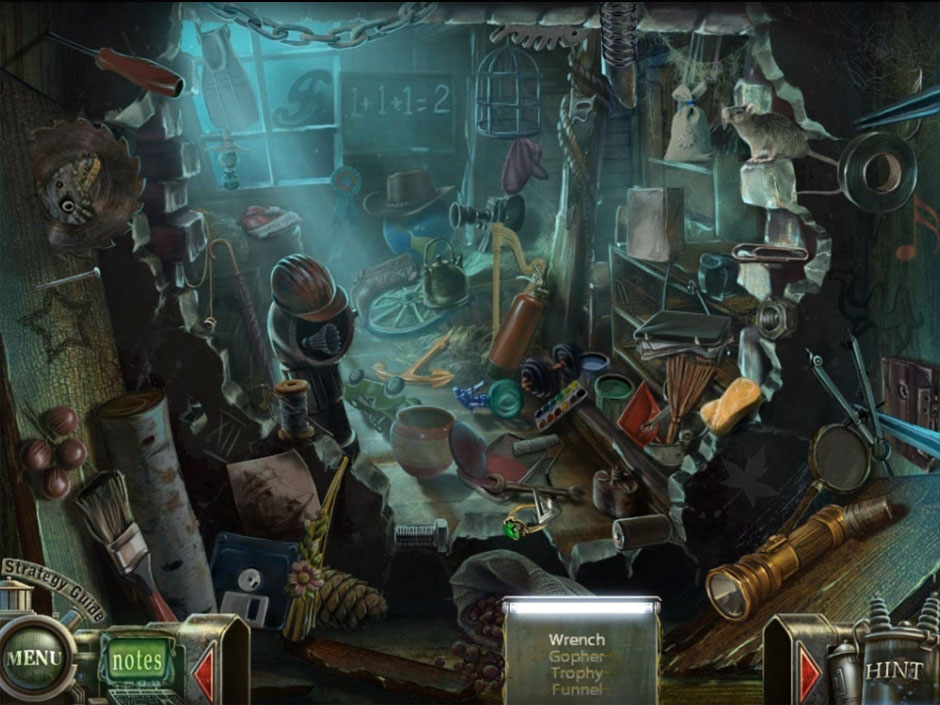
- Select the cave and begin a new puzzle!
The object is to move the stalactites and stalagmites into place. Right-click to rotate them, and click and drag to drop them into the correct place.
Haunted Halls Fears from Childhood Stalactites Puzzle
- Take the escalator lever when the puzzle is complete.
Travel down once.
- Select the left escalator and place the escalator lever.
- Pull the lever.
- Select the ground and take the broken bottle.
- Select the box on the ledge and a tentacle will take the package.
- Select the right wall.
- Use the fishing rod to grab the fallen package.
- Open the package with the broken bottle.
- Take the tile and the book far below.
- Select the crane device.
- Place the lever in the slot.
- Pull the lever for the scaffolding to rise.
- Place the lever in the slot.
- Select the scaffolding.
- Take the squeegee and tile.
- Select the satellite dish.
- The wrench can be used on the four nuts. Take the antenna.
Travel down twice.
- Select the pipe.
- Place the squeegee on the water and take the wet squeegee.
Travel forward once.
- Select the escalator on the right.
- Select the wall on the right side.
- Take the pick and hammer the stones.
- Select the mica, and use the wet squeegee on the mica three times.
- On the lower left corner, hammer the stones twice.
- Take the tile.
Travel down once.
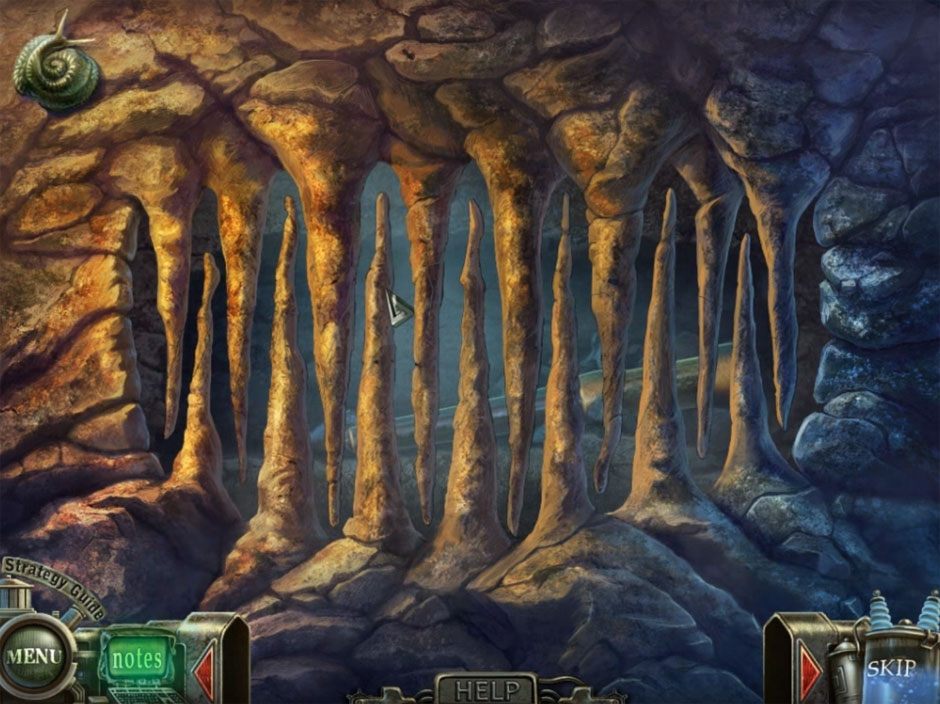
- Select the back door. Place all seven tiles to begin a new puzzle!
The puzzle can be completed by clicking the tiles to generate an image of the five missing children. Refer to our solution for the correct placement of each tile.
Haunted Halls Fears from Childhood Child Tiles Puzzle Solution
Travel through the door.
- Select the door in the lower right corner.
- Place the book on the door.
Travel through the door and into the next area.
Chapter 2: Boy in the Tree
The next area is the forest. The forest is dark, misty, and full of creepy turns. Stick close to the guide to avoid getting lost.
- Complete the hidden object puzzle.
- The nippers are beneath several leaves on the left side of the screen.
- The worm is beneath another pile of leaves on the lower right.
- Make sure you get the hose!
Travel down the road.
- Take the branch.
Travel left once.
- Select the hollow tree and take the key.
- Select the door to the cottage.
- Use the key on the door.
Travel inside the cottage.
- Open the stove and complete the hidden object puzzle!
- Place the mustache on the bust.
- Take the mustached man.
- Place the flask on the snake.
- Take the poison.
- Make sure you get the pitcher!
- Take the chair leg.
Travel down.
- Select the barrel.
- Place the hose in the barrel hole.
- Place the pitcher at the base of the hose for fuel.
Return to the cabin.
- Select the chainsaw on the ground and take the screw.
- Place the fuel in the chainsaw.
Travel down twice and right once.
- Select the mushrooms on the left side to start a puzzle!
The object of the puzzle is to line up a board on top of three mushrooms until each of them are highlighted except for one.
- Grab the board to the right.
- Place the board so that three mushrooms are always in the holes.
- Select the board to light up the mushrooms.
- Right click the board to make it rotate.
- Use our solution image if you need help!
- Make sure you grab the final mushroom!
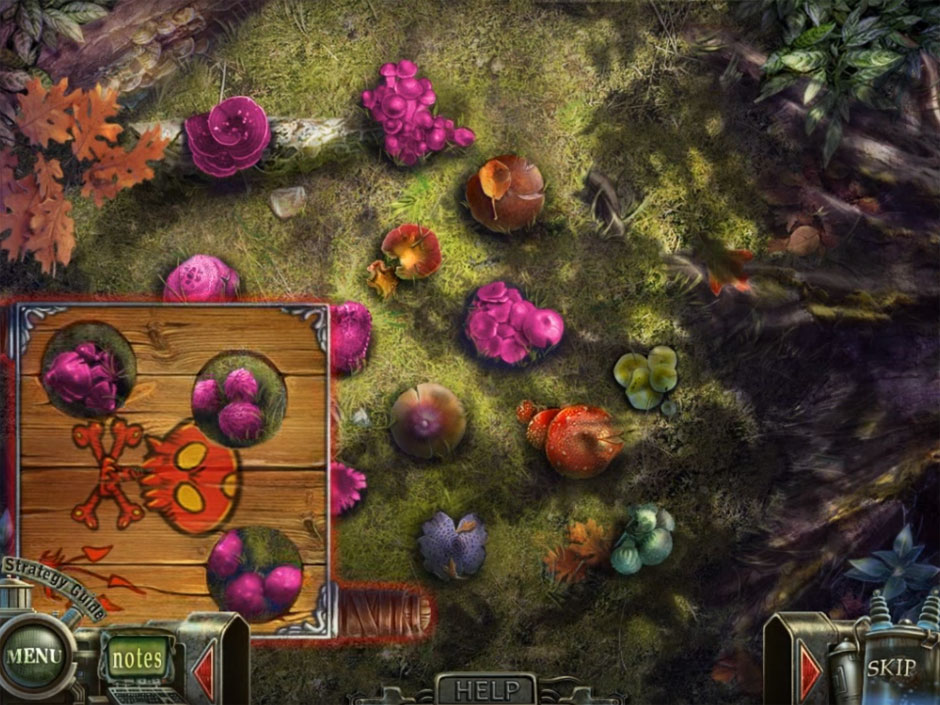
Haunted Halls Fears from Childhood Mushroom Puzzle
- The chainsaw will cut the tree on the road.
- Take the log.
Travel forward once.
- Select the left bushes.
- Move the leaves and take the hazelnut.
Travel down twice.
- Play the hidden object puzzle.
- Take the magnifier after moving the log.
- Take the handgun from the holster.
Travel left and to the cabin.
- Play the hidden object puzzle.
- Open the envelope with the dagger.
- The gavel will break the piggybank.
- Take the coin.
Travel down once.
- Select the squirrel.
- Take the claw.
- Give the squirrel the hazelnut and take the marble.
Travel down once.
- Select the hollow in the tree.
- Place the marble in the hollow to begin a new puzzle!
- The object is to knock all marbles off the board except for one.
- Refer to our solution image if you need help!
- Grab the apple.
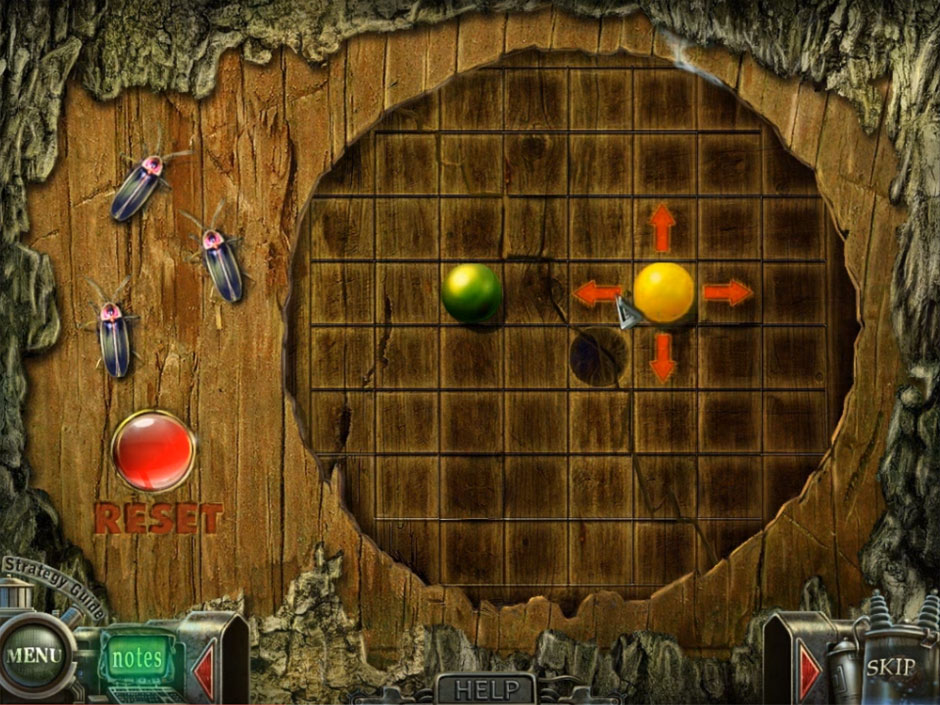
Haunted Halls Fears from Childhood Marbles Puzzle
- Select the porcupine.
- Give him both the mushroom and apple.
- Take the claw.
Travel right once.
- Select the tree house.
- Place the chair leg, branch, and bone in the ladder.
- Take the ladder once it falls.
Travel to the cabin.
- Select the bar.
- Place the claws on the bear’s paws.
- Take the light bulb.
- Place the log on the ground.
- Select the lamp and place the light bulb.
- Select the closet and remove the torch.
Travel down once.
- Select the gasoline barrel.
- Drop the torch into the barrel and take the fuel-soaked torch.
Travel down once and right once.
- Select the tree stump.
- Place the magnifier against the stump.
- Hold down the magnifying light and use it around the flaming edges.
- Place the torch into the fire and take the burning torch.
Travel forward once.
- Place the burning torch on the pile of leaves.
- Place the ladder against the tree.
- Speak with the boy.
- Take the book.
Travel down three times.
- Select the lower left door.
- Place the book on the door.
Travel through the door.
Chapter 3: Girl in the Toy Store
The toy store is an eerie place filled with haunted childhood memories. Never let your guard down while searching through the disturbing collection of toys.
- Finish the hidden object puzzle.
- Place the brush on the ball.
- Take the green ball.
- Place the screwdriver on the screw.
- Take the screw.
- Once finished, select the cake near the wall and begin a new puzzle!
The goal is to paint the cake’s sections so that no connecting sections are the same color.
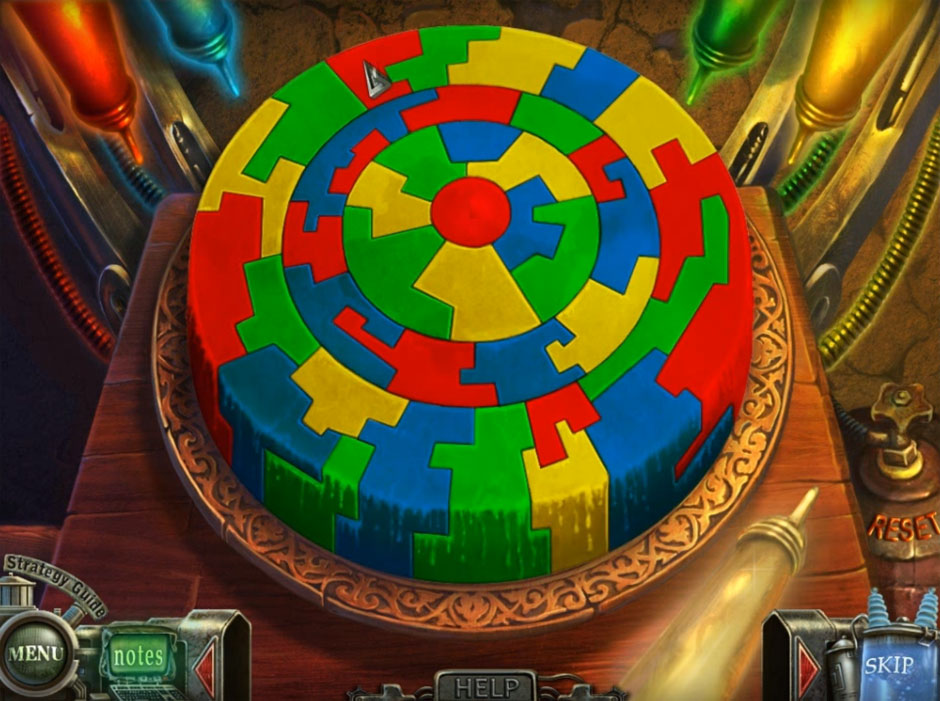
Haunted Halls Fears from Childhood Cake Sections Puzzle Solution
- Use the tube of paint by clicking it and applying the desired color to the cake section you wish to paint.
- When finished, take the cake.
- Select the cabinet and take the saber.
Travel through the far door.
- Select the model castle and take the ramrod from the wizard.
- Select the dollhouse in the right corner to begin a new puzzle!
- The object of the puzzle is to drag and drop the different people into their correct room.
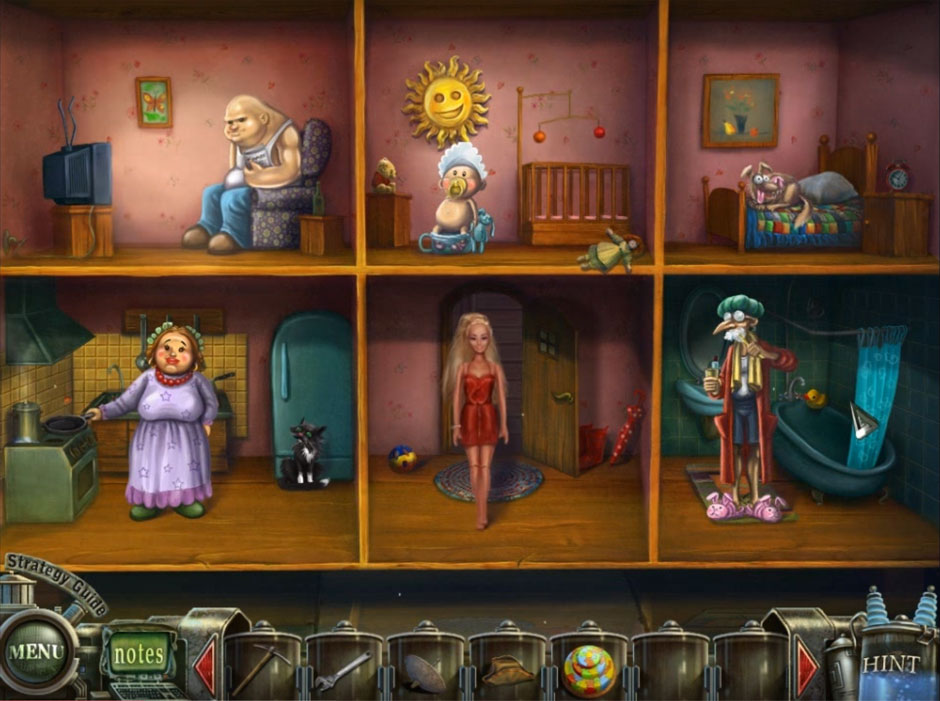
Haunted Halls Fears from Childhood Doll House Puzzle
Once finished, take the doll.
Travel through the back door.
- Select the shelf on the upper right side.
- Take the tin soldier.
- Select the robot on the podium.
- The wrench will remove the nut on top of the robot’s head.
Travel through the back door.
- Finish the hidden object puzzle.
- Turn the book page.
- Take the lion.
- Make sure you get the scissors!
- Select the open book on the left side.
- Note the equations if you wish.
- Select the bookcase in the back left.
- Open the book, use the scissors to take the metal segment.
Travel through the back door.
- Select the teddy bear.
- Take the eye patch.
- Select the doll.
- Take the pipe.
- Take the parrot.
- Drop the cake in front of the dolphin.
- Take the hat.
Travel down twice.
- Select the soldiers on the right side.
- Drop the ramrod near the soldier on the left.
- Drop the pipe near the soldier on the right.
- The soldiers will fire!
- Select the tank on the left.
- Take the cannonball.
Travel down once.
- Select the crane.
- Use the scissors on the rope and take the hook.
Travel down once.
- Finish the hidden object puzzle.
- Select the clock weights to take the XII.
- Use the spoon on the egg to take the chick.
- Make sure you get the angel!
- Select the cash register.
- The combination is 7283.
- Enter C if you need to start over.
- Select the handle to open the register.
- Take the coin.
- The combination is 7283.
- Select the table.
- Place the doll in the empty chair.
- Select the table beneath the doll’s hand.
- Take the ring.
Travel through the back door.
- Select the castle in the upper right corner.
- Place the angel on the left side.
- Take the holy water.
- Select the castle in the upper left corner.
- Drop the holy water on the demon.
- Take the sulfur.
Travel down until you reach the library.
- Finish the hidden object puzzle.
- Take the pelican and French horn.
- Make sure you get the bomb!
Travel down once.
- Select the castle near the top left.
- Place the eye patch, hook, metal segment, parrot, pirate hat, and saber on the pirate.
- Drop the bomb near the pirate when the soldier arrives.
- Take the plate.
Travel through the back door.
- Select the book on the display podium and zoom in.
- In a clockwise motion from the top right: drop the cannonball, sulfur, tin soldier, coin, plate, ring, and nut.

Haunted Halls Fears from Childhood Materials Item Puzzle
- Take the staff from the center.
Travel down twice.
- Select the castle on the left.
- Select the wizard.
- Drop the hat and staff onto the wizard.
- Take the emblem when the dragon leaves.
- Select the wizard.
Travel back to the party room.
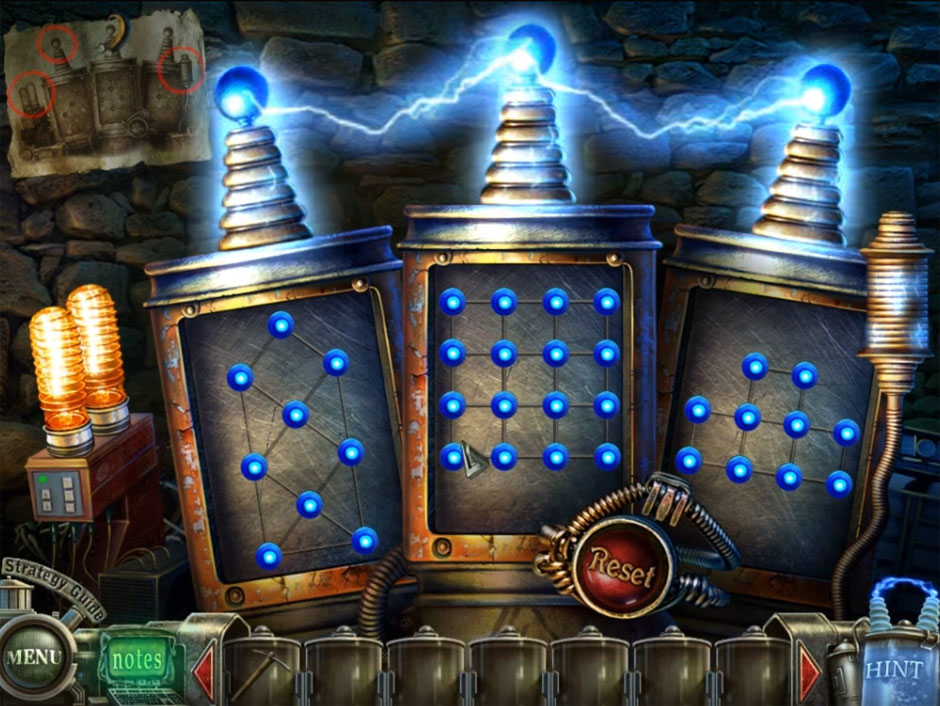
- Select the machine.
- Place the emblem in the coin slot.
- Click the red button to activate a new puzzle!
- Place the emblem in the coin slot.
To solve the puzzle, you must match the lights inside the machine with the lights that are displayed on the left grid. Entering a solution requires you to use the arrow keys. To test a solution, press the large, red button at the top right of the left grid. When a light turns blue, you have found the correct solution.
The four arrows, from top left to right, are labeled: W, X. From bottom left to right: Y, Z.
- To solve square A: Y twice, Z twice.
- B: Y twice, Z once, Y once.
- C: Z three times.
- D: Z twice, X once.
- Take the book and broken mirror.
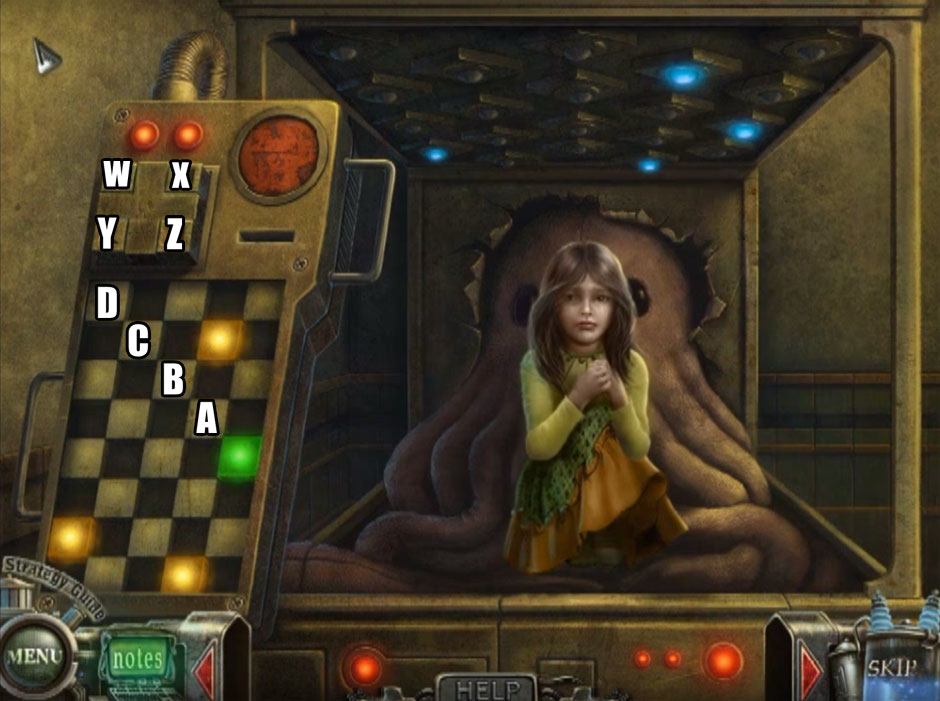
Haunted Halls Fears from Childhood Light Matching Puzzle
Travel out of the toy store.
- Select the second story door on the right side.
- Place the book on the door.
Travel through the new door.
Chapter 4: Boy in the Bedroom
The bedroom is plagued by the tentacles of the evil Blackmore. Rescuing the stranded boy will be no easy task.
- Take the paint can.
- Select the cabinet’s top.
- Use the scissors on the cord.
- Take the electrical cord.
- Select the underside of the bed to look beneath it.
- Place the cord in the outlet.
- Select the baseball to fill the hole.
- Take the jam jar.
- Leave the bed.
- Select the window in the center.
- Finish the hidden object puzzle.
- Take the doll from the open box.
- Take the bird from the sack.
- Make sure you get the shovel!
Travel down once. Travel through the window on the left.
- Finish the hidden object puzzle.
- Select the frozen flower and take the rose.
- Select the bird and take the crocodile eye.
- Make sure you get the tongs!
- The shovel will unearth the bowling ball from the mound of snow beneath the snowman.
- The pick will break the icicle on the upper right.
- Use the pick again on the fallen icicle to take the puzzle piece.
Travel down once and through the final window.
- Select the idol to begin a new puzzle!
The goal of the puzzle is to align the teeth in the correct order

Haunted Halls Fears from Childhood Teeth Tile Puzzle
- Use right click to rotate teeth.
- When the puzzle is complete, take the eyes.
- Take the axe.
- On the ground is the flask.
- Select the salamander and grab it.
- Drop the axe near the venus flytrap and let them eat it.
- Drop the jam jar in the lower left corner.
- Select the beehive and it will drop.
- Select the beehive again.
- Drop the paint can on it as well as the eyes.
Travel back to the window with the desert scene.
- Drop the flask over the tornado and take the bottle tornado.
- Drop the antenna on the building and place the broken mirror next to it.
- Select the antenna to begin a new puzzle!
The goal of the puzzle is to arrange the mirror shards in the correct order. Right click the shards to rotate them.
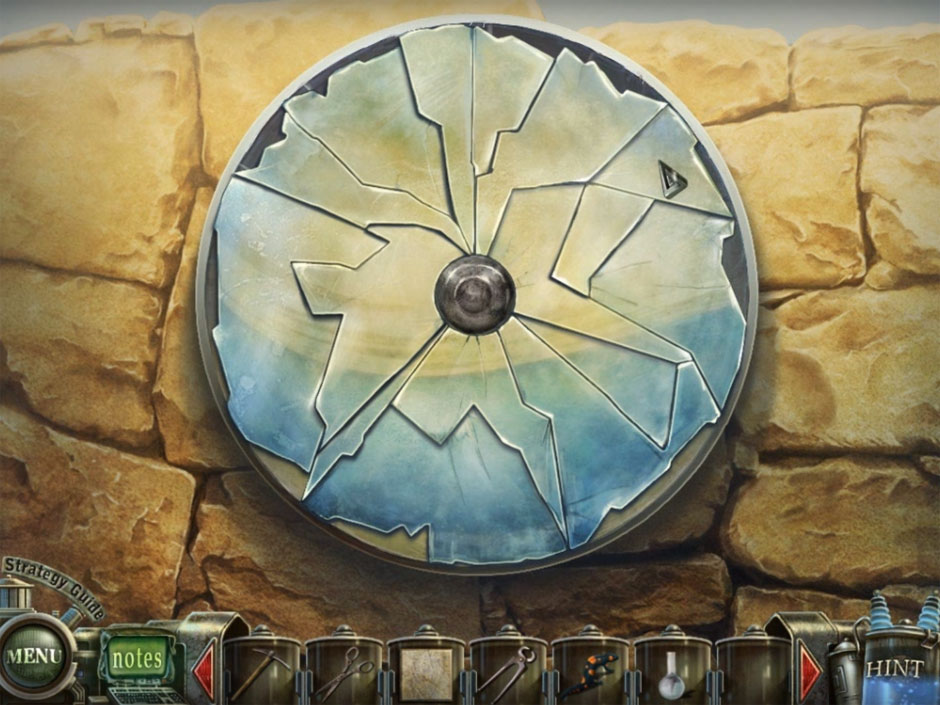
Haunted Halls Fears from Childhood Mirror Shards Puzzle Solution
- When finished, drop the salamander on the rock.
- Grab the fiery lizard with the tongs.
Travel to the window with the winter scene.
- Drop the fiery lizard on the snowman.
- Take the three gallon hat.
- Place the bottle tornado on top of the chunk of ice.
- Select the ice statue of Blackmore.
- Use the pick on his teeth.
- Select the broken ice.
- Click the ice until you acquire the puzzle piece.
- Select the box.
- Drop two puzzle pieces on it to begin a new puzzle!
The goal of the puzzle is to fit every piece inside the box.
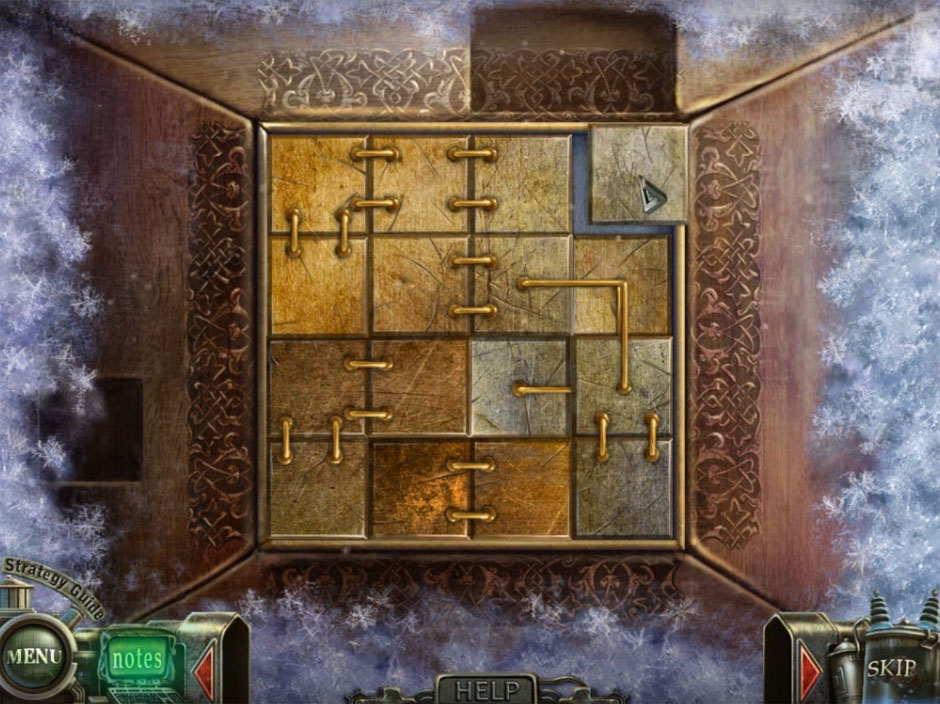
Haunted Halls Fears from Childhood Lamp Box Tile Puzzle
- Right click pieces to rotate them.
- When finished, grab the lamp.
- Finish the hidden object puzzle.
- Select the leaf to find the pine cone.
- Select the fan and take the ballerina.
- Make sure you get the wings!
Travel to the window that overlooks the desert.
- Finish the hidden object puzzle.
- Inside the basket are the snakes.
- Select the wall to find the hieroglyph.
- Make sure you get the balloon!
- Select the genie lamp.
- Drop the lamp beside it.
- Select the genie lamp a second time.
- Select the lamp on the left.
Travel to the window that overlooks the tropical forest.
- Select the hive and drop the wings on it.
Travel beneath the bed.
- Drop the bowling ball.
- Select the bowling ball to fill the final hole.
- Take the shoelace.
- Drop the balloon on the bicycle pump.
- Tie the shoelace onto the balloon.
- Select the pump.
Travel out from beneath the bed.
- Take the book.
Travel down twice.
- Finish the hidden object challenge.
- Drop the sponge on the chalkboard.
- Take the 1 + 1 equation.
- Drop the nail onto the XIII.
- Take the XIII.
- Make sure you get the lamp!
Travel down once.
- Finish the hidden object challenge.
- Select the box to find the clown.
- Drop the brush on the die and take the six dots.
- Use the hammer to break the clock.
- Take the gears.
- Make sure you get the water pipe!
- Select the leaky pipe.
- Place the three gallon hat beneath the pipe to get a hat with water.
Travel forward twice.
- Select the middle left door.
- Place the book on the door.
Travel through the door.
Chapter 5: Girl in the Graveyard
The graveyard is riddled with old growth and spooky architecture. Around every corner is a new terror, so take a few deep breaths before continuing forward into the darkness.
- The pick can be used to break the large stone on the left.
- Take the stone.
- Select the top of the gate.
- Click the keys.
- Take the keys on the ground.
- Drop the hat with water near the right gate.
- Select the right gate’s lock and place the keys inside.
- Select the keys and travel through the gate.
- Place the stone on the left steps.
- Open the gate to begin a hidden object challenge.
- Select the banana to reveal the peeled banana.
- Select the lamp to find the lit lamp.
- Make sure you get the insulating tape!
- Select the stick near the distant graves.
- Take the tow.
- Lift the grate and look inside.
- Place the water pipe over the leak.
- Place the tow and insulating tape on top of the pipe.
- Select the valve to activate the fountain.
- Select the fountain.
- Select the paper boat and take the instructions.
Travel left once.
- Select the open grave to begin a new puzzle!
- Assemble the skeleton by placing the bones inside the coffin.
- Take the shield.
- Look at the statues in the back.
- Select and take the spear.
- Take the shield on the ground near the mirror.
- Finish the hidden object puzzle.
- Select the box to find the mask.
- Slice the melon with the knife to get the sliced melon.
- Select the artificial knee to find the gem.
- Make sure you get the fan!
Travel down once and left once.
- Select the grave on the right.
- Drop the fan to remove the leaves.
- The shield can be removed with the spear.
- Select the mausoleum.
- Place the spear where you found it.
- Place the three shields where they belong.
Go forward once.
- Select the back wall.
- Place the instructions on the wall to begin a new puzzle!
Travel down three times.
- Finish the hidden object puzzle.
- Select the paper to find the photo.
- Make sure you get the conductor!
Travel right once.
- Finish the hidden object puzzle.
- Select the accordion to find the music.
- Select the bottle to find the bubbles.
- Make sure you get the iron ball!
Travel back to the beginning of the mausoleum.
- Select the back wall.
- Place the lamp, iron ball, and conductor to finally begin the puzzle.
The puzzle requires that the lights be selected in the appropriate order.
Haunted Halls Fears from Childhood Light Puzzle Solution
- Refer to our image for the solution.
- Select the lock.
- Break the lock with the pick.
Travel down twice and right once.
- Break the skeleton hands on the grave with the pick three times.
- Take the book.
Travel down three times.
- Select the top right door.
- Place the book on the door.
Travel through the door.
Chapter 6: Boy in the Museum
The museum is twisted, overgrown, and full of old artifacts that are as haunting as Blackmore himself. Tread carefully, but don’t keep your hands to yourself!
- Complete the hidden object puzzle.
- Place the lipstick on the heart to find the heart with arrow.
- Strike the fly with the flyswatter to find the dead fly.
- Make sure you get the chalice!
- Select the small statue to the right of the stairs.
- Take the lira.
- Select the door on the right side.
- Take the lightning.
Travel through the archway on the left.
- Complete the hidden object puzzle.
- Drop the head on the body to find the doll.
- Drop the charcoal on the ball to find the black ball.
- Make sure you get the saw!
- Grab the rope.
- Select the barrel.
- Open the barrel and grab the fish.
- Select the rock.
- Place the fish on the rock.
- Select the seagull.
- Take the wings.
- Select the seagull.
- Place the fish on the rock.
- Select the Vikings.
- Saw off the horn from the helmet with the saw.
Travel through the back door.
- Select the shields to the right to begin a new puzzle!
The object is to place the shields in their correct locations by dropping them where the horizontal and vertical symbols meet.
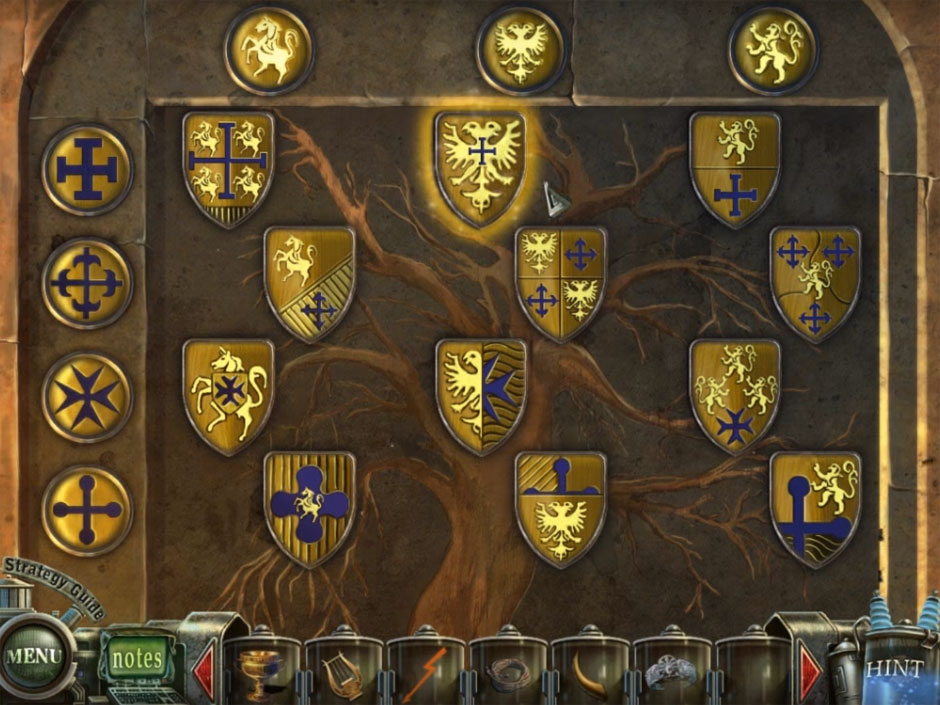
Haunted Halls Fears from Childhood Shield Placement Puzzle
- Grab the shield when the puzzle is complete.
- Select the knight helmet at the top right.
- Take the crown.
- Select the arena in the distance.
- Drop the shield on the knight to the left.
- Take the sword.
Travel down twice and right once.
- Select the cavemen.
- Take the bow.
Travel right once.
- Select the statues in the distance.
- Take the hammer and trident from the gladiators.
Travel down twice.
- Finish the hidden object puzzle.
- Drop the pencil on the paper to find tic-tac-toe.
- Select the spool to find the needle.
- Make sure you take the shield!
Travel through the archway on the left.
- Finish the hidden object puzzle.
- Select the box to find the button.
- Drop the water bowl on the coals to find boiling water.
- Make sure you grab the bolt!
Travel through the back door.
- Select the crossbowman.
- Drop the bolt into the crossbow.
- Select the apple on the floor.
Travel back twice, travel through the archway on the right, and travel right once more.
- Select the wall on the right to find a new puzzle!
The goal of the puzzle is to move the spokes until the lasers no longer cross one another.
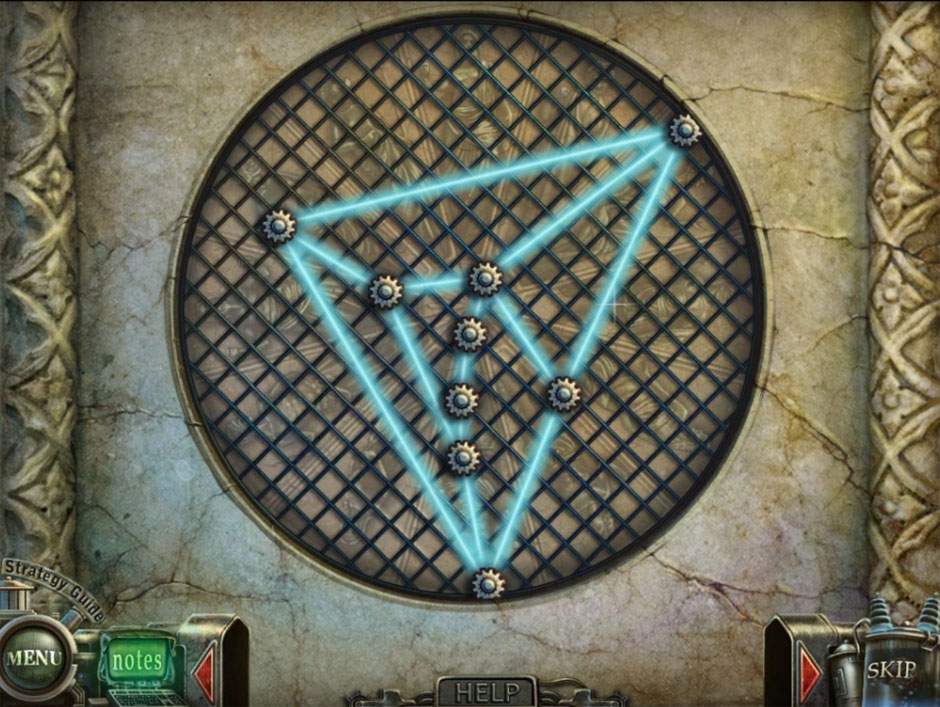
Haunted Halls Fears from Childhood Laser Beam Puzzle
Another puzzle will appear after the first.
The goal is to place objects next to the correct figures. Clicking on a figure will reveal a brief description, which you can use to match them to an object.
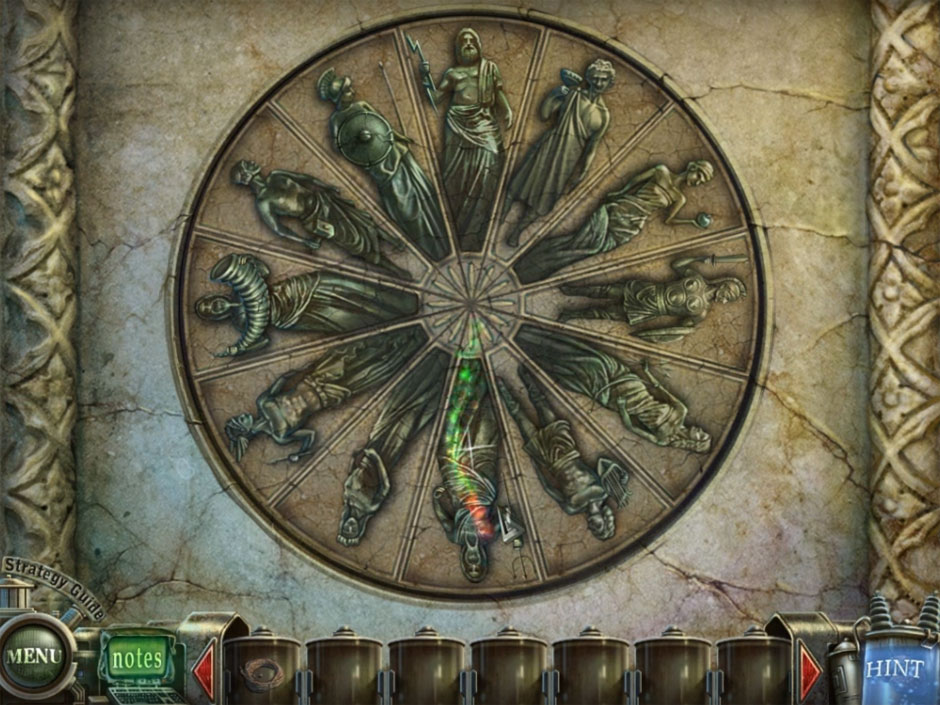
Haunted Halls Fears from Childhood Figure Items Puzzle
- Beginning at the noon position, and continuing clockwise, place the: lightning, chalice, apple, sword, bow, lira, trident, crown, wings, horn, hammer, and shield.
- Grab the helmet!
- Drop the helmet on the statue of the Roman lancer.
Travel down once.
- Drop the rope onto the spear.
Travel down twice. Travel through the door on the upper left side.
Chapter 7: The Lair of Dr. Blackmore
Blackmore’s home is a series of impossibly constructed spaces that reveal his twisted origins and motivations. Convoluted and full of alien technology, his home will require your utmost attention to travel through unscathed.
- Select the large building in the back.
- Take the board.
- Select the octopus and grab it.
- Select the large building once more.
- Place the octopus on the door.
Travel through the door.
- Select the bottom of the steps in the right corner.
- Grab the skeleton.
Travel through the center door.
- Select the carpet.
- Take the key.
- Select the chest.
- Place the key in the chest lock.
- Open the chest and grab the monsters.
- Place the key in the chest lock.
Travel through the left door.
- Finish the hidden object puzzle.
- Drop the cheese on the grater to find grated cheese.
- Place the knife on the wood to find the square.
- Make sure you grab the pin!
Leave the room and travel through the door on the right.
- Select the grate.
- The pin will unlock a hidden object challenge inside the grate.
- Select the box to find the mouse toy.
- Select the matchbox to find the last match.
- Make sure you grab the drawer handle!
Travel back to the bedroom.
- Finish the hidden object challenge.
- Select the cocoon to find the butterfly.
- Break the bucket with the hammer to find the lizard.
- Make sure you grab the octopus!
- Select the drawer.
- Drop the drawer handle on the drawer.
- Open the drawer.
- Take the dinosaur.
Travel down once and into the door on the right.
- Finish the hidden object puzzle.
- The plane will fly with the propeller.
- Grab the fixed plane.
- Make sure you grab the wolf!
- The plane will fly with the propeller.
- Beginning with the left side, drop the items in order on the mirrors: wolf, octopus, monsters, skeleton, and dinosaur.
- Grab the toy that appears.
Travel down once and through the door on the left.
- Select the device on the left side.
- Drop the toy on the lower left slot to begin a new puzzle!
The goal is to simply match the wires. However, you must match them three times.
- In the first puzzle, you may simply swap pieces easily. Match them to our solution image.
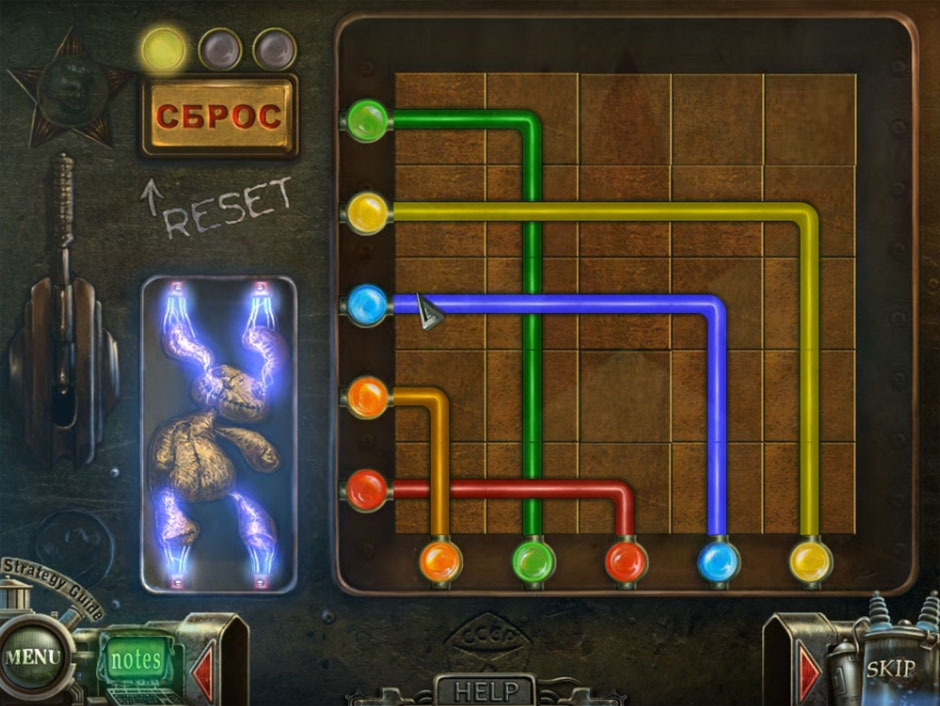
Haunted Halls Fears from Childhood Toy Puzzle Part 1
- In the second puzzle, you must use arrow keys to move the pieces.
- Vertical arrows are listed A, B, C, D, and E.
- Horizontal arrows are listed F, G, H, I, and J.
- To complete the puzzle, follow this guide: B once, E three times, I twice, C once, J twice, B once, F once, B four times, E once, J twice, E four times, J once, E three times, J six times, E four times, J once, G three times, E four times, G twice, E once, F four times, E four times, and F once.
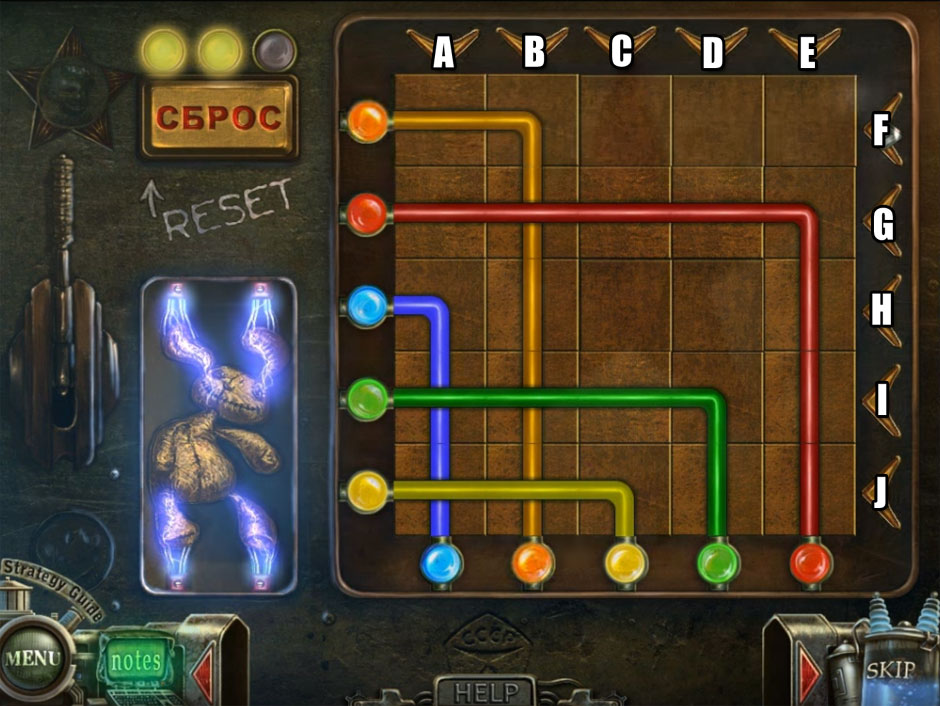
Haunted Halls Fears from Childhood Toy Puzzle Part 2
- The final puzzle is much more complicated. Four tiles are turned at once.
- To solve the final puzzle, follow this order: B three times, C twice, D three times, H twice, G once, D three times, L three times, J twice, K once, and J twice.
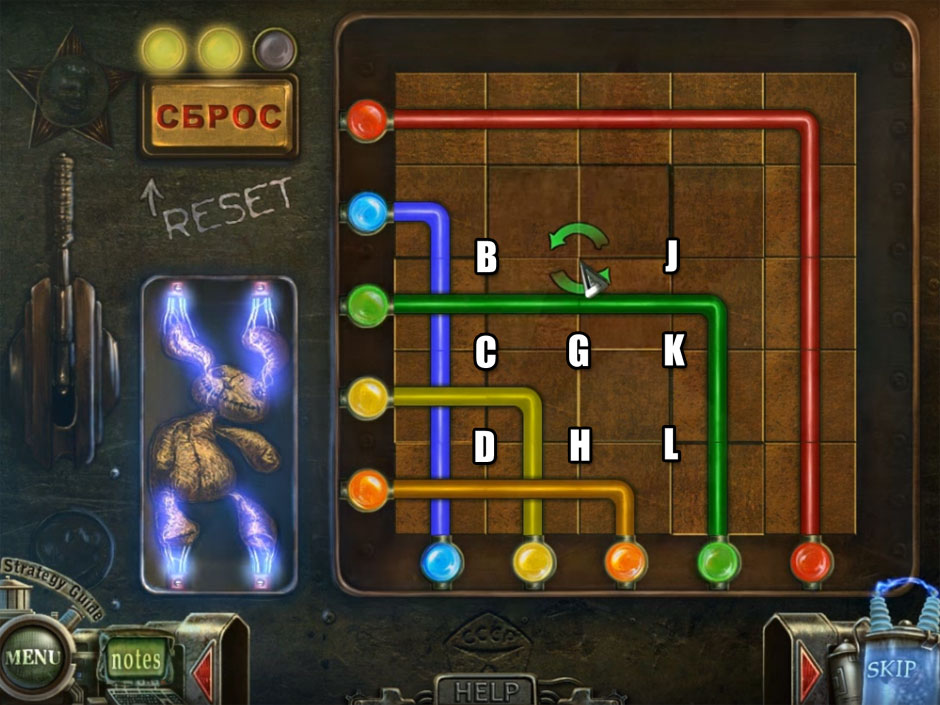
Haunted Halls Fears from Childhood Toy Puzzle Part 3
Well done! Tim will lead you back to the lab.
Congratulations, you have finished the Haunted Halls – Fears from Childhood Walkthrough!
For more great tips and tricks, visit our blog!
The Haunted Halls – Fears from Childhood Walkthrough is meant as a guide and does not contain cheats, hacks, or serials.