Welcome to our Haunted Legends – The Bronze Horseman walkthrough! The Bronze Horseman is an ancient legend who has come to life in a flooded town. The townspeople are missing, and many believe black magic is the cause. You play a detective who must solve the many problems of the town. We will guide you through the game with tips and tricks, solutions to puzzles, and locations for the game’s many hidden objects.
Contents
General Tips & Tricks
To help you through the game, we have a few tips and tricks. If you become stuck, then refer back here for some help with Haunted Legends – The Bronze Horseman.
– Hidden object challenges are marked with sparkles.
– Inventory items are capitalized in our guide.
– Use the hint button during hidden object challenges.
– You will need 24 crystals by the end of the game. Make sure you get them all!
– You can zoom in on an object when the magnifying glass appears.
– All notes will be added to your diary.
Haunted Legends – The Bronze Horseman Walkthrough
Chapter 1
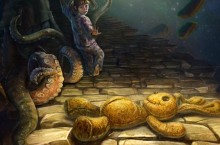
You will be welcomed to a town in peril by a worried father who has lost his son. The town is beset by rains and floods, and the townsfolk fear the coming of a legend known as the Bronze Horseman.
– Select the chair and take the crystal. Afterwards, select the note and read it carefully. Take the Wrench from the chair and zoom out.
– Knock the picture frame off the right wall. Select the wall safe to find a piece of Stained Glass.
– Select the shoe beneath the tree on the left. Take the Safe Key and Stained Glass.
– Select the stained glass window and drop both pieces of Stained Glass into place. The window will open.
Go through the window.
– Select the hidden door to the left. Use the Wrench to loosen the screws around the door. Take the Lever and Safe Key.
Travel forward once.
– Select the shirt that the goblin dropped. Take the Spring and read the note in the pocket.
– Select and read the plaque on the statue in the center of the plaza.
Travel back once.
– Select the lock to the left of the gate. Use the Spring on the lock to open it up.
Travel right once.
– Speak with the girl. She will give you another Safe Key.
– Take the blue crystal on the shelf to the left. Afterwards, select the red blanket on the floor to begin a hidden object challenge.
— Pour the glue on the vase to find the broken vase. Select the cheese twice. The Safe Handle will be added to your inventory.
Travel back twice.
– Begin the hidden object challenge! The first Mosaic Fragment is in the book. Take Africa from the globe, and make sure to get the duckling in the egg. Lastly, take the crab from the scroll. The Mosaic Fragment will appear in your inventory.
– Select the safe, which was behind the picture frame that was knocked to the floor. Place the three keys and Safe Handle into position. Turn the handle to find a Chisel and a note.
Travel forward once and right once.
– Select the far wall. Use the chisel on the strange brick in the center of the wall. You will find the Strange Key!
– Select the red blanket again to begin another hidden object challenge.
— Use the chalk to find the horseman drawing. The match will start the lamp flame. The Gaff Hook will be automatically added to your inventory.
Travel back once and forward once.
– Watch the horseman leave the podium and crash into the barricade. Follow him! Use the Gaff Hook to clear the wood.
Travel over the barricade.
– Select the area of road near the red crystal. Take the Horseshoe and the crystal.
– Select the bulletin board and pull the newspaper page free. Beneath the page is a crude map.
Travel forward once.
– Select the goblin and watch him run away. There is a Hidden Object challenge to the left.
— Select the metal cup to melt the chocolate and get hot chocolate. The bracelet is in the jewelry box on the top left. The Slats will be added to your inventory.
Travel back twice.
– To the right of the statue is a grassy area and tree. Select the space between the grass and tree to begin a new puzzle!
The object of the puzzle is to create a bridge across the stones using the Slats in your inventory. Mix and match the slats to complete the puzzle.
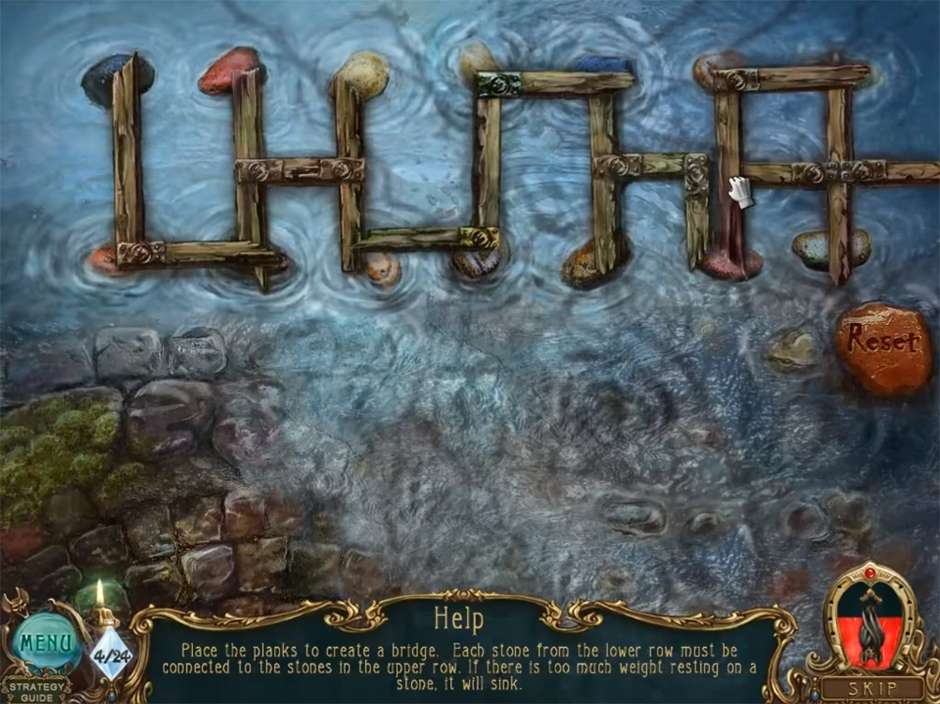
Haunted Legends – The Bronze Puzzle 1
Travel right once.
Chapter 2
You have managed to release the Bronze Horseman! The townspeople are nowhere to be found, and a strange goblin has fled from your sight. The mysteries of the village continue to grow while you make your way down the dark cobblestone streets. Don’t stray far from our guide, or you may lose your way.
– Select the shelf with the blue crystal on the left. Use the chisel to wedge the crystal free. Make sure you get the Hammer.
– Select the gate to the right. Use the Chisel and the Hammer on the padlock to bust it open.
Travel right once.
– Select the hiding girl to the left and listen to her plea. Select the tilted carousel to begin another hidden object challenge!
— Move the unlit candle onto the flame to find the burning Candle. Tear the cloth to find the sword. Select the horse to find the candies. Select the horse head to find the carrot. The Candle will be added to your inventory.
Travel back twice, to the left once, and forward once.
– In the bottom right corner of the screen is a stone shelf. Take the green crystal and set the candle on the shelf. Watch the wax melt. Release the chains to find a Cannon Ball.
Travel down twice and right twice.
– Drop the Cannon Ball on the seesaw. Select the bag that fell and take the Fire Canister and crystal that are inside it.
– Return to the askew carousel for another hidden object challenge. Unlock the wooden door to find the Puzzle Piece, which will be added to your inventory.
Travel back once.
– Take the Knife from the wooden branch near the back left side of the alley. Read the note that was pinned to the branch.
Travel right once.
– Select the shack and place the Strange Key on the lock after clicking the button. The door will open. Select the little girl. Take the Ice Canister on the right side of the room.
Make your way back to the tower.
– You will encounter a new hidden object challenge in the tower. Use the knife on the watermelon to get the watermelon seeds. The brush will paint the garlic red. You will acquire the Flint and Steel in your inventory.
– Select the door to the tower on the right. You will begin your next puzzle!
The puzzle requires you to combine elements to create new ones. By pairing two items together, you can create additional items. Place fire and ice canisters on the left. Drop the fire on the ice to create water. Fire and wood create ash. Ash and water create earth. Continue to pair the items until they are all unlocked. Steam and metal will most likely be your final combination.

Haunted Legends – The Bronze Puzzle 2
Travel into the tall tower.
Chapter 3
The tower and its mysteries await you. Phantoms, floods, and spirits plague the streets outside, but you must unravel the mysteries of the tower.
– Select the goblin and watch him run away. Grab the red crystal from the bench as well as the Lever. Next, zoom in on the strange machine on the right.
— Drop all three levers onto the machine. Your diary has notes for how to activate the levers. Select the red, green, and blue lever. Once they are finished moving, select the red and green lever again.
Travel up once.
– Begin the hidden object challenge! Select the piece of wood to find the coin. The mask is beneath the cloth. The Mug will be placed in your inventory.
– Select the unlit torch on the wall. Use the Flint and Steel to light the torch. Grab the Ladder from the wall.
Travel down twice and enter the plaza.
– Place the Ladder on the statue, and travel up the Ladder to find the Key and the Bronze Nail.
Return to the tower and travel to the top room.
– Select the door and use the key to unlock it. Travel through the door to find a boy being held by the goblin. Select the boy and watch the goblin escape.
– Select the windowsill and take the Wooden Mechanism. Grab the note that was left. Next, open the cabinet to the left of the window and take the two crystals inside.
– Turn to the desk. Use the knife to cut open the sealed pages of the book. Flip the page to find the Strange Recipe.
Travel down four times.
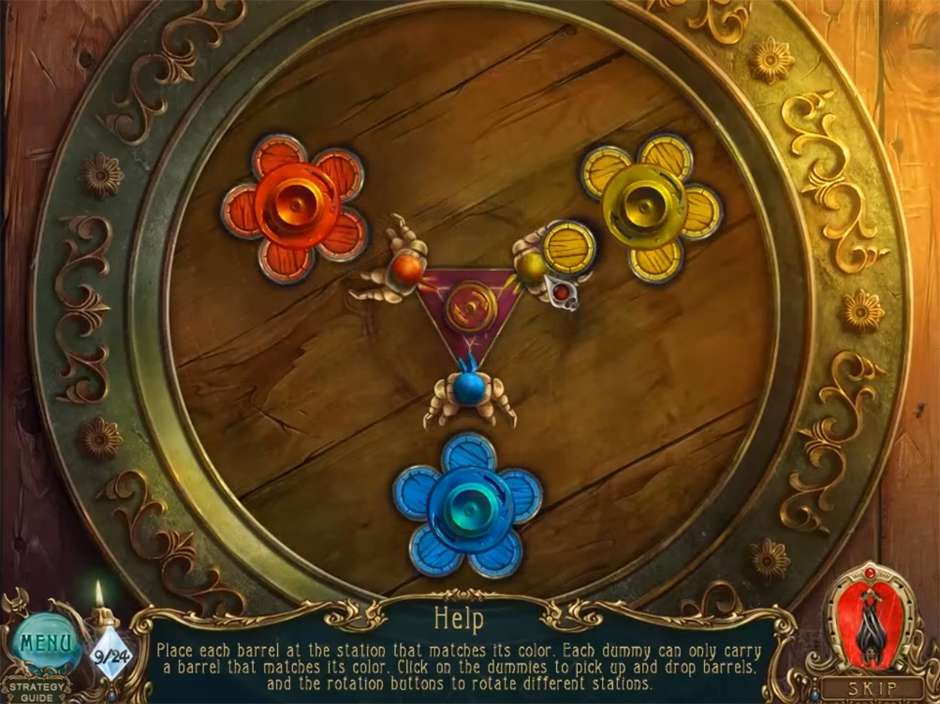
– Select the door on the right side. You can place the Wooden Mechanism in the center to begin a new puzzle!
The goal of the puzzle is to match the color of the smaller circles with the color of the large circle in the middle of the three mechanisms. To do this, grab the smaller circles using the mechanism in the center. All you need to do is drop the smaller circles onto the correct larger circle to finish the puzzle.
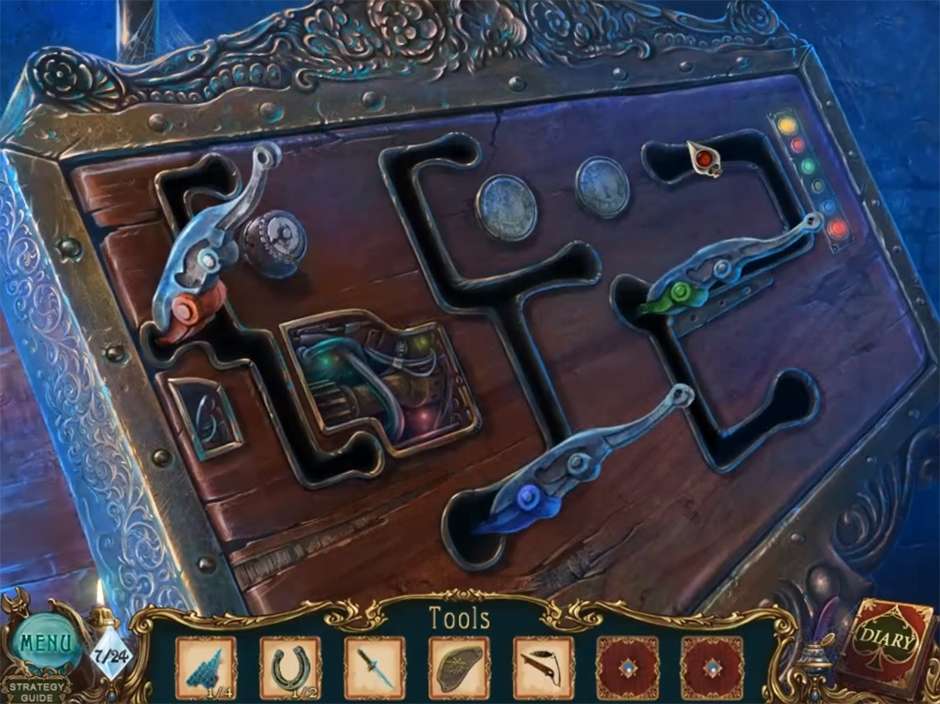
Haunted Legends – The Bronze Puzzle 3
– Travel through the newly opened door. Select the glowing item on the distant table edge. When the phantom appears, click him again.
– Select the bar to begin another hidden object challenge. Select the spout to find the pouring wine. Select the bottle to find the pepper. Look at the framed award in the top left to find the seal. The Solvent will appear in your inventory.
– Grab the red crystal on the table to the right. In the back of the room is a Coat of Arms that you can collect by loosening the screws. On the table is a broken crystal. Use the solvent on the shattered brass portion of the crystal to acquire a Puzzle Piece.
Travel to the top room in the tower.
– Begin the hidden object challenge. Select the locket to find the red heart. The Stout Key will be placed in your inventory.
Travel down twice and enter the bar to the right.
– Select the locked door to the left. Use the Stout Key to open the door.
– Take the purple crystal standing on the keg. Select the book on the table and take the Trowel. Pull the lever on the left to open the mechanism on the book. Read the pages at your own peril! Use the trowel on the bag full of hops to get some Hops.
Return to the top level of the tower.
– Use the Coat of Arms on the shield that is hanging on the wall. Take the Puzzle Piece and the note inside the secret compartment.
Travel down until you reach the plaza with the statue. From the plaza, travel right once.
– Zoom in on Garibaldi’s Workshop. Use the three Puzzle Pieces to gain access to a new puzzle!
The goal is to complete the puzzle by moving and flipping individual planks until a bridge across the water forms.
Haunted Legends – The Bronze Puzzle 4
Chapter 4
The mysteries of the strange town have begun to unravel. Ghosts and a strange, dark magic plague the answers that you have sought since stepping into town. The workshop is a challenging adventure that will not end quickly.
– Select the corpse on the floor. Grab the note next to his right hand. Open up his front apron pocket to discover the Magnifier. Zoom out and select the counter space to the left to begin a new hidden object challenge!
— The songbird is in the birdhouse. The picture is beneath the paper. The Wire Cutters will be placed in your inventory.
– In the back right of the room is a machine. Select the lever on the machine to activate a light.
Go forward once.
– Select the door on the left to begin a new hidden object challenge! Select the bottle to find the champagne foam. Drop the knife near the door to find the lightning. The Hexagonal Tile will appear in your inventory.
– Zoom in on the grate above. Use the Wire Cutters on the wires that hold it in place. Open the grate and travel through it to reach the roof.
– Take the fallen Branch near the large hole.
Travel back once.
– Play the hidden object challenge beneath you. Select the soldier to find the trumpeter. You will acquire Planks.
Travel back once.
– Drop the planks over the hole in the roof. Take the small scroll to the left of the opened door. Select the door to travel into the next room.
– Take the green crystal on the floor. Select the bed to begin another hidden object challenge! The flag is in the purse. The Mirror will appear in your inventory.
– Zoom in on the window. Use the branch to pull a Jack towards you so that you can take it.
Travel back to the workshop.
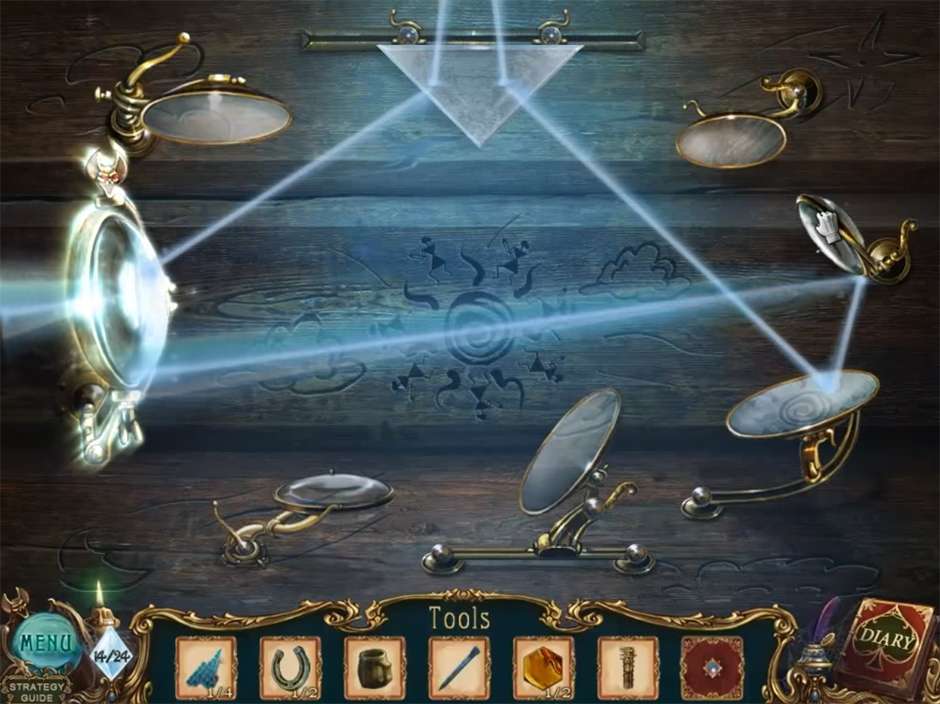
– On the right is a machine with pale light. Select it to begin a new puzzle! The goal of this puzzle is fairly simple. All you need to do is direct the light from the mirrors so that it illuminates the far wall to the left. See our solution if you need help. Afterward, select the back left wall to receive a diagram.

Haunted Legends – The Bronze Puzzle 5
– Play the next hidden object challenge! The drawer contains two random items. You will gain a Set of Pins in your inventory.
Travel forward and up the hole in the ceiling. Travel back once.
– In the distance is a gate that you can zoom in on. Luckily, we know a trick. Use the Jack to pry the gate open.
Travel through the new opening.
– Zoom in on the blue glow to find another crystal. Zoom in on the piano near the back left of the street to find a green crystal.
Travel back twice and enter the door beyond the planks.
– Select the cabinet and drop the Set of Pins on the mechanism to start another puzzle! Refer to the instructions, and configure the puzzle into an outer circle and inner broken circle.. When the puzzle is complete, take the Horse Emblem.
Haunted Legends – The Bronze Puzzle 6
Travel down twice and through the archway on the right.
– Select the piano and use the Horse Emblem on the lock to receive a Forked Key.
Travel down twice and walk back across the planks.
– Complete the hidden object challenge. Select the bell to find the jingle bell. A Palette Knife will be added to your inventory.
Travel down twice.
– Use the forked key on the lock that secures the chest. Take the red crystal, letter, and Handle. Go through the door on the left to begin another hidden object puzzle. Select the chair cushion to find the spring. A Glove will be added to your inventory.
Travel up through the hole once and back once.
– Zoom in on the broken window near the left side of the plaza. Use the Glove to clear the glass. Take the Hexagonal Piece.
– Play the hidden object challenge. Set the leaf aside to find the Caterpillar. The blooming flower is beneath the flower. You will get a Scoop in your inventory.
Travel through the archway.
– Select the chest to begin a new puzzle! Drop the two tiles into the missing slots, and then twist the tiles to complete the image. The final image will look like a horse that is attempting to bite its own tail.
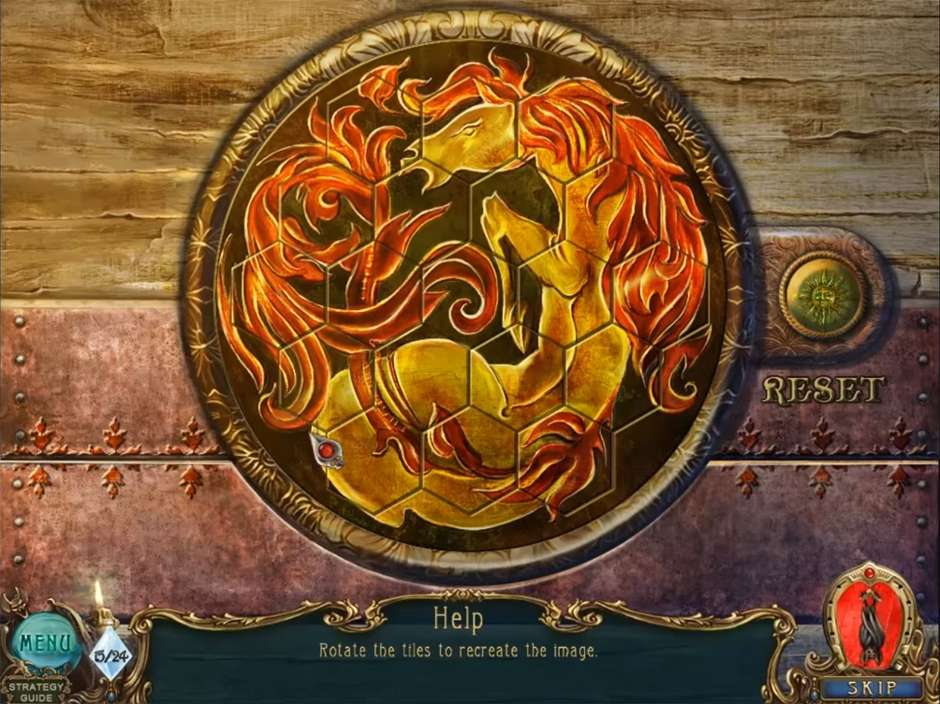
Haunted Legends – The Bronze Puzzle 8
– Take the Ingredient and note.
Return to the workshop.
– Select the diagram you revealed with the mirrors. Use the Palette Knife to peel back the edge of the diagram. Select the mechanism and use the handle to open it up.
Travel down the stairs that appeared.
– Open the top left cabinet door to find a crystal and a note. Use the Scoop on the coals to acquire Coals. Open up the furnace and drop the Coals inside. Pull the lever down to reveal a new puzzle!
The goal is to allow the liquid metal to flow through the valves and into the cast. All you need to do is make sure every valve is facing down and to the left. You will acquire the Tap.
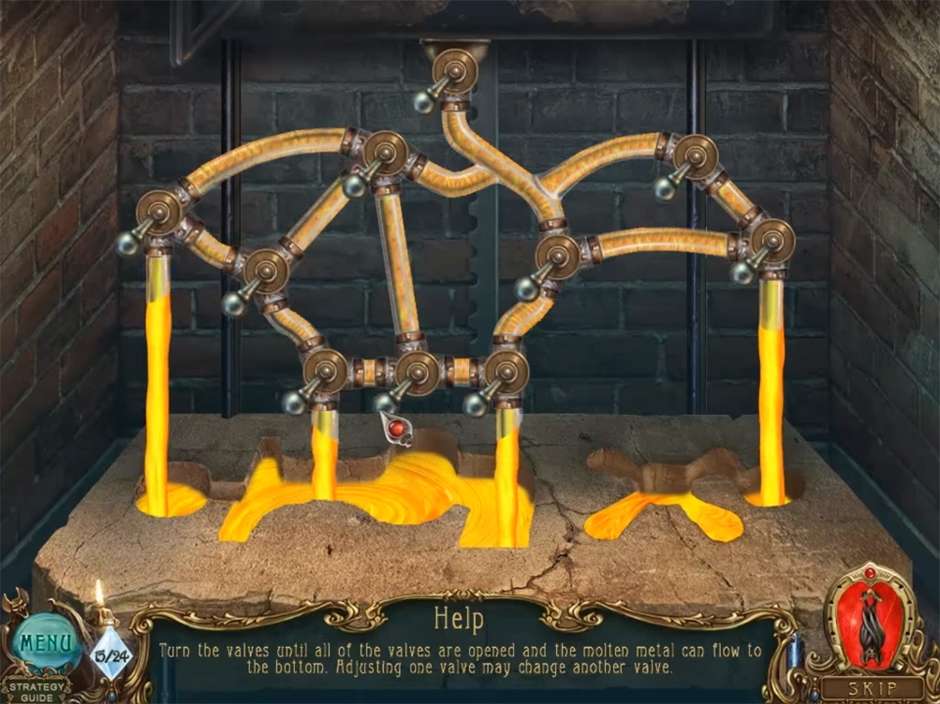
Haunted Legends – The Bronze Puzzle 9
Travel back to the bar and into the room on the left.
– Select the copper gauge and drop the Hops, Strange Recipe, and Ingredient on the table. Make the potion by following the recipe on the top left.
– When the recipe is completed, drop your Mug below the keg. Place the Tap on the barrel and click it. Take the Potion.
Travel down once.
– Deliver the potion to the ghost.
– Complete the hidden object challenge. Drop the coffee beans in the coffee grinder to find ground coffee. Drop the sponge in the water and you will get the wet sponge. Select the calendar and click on Sunday. You will acquire a Handle.
Travel through the door on the right.
– Take the note from the upright table.
Travel forward.
– Grab the cane.
Travel back.
– Zoom in on the basket filled with bags. Use the cane to move the bags. Zoom out. Zoom into the second basket and take the crystal and Fishing Rod.
Travel forward
Zoom in on the lake to the left of the dock. Use the Fishing Rod to grab a Floating Gear. Select the horse mechanism to begin a new puzzle!
The puzzle requires you to match images on the left with those on the right. You can turn both wheels to match the images. The install button will pair the images.
– Here are the solutions:
Wavy lines, boat, paddle.
Pistol, soldier, hat.
Hatchet, mannequin, tree.
Painting pallet, picture, paintbrush.
Wind, windmill, crops.
Wheel, wagon, road.
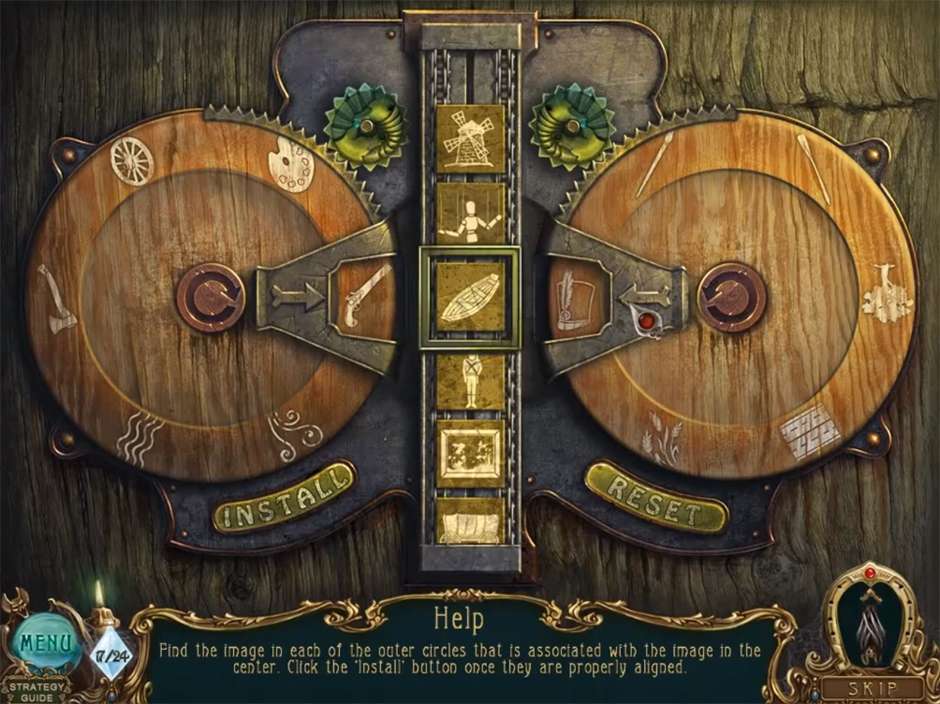
Haunted Legends – The Bronze Puzzle 10
– Use the handle when the puzzle is complete. Travel into the mayor’s house.
Chapter 5
The mayor seems to be behind at least a portion of the mischief occurring in the city. If absolute power corrupts absolutely, then it is not a stretch to presume he has turned to powers beyond his control. Tread carefully as you progress through his home.
Travel to the right.
– Take the blowtorch before zooming in on the steps. Read and take the note.
Travel left.
– Zoom in on the bushes to the left to find a crystal and Mosaic Fragment.
– Zoom in on the horse’s flank. Drop the nail into the pinhole, and then you can use the Blowtorch to melt the device until it can be opened.
– Inside the horse statue are a series of mechanisms. Click the two levers followed by the door. A new puzzle will appear! The solution is to click the one, two, and four buttons.
**screenshot? 9
Travel through the door.
– Take the Pin on the stone block to the left.
Travel back once.
– Select the lever closest to you and zoom in. Use the Pin to open each latch. Once opened, take the Rough Cloth.
Go through the door again.
– Drop the Rough Cloth over the exposed wires.
Go forward.
– Select the goblin and watch a scene unfold. Click on the mayor. It seems we were mistaken about the mayor’s involvement!
– Play the hidden object challenge in the cabinet to the left. The hammer will break the glass to reveal broken glass. Drop the black ink on the tulip to find black tulip. You will acquire a Wheel in your inventory.
Go forward.
– Take the green crystal on the left. Another hidden object challenge awaits you! The postcard is in the envelope. You can find the handprint by dropping the powder on the mirror. Acid will appear in your inventory.
– Once finished, zoom in on the painting. Use the Palette Knife to cut open the canvas and take the Key Panel.
Travel back.
– Zoom in on the statue in the back of the room. Use the Acid on the statue’s arm to acquire the Spearhead.
Go forward once. Travel through the door to the left.
– Zoom in on the package above you to the right. Use the spearhead to cut open the package and claim the Pin.
Leave the room.
– Play the hidden object challenge. Select the globe to find the snow globe. You will acquire the Screwdriver in your inventory.
– Select the door to the right, and use the two pins to unlock the door.
Travel through the door.
– Select the column in front of you and take the crystal and coal.
Go forward.
– Click on the goblin and watch him disappear. Don’t worry! Our guide will lead you to him again. Take the blue crystal in front of you. Zoom in on the chair. Use the Wheel, the screw on the floor, and the Screwdriver to fix the rolling chair. Select the chair to begin another hidden object challenge!
— The knife will cut the lemon and produce a slice of lemon. Apples will be added to your inventory.
Travel back once.
– Zoom in on the statue of the apple tree on the bannister. Place the Apple where it belongs on the statue to acquire the Glass Triangle.
Travel left twice.
– Select the book on the table and use the Key Panel. Grab the Clue Scroll. Zoom in on the bookshelf above the desk to find a small puzzle! Place the Glass Triangle and Clue Scroll where they belong to start the puzzle.
The goal is to match the sand pattern in the triangles with the pattern in the scroll. To move the sand, rotate the exes between the triangles. From left to right, the exes should be turned in this order: 3, 3, 2, 2, 2, 3.
– After the puzzle, take the Bandages and note from the bookcase.
Travel back twice.
– Give the bandages to the mayor. When he is finished speaking, play the hidden object challenge to the left. Select the fan to receive access to two random items. You will receive the Door Knob.
– Take the diary note from the open window to the left.
Travel forward and to the right twice.
– Begin the hidden object challenge. Select the peanut shell to find the peanuts. The last Mosaic Piece will be added to your inventory.
– Place the Door Knob on the back door before selecting both handles. Travel through the door and select the mosaic. Drop the Mosaic Pieces into the empty spots so that you can finally claim the Handle!
Travel all the way back to the topmost room in the tower.
– Place the Handle on the zip-line and make your way across the expanse.
Chapter 6
You have come at last to the heart of the enemy’s lair. The strange mystery that has unfolded before you will surely meet its end here. Prepare yourself for the very worst and stick close to our guide! Our tips will help your reach the story’s conclusion.
– Immediately begin the hidden object challenge. Bring the two dolls together to find the twins, and drop the pot on the stove. Drop the corn in the pot to find the popcorn. A Horseshoe will be placed in your inventory.
– Zoom in on the far door and drop the Horseshoe to make the door open. Travel through the door and select the lever on the left to find the Fuse. Select the cabinets on the right to find another crystal and a Control Panel. Zoom in on the chair and use the coal on the page to reveal a note!
Travel back once.
– Select the canister on the bench to the left to begin a new puzzle! Drop the Fuse onto the other equipment. Afterwards, all you need to do is place the items as they appear in the diagram beneath the equipment. The final step is to turn the fuel valve. When the puzzle is completed, you will get the Lamp.
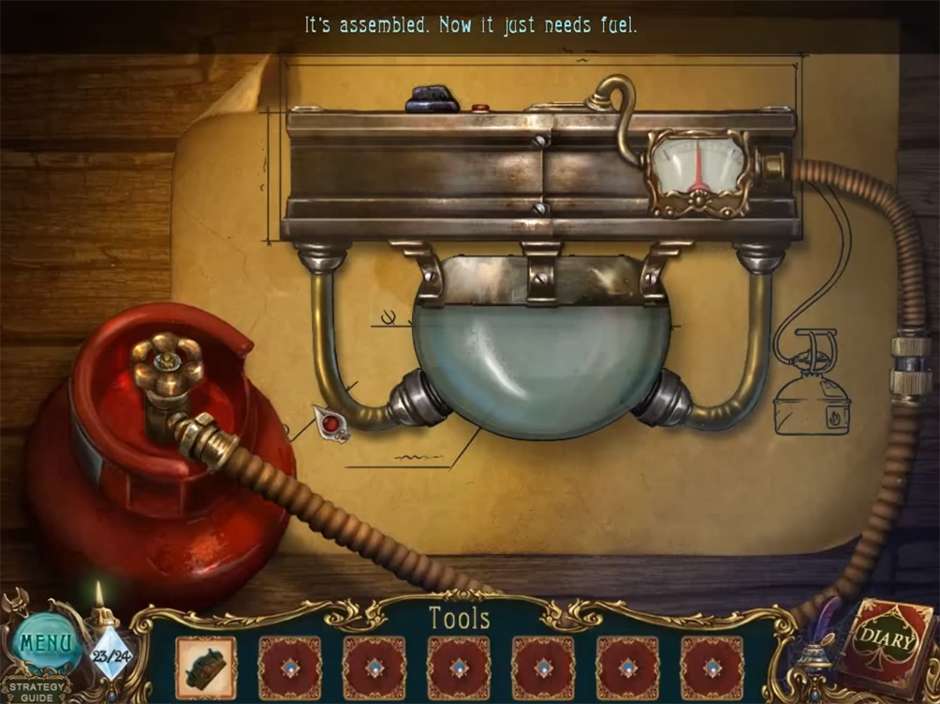
Haunted Legends – The Bronze Puzzle 12
– Play the next hidden object challenge! The violin is in the violin case. A Hooked Cable will appear in your inventory.
Go forward once.
– Select the mechanism and drop the Lamp on top of it. Follow the lamp forward down the path. Once in the tunnel, drop the Control Panel on the floor. You will need to hit the levers in the following order: right, left, left, right, right, left.
– Finally! You have reached the goblin. However, he will thwart you once more. Luckily, we have a few tips for bringing him down.
– Begin the next hidden object challenge. Select the fan to reveal two random objects. You will acquire the Round Key.
Travel back once.
– Use the Round Key on the locked drawer to the right to find Freezing Liquid.
Travel forward once.
– Play the next hidden object challenge. Close the eye by selecting it. A Sledgehammer will appear in your inventory.
– Select the well, which is marked by blue light, and use the Hooked Cable to find the Machine Lever.
Travel forward.
– Select the boy in the cage and listen to what he has to say. Drop the Freezing Liquid on the lock before bashing it open with the sledgehammer. Nice work! Speak to the boy again. When he is free, zoom in on the rocks near the top of the room to find the Cross Key.
Travel down.
– Select the desk and use the Cross Key to open the lock. Take the green crystal.
Go forward.
– Select the chair to begin the final puzzle. You must have all of the 24 crystals to begin the puzzle. All of them are included in our guide, so if you followed it closely you will be in excellent shape.
The puzzle requires that you click the levers in a specific order: blue five times, purple five times, red once, green four times, red once, green once, red twice, and green twice.
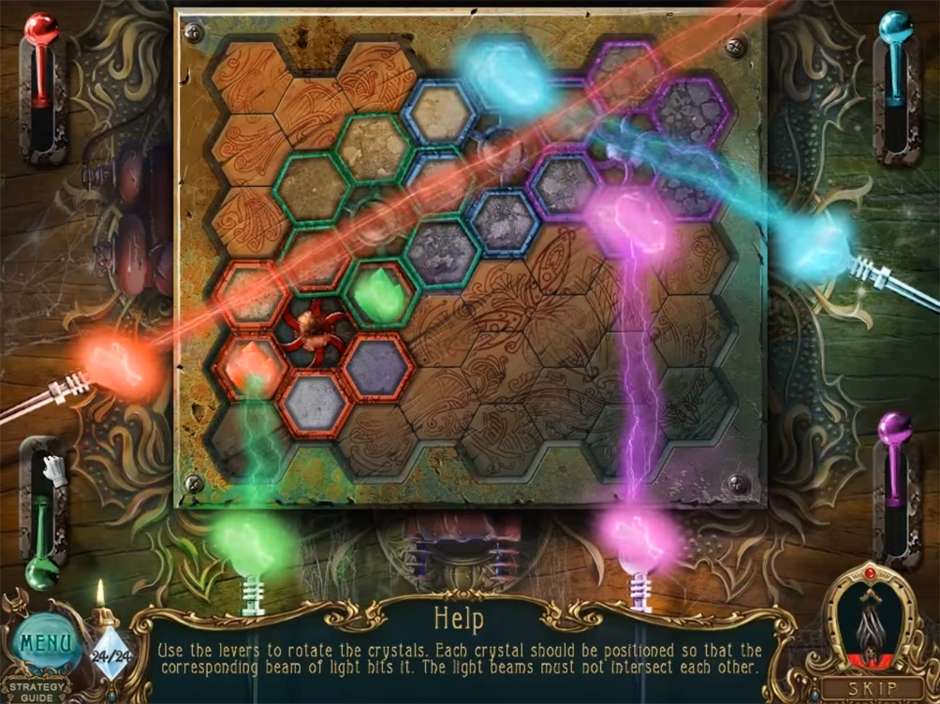
Haunted Legends – The Bronze Puzzle 13
Congratulations! You have completed the main game! We hope you enjoyed our Haunted Legends – The Bronze Horseman walkthrough. Be sure to check out one of our other guides!
The Haunted Legends – The Bronze Horseman Walkthrough is meant as a guide and does not contain cheats, hacks, or serials.