Explore the realms of the dead and the living in this Redemption Cemetery – Grave Testimony walkthrough! If you’ve found yourself in trouble and unable to make progress in your game, this walkthrough will help you move further into your quest. What mysteries will you uncover?
Contents
General Tips & Tricks
You’ll find your Crow on the lower left by the menu button once you reach him in the game. You can use your friendly crow when you have a Crow Rune, otherwise he will be made of stone. Use him to get objects from far off or do certain actions.
Your Diary is where you notes are kept. Important details that you may have forgotten can be found here, including newpapers and other notes you’ve found.
Hint and Skip buttons can be used when you’re feeling stuck and don’t want to use the walkthrough quite yet. Hint will give you a simple hint to help you move forward and the Skip buttons, when they appear, will allow you to go past puzzles if you are taking too long on them.
Redemption Cemetery – Grave Testimony Walkthrough
Chapter 1: Skull Hill
Welcome to the Redemption Cemetery – Grave Testimony. We’re going to start out by taking a closer look at the man on the ground and collecting the Optical Sight. Now move to the left and go to the dock. The Optical Sight can be used to look at the man on the boat. The first dock post has a Skull Piece for you to collect. Walk back to the open grave and now go right to the lake. Here you will use the Skull Piece on the lantern’s lock and take the Empty Locket Half and Candle from inside. Go back to the dock area and click on the little hole that is on the higher left of the dock. You can use the Candle here and a puzzle will start. Move the candles as so: D to F, E to D, B to E, A to B, C to A, D to C, E to D, B to E, A to B, and D to A. When you are finished, a man will show up. Talk to him to get the Crow and Crow Rune. Now the Crow can be used to pick up things, like the hat on the submerged headstone. When the hat is on the dock, study it and take the Photo.
Combine your collected Empty Locket Half with the Photo to get the Locket Half. Now go back to the open grave and take a look at the dead man’s hand. Add your Locket Half to his. Talk to the ghost and then go through the portal.
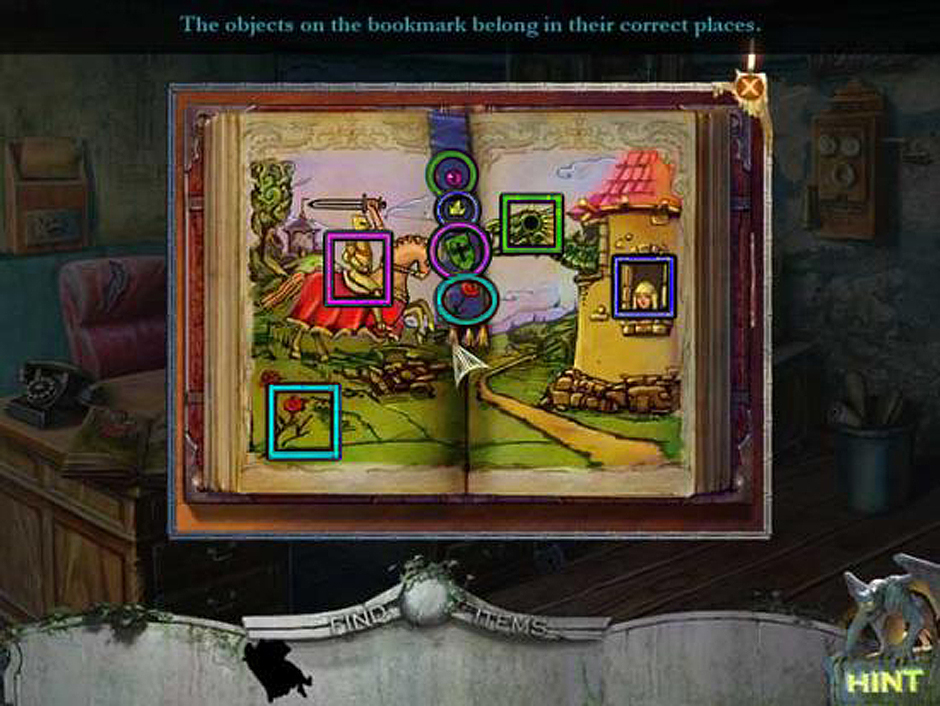
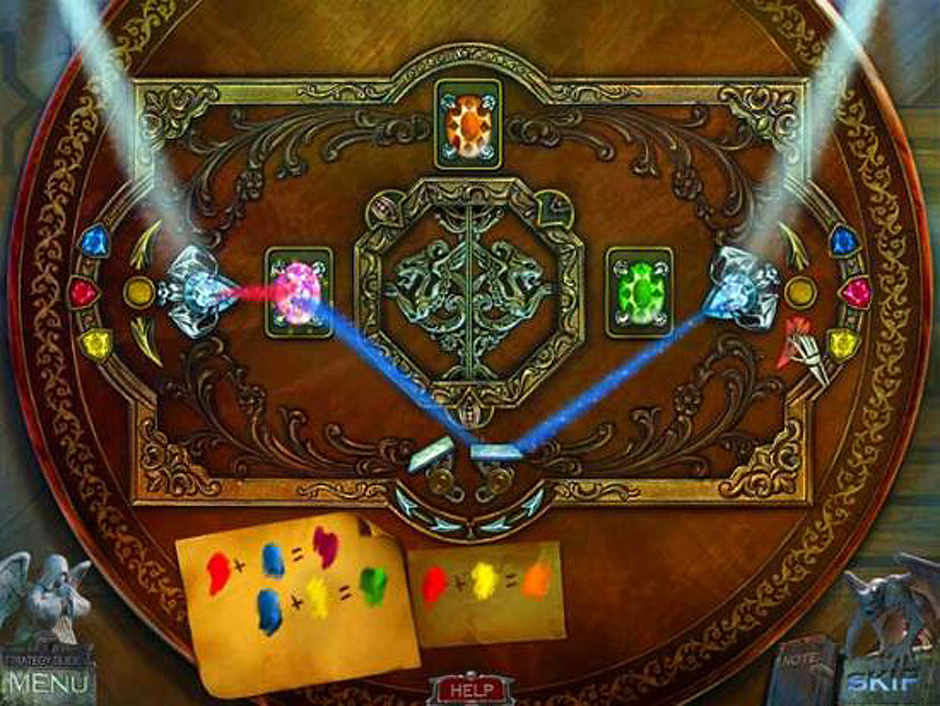
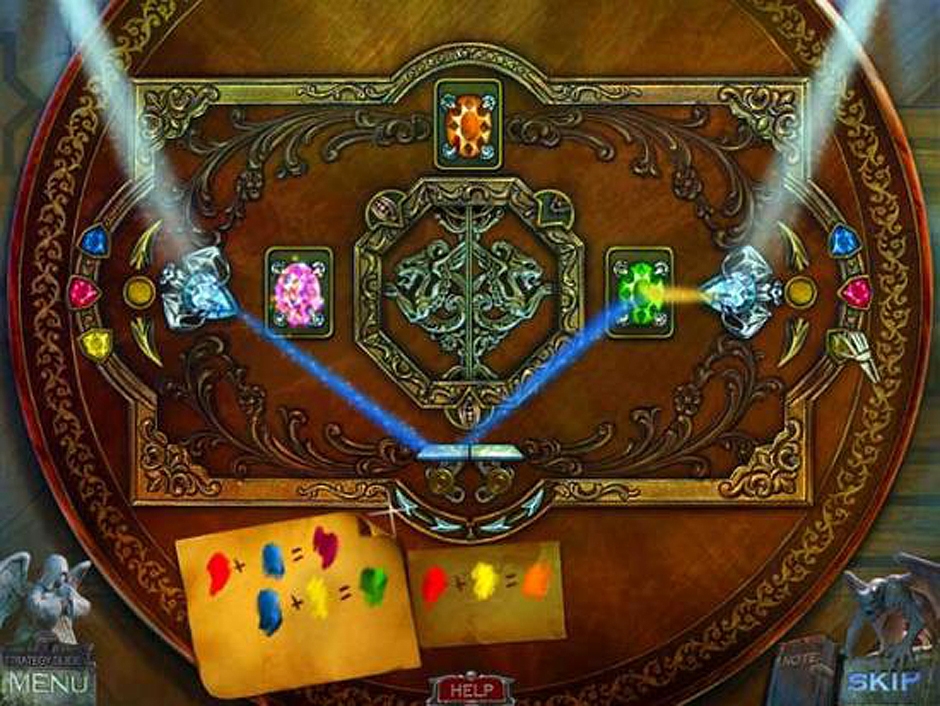
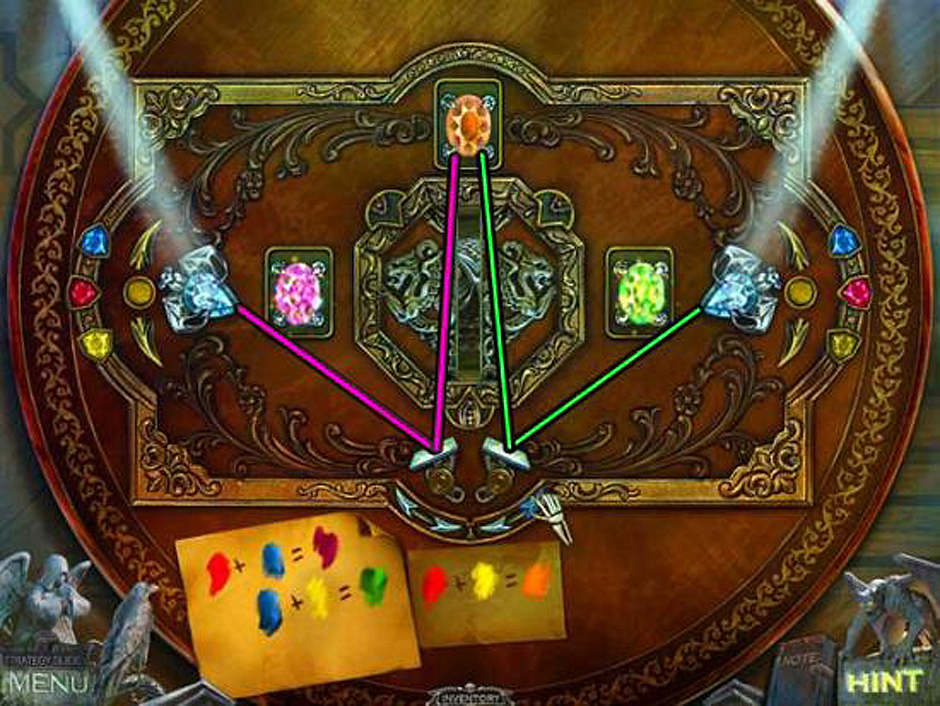
Welcome to Skull Hill. Take the Handkerchief from the road sign. When you study the car on the left you can peek inside the rear car door and take the Batteries and Elastic Band. You can lift the mud mat from the floor and look at the locket. Place the pieces in the correct positions to make this image:
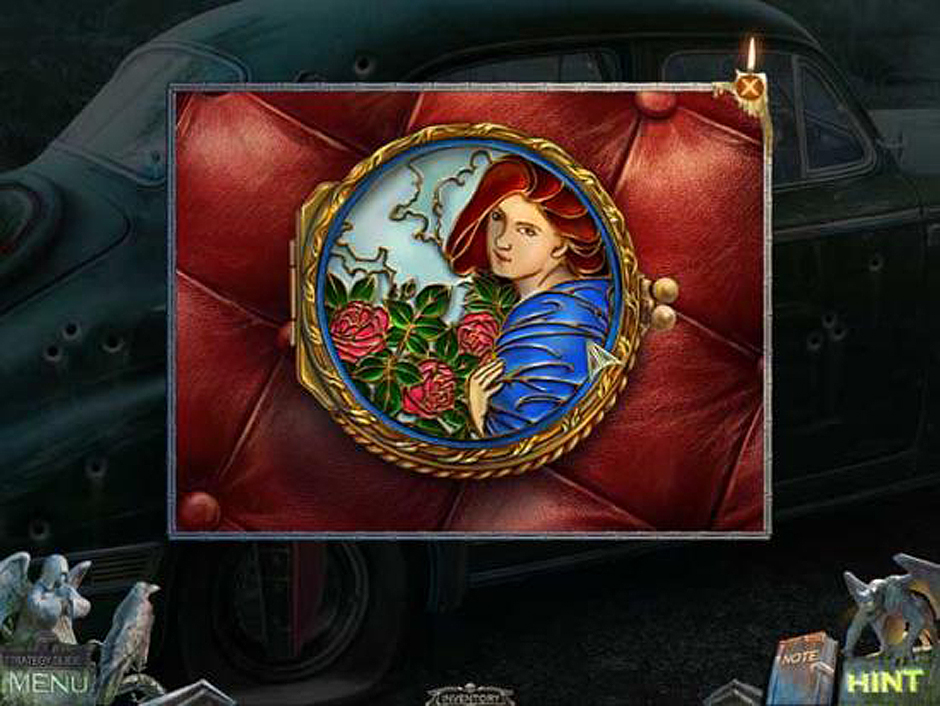
Redemption Cemetery – Grave Testimony Puzzle 01
Now you can take the Trunk Key. Pull back and open the front door of the car and take the newspaper. Clean the rear-view mirror with the Handkerchief. This will give you a code.: 347. Now you can pull out and use the Trunk Key to open the trunk. Take the Horses Statuette and Fuel Canister. Now you can walk down the road. Take the Hook off the ground. Use the “347” code to open the suitcase and start a hidden object area. Place the Medallion into the center slot and rotate the center rings. Take the Powder Compact and use it on the locks before clicking the buttons. Take the Key and open the locked box. Grab the Ring and open the round lock with it. Take all the Photos and place them on the square frame, where you will have to put them back together. Collect the Belt and leave.
Go back to Skull Hill. When you’re looking at the sign, use the hook to move the sign and then take the Glass Shard. Combine it with the Belt to make the Glass Knife. Go back to the front seat of the car and open the glove compartment. Use the Glass Knife inside to uncover the puzzle panel. Here you will use the Horses Statuette to start a puzzle. Click on the figures in this order:
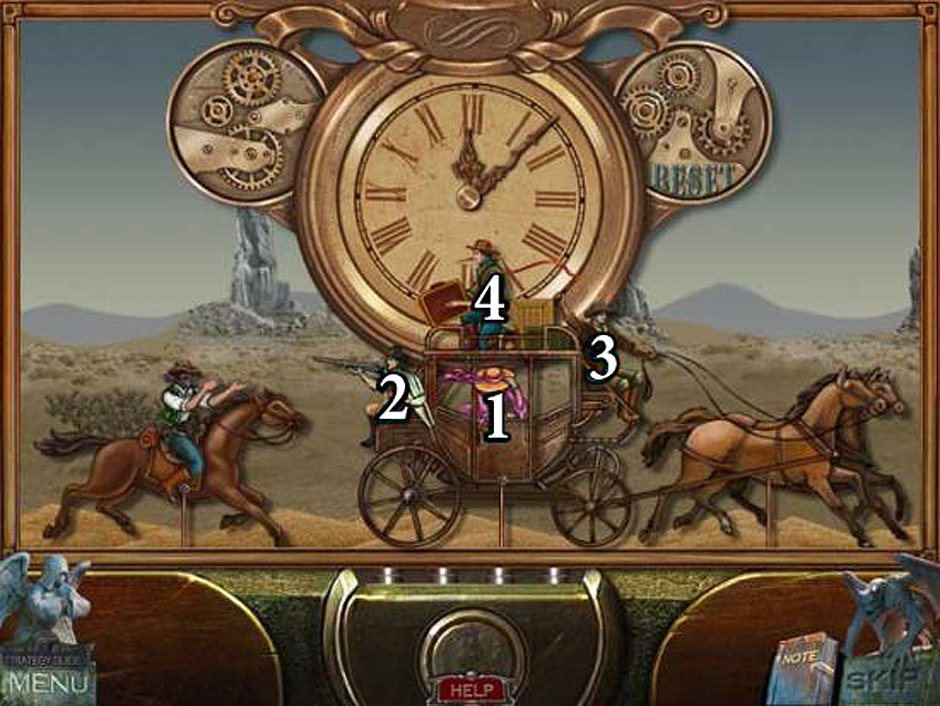
Redemption Cemetery – Grave Testimony Puzzle 02
When you’ve finished, take the Forked Stick from the compartment. Use it with the Elastic Band you’re carrying and create the Slingshot. Now you will want to go back to outside of the mine. Shoot the Slingshot at the bell above the entrance. While the gangster is distracted, take the Cup and Garrote from the table on the right. Now go forward. Here at the gate you’ll want to look at the ladder and use the Garrote to fix the first rung. Now you can look over the fence and grab the Lever. Now back at the main screen, grab the Crow Rune from under the leaves in the bucket. Send your Crow to grab the Grapple. On the bulletin board you can get the note and Pliers. Now go back to the mine.
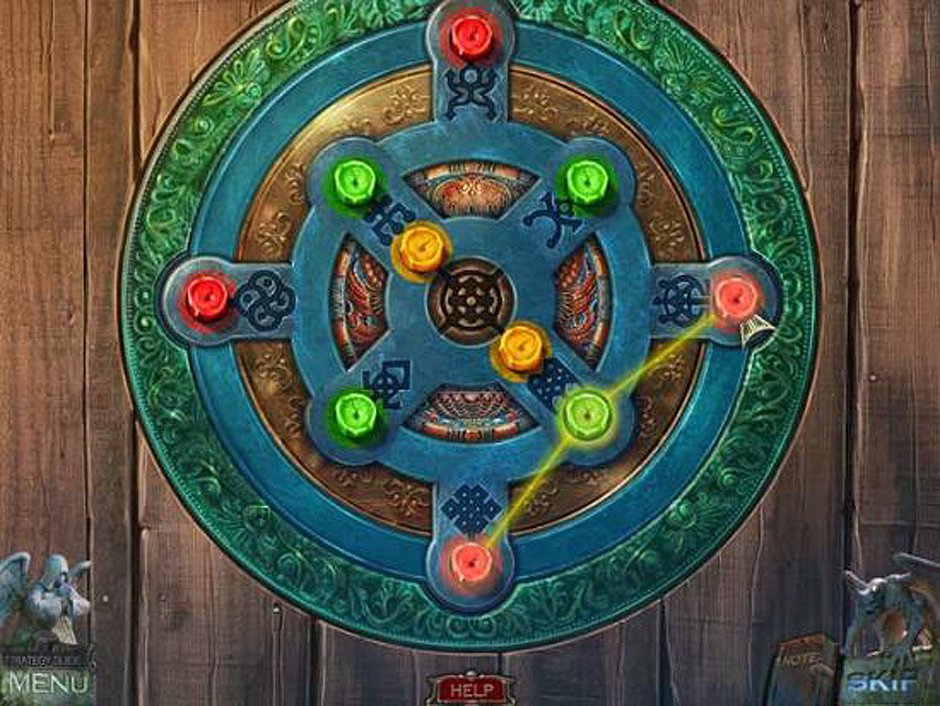
If you look at the crane you can use the Lever on the panel to start a puzzle. This is the answer:
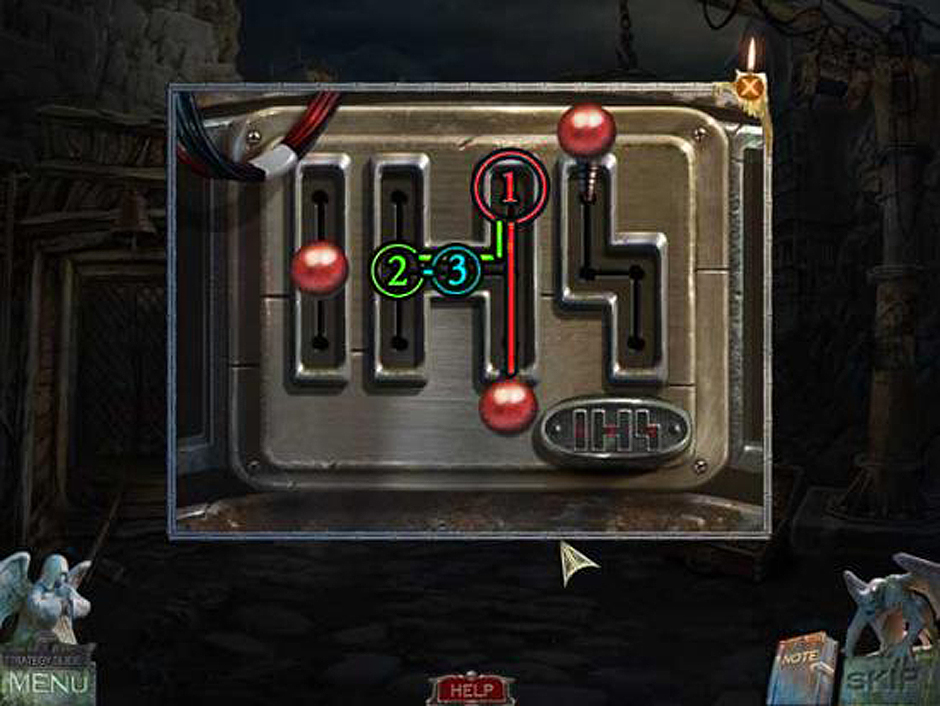
Redemption Cemetery – Grave Testimony Puzzle 03
When the puzzle is finished the crate will drop for you to look at. Use the Pliers to cut the wire and then take the Rope and Flashlight without Batteries. You can fill it with your Batteries to create the Flashlight with Batteries. Now put the Rope and Grapple together to make the Grappling Hook. Go back to the gate. The is a red steel drum on the right. Take a look inside with the Flashlight with Batteries and then use the Hook to grab the Valve. You can use this on the spigot on the water tower that is on the other side of the fence, starting the water again. The gate will open when the drum is filled, so you can move forward.
Chapter 2: The Mining Town
Wait for a moment until the man leaves. Now use the Grappling Hook to bring down the ladder. There is a Winch to grab from the sewer grate. Cut the pile of wire with the Pliers and then take the Glass Cutter. If you look closer at the Bulldozer, you will see a lock with gems. Place the gem into the slot, rotate it to where it needs to go, then tap the gem to put it into place. Leave the bulldozer for now.
Take a look at the door on the upper level of the right most building. Cut the window with the Glass Cutter and then go inside to the office. There is a hidden object area in the back. Take the Steak and give it to the fish. Take the Right Medallion Half and then lift the paper to find the Left Medallion Half. Use the both of them in the slot on the book. Take the Ruler and then the Code Message. Move the beads on the abacus to match the diagram then take the Resin Lump. The Ruler will open the drawer so you can collect the Gnome to use on the box on the desk. Take the Fuse from the box and put in into the fuse box. Now that there is power back, you can use the Resin Lump on the lamp. Take the Knight and place it into the empty slot in the book. Now place everything where it belongs inside the book
Redemption Cemetery – Grave Testimony Puzzle 04
Now you can take the Angel. On the couch there is a Newspaper to pick up. Opening the cabinet will let you gather the Matches. Look at the ceiling and use the Winch with the hook there. Pull the lever. There is a safe on the floor. Latch the hook with the handle and then look at the winch again before using the lever. The safe will lift. Take the Insulating Tape. Now go back outside and look at the bulldozer again. Use the Insulating Tape to the cover the wires. Now use the outmost lever and start the bulldozer, which will move away. Head into the bar and take the Fire Extinguisher.
There is a vent in the right corner. Look inside and take the Article. Take the Angel (2) from the broken jukebox. The upper left of the room has a cabinet to open with the Glass Knife. Take the Stethoscope. Now go back to the office. Use the Stethoscope on the safe to start a puzzle. Turn the dials while moving the Stethoscope to find the correct dial 11placements. Take the Sleeping Pills from the safe. Now go back outside.
That bulldozer is on fire! Use the Fire Extinguisher on it then look at it’s scoop to collect the Jack. Go back into the bar. Use the Jack to lift the refrigerator and then pull it back out. Open the wooden hatch in the floor and cut it open with the Glass Knife. Take the Coffee Beans from the sack then look inside the refrigerator to start a puzzle. Move the objects around until the cat food is in the correct place. Then you will be able to collect the Cat Food Can. Takea look at the coffee maker and place the Matches, Coffee Beans and Cup here to start a puzzle. Make the coffee by aligning the grinder, opening it, adding the coffee beans, and pulling the lever to grind it. Then add the coffee to the rightmost container, then add the water. Light a fire underneath with the Matches then pour the coffee into the cup. You will collect the Cup of Coffee. Combine this with the Sleeping Pills to make the Coffee with Sleeping Pills. Go back to the Mine and place it onto the table on the right of the man. After he falls asleep you can get into his pockets. Take the Lighter. Then take the Funnel from the steel drum.
Now that the way is cleared, go up the staircase. Inside this workshop you can collect the Forge Bellows and the Article hanging on the bulletin board. Take a close look at the generator and take away the tank cap. Place the Funnel inside and full it with the Fuel Canister. Collect the Coin and then turn on the generator by pressing the red button. Take the Demon from above the power box and leave the workshop and go back to the mine entrance.
There is a hidden object area over the suitcase. Take the Knitting Needles and sew gloves by using them on the thread. Then use the Gloves to pick up the Rose, which you use to open the box. Take the Screwdriver and use it to remove the small plate. Take the Spring and use it inside of the watch. This will let you get the Hairpin, which can be used to open the leather case. Take the Scissors from the case and cut open the ribbon on the gift box. Take the Tin Soldiers from the box to complete the area.
You can now use the Tin Soldiers in the fire drum. Place them in the mold before using the Forge Bellows to increase the heat. Then you can look at the mold again and collect the Angel. Return to the Office.
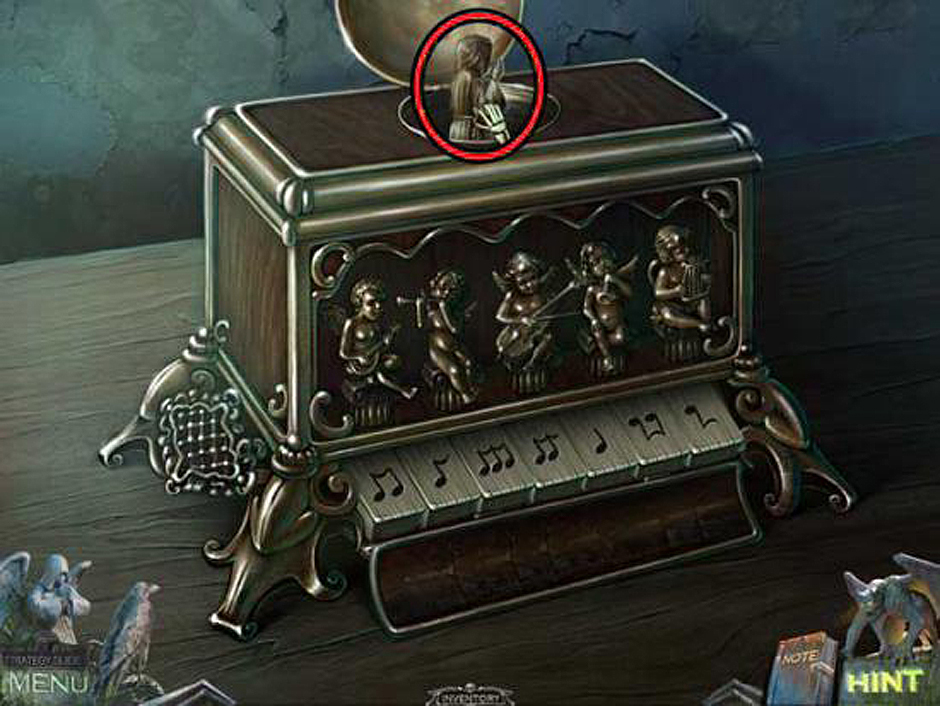
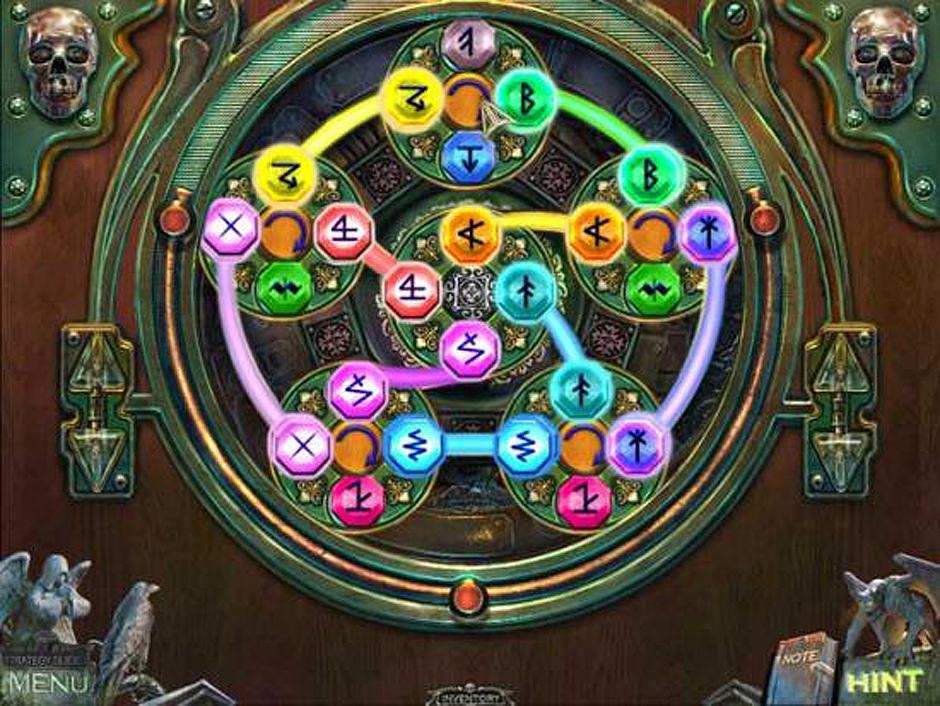
There is a hidden object area in the back. Fine the objects and use them as follows: Take the Handle and use it on the sharpener and then open the drawer. Take the Pencil and sharpen it in the sharpener then use the Pencil on the paper in the box. Take a look at the phone and dial 7-9-4-8-5. A Piece of Lock will show up that you can use on the lock to fix it. Add the Razor Handle to the Blade to make the Razor. Use this on the chair to get the Broken Spring and then open the locked drawer with it. Collect the Brush from inside. Now you can take a look at the cabinet. There is a puzzle box inside that you start by placing the Angel in the top slot. Match the musicians with the instruments. This is the correct order:
Redemption Cemetery – Grave Testimony Puzzle 05
Take the Monk and then go look at the chapel door. Insert the Demon and the two Angels you’ve collected. A puzzle will begin where you need to attack the demons. The puzzle is randomized and the demons will fight back. Be careful! The doors will open when you are finished. You can enter the Chapel.
Chapter 3: The Chapel
Inside the Chapel you will want to move both the right and left curtains. Take the book off the floor and then look at the grate to collect the Design Piece. Look at the back of the church and collect the Paints. There is a Crow Rune to collect on the bookshelf. Go back to the workshop where you can use the Crow to collect the Can Opener. Use this to open the can of Cat Food, creating the Opened Cat Food Can. Go back to the bar and use this on the dish. You can now collect the Chisel. Use the Coin on the slot of the jukebox and then collect the Design Piece (2). You can combine both Design Pieces to create the Design. Go back to the church and use the Chisel to remove candle Wax from around the large cross. Now go back to the workshop again. If you place the Wax in the hollow in the work table in the center of the room. Turn on the gas with the valve and light it with the Lighter. You’ll make a Candle to collect. Go back to the church.
You can place the Candle you just made into the holder on the altar on the right. Light it with the Lighter and then collect the Cable. Head back to the workshop. The Cable can be used above the generator between the red and blue sockets. Under the saw there is a lever, which will toss a Saw Blade at you. Collect it. Now examine the saw table and use the wood to create the Wooden Statuette. Using the work bench on the right, place the Paints, Wooden Statuette, and Brush to start a puzzle where you create a monk statuette.
Use the Carving Tool on the wooden blocks and then smooth it with the Sandpaper. Add the Wooden Limbs and then add the Screws. The Screwdriver is used to tighten them. Dip the Brush in the stain and use it on the figure, then use the Cloth to clothe it. Use the Small Brush dipped in the orange paint to paint a face. Use the black paint to paint the robe. Now you will have the Monk (2). Go back to the church. You can use both Monks on both stands in the confessional. A Key will appear to collect. Go back to the mine entrance. You can now open the gates with the Key.
Chapter 4: The Mine
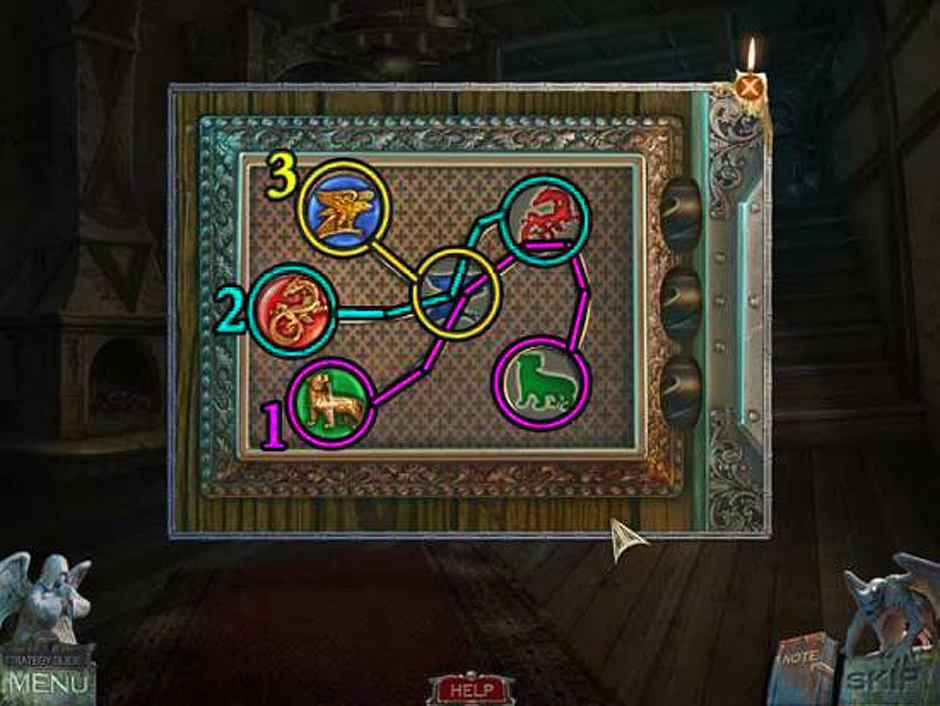
While inside the elevator, take a look at the floor console. No matter what you press, a gear will break. Replace it with the Saw Blade. Take another look and press “B3”. Get off on this level and pull out your Flashlight with Batteries. There is a Crow Rune to collect. Take a look at the miner’s helmet and then take the Central Panel Element before looking at the panel on the wall. Cut the rope with the Glass Knife and then place the Central Panel Element into the center slot. This will start a puzzle. Place the puzzle pieces into the matching color slots and then rotate them. This is the answer:

Redemption Cemetery – Grave Testimony Puzzle 06
When you finish, the power and lights will come back on. You can go forward now into the chasm. There is a contraption at the back where you can look closer and take the Elevator Button. Go back to the main area and use your crow to activate the lever on the right wall, summoning a mine cart. Look inside to find the Cell Key. No go back to the elevator and fix the panel with the Elevator Button you found. Go to B1 and exit onto that level. You can use the Cell Key to open the door and start a hidden object puzzle. When you collect all the items, you can collect the Insect Spray. Go back to the Chasm.
Use the Insect Spray to remove the bugs from the fallen over mine car. Collect the Stick and Amulet Piece. You’ll want to go all the way back to the Workshop now. On the round table you can saw the Stick into smaller pieces and collect them as Stick Pieces. Now go back to the Chasm, again. You can use these on the mechanism at the back of area. This will open a door for you to go through. Inside the creepy burial site, you’ll see a man who blocks your path. Collect the pickax then take the Elevator Button from the slab on the left. Go back to the elevator to go to B2 using the new button, but the elevator won’t let you, instead dropping you off on B1. There is a hidden object area here. Collect the items so you can collect the Amulet Piece (2). Now go back to the Elevator again.
Try to go to B2 again. Here you can read the scroll before using the Pickax to break the wall of rocks to collect Amulet Piece (3). You’re going to take these three pieces back to the Burial Site and place them in the three slots on the slab. This will start a puzzle. The answer is Ax2, Cx6, Bx3, Dx1.

Redemption Cemetery – Grave Testimony Puzzle 07
Chapter 5: The Small Town
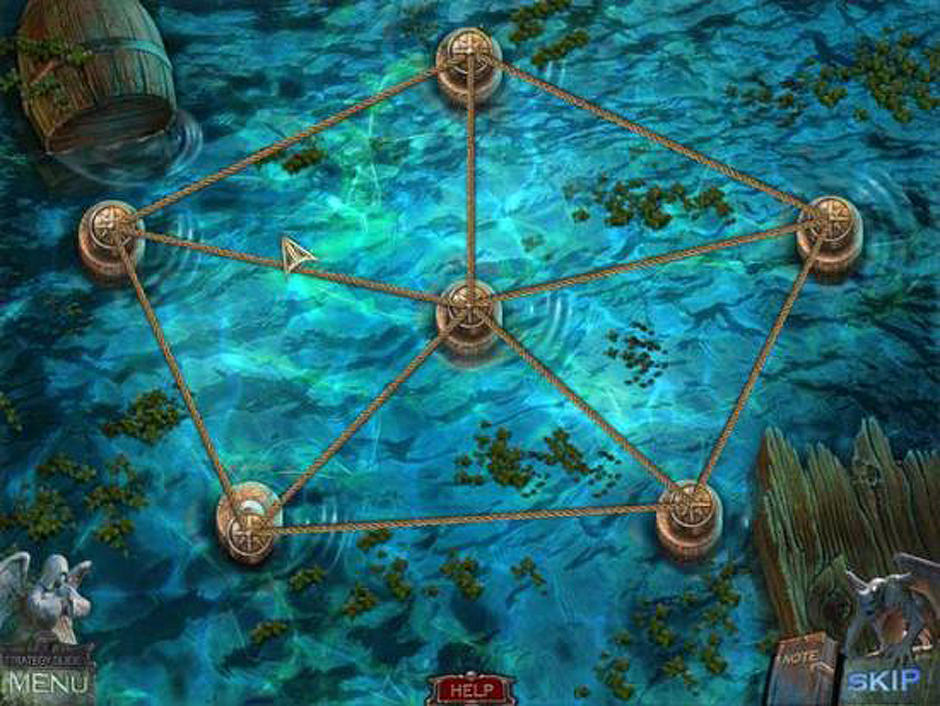
Back in the graveyard, you’ll want to talk to the ghost and collect the Soul Stone. Examine the water to start a puzzle. You have to place the boards in their proper places by switching them around. When you finish, you’ll move onto the swamp. Look at the water and talk to the ghost before heading through the portal. You’ll end up in a stable. Knock the box off the rafters and collect the Hand Drill. Talk to the man and woman, then take the note from beside the man. Go to the porch and use the Hand Drill on the barrel to empty it.
Take the Pitchfork from the barrel. The Scissors can be collected from the stain glass window. When you look closer at the door on the right house you can get the note and the Saw. Use the Scissorsto cut the rope around the tree before collecting the Fishing Rod. Now go back to the stable and use the Pitchfork on the hay. You will be able to collect the Iron Hammer and the Crow Rune. Use the Saw on the handle of the pitchfork to get the Hammer Handle. Add this to the Iron Hammer to collect the Hammer. Now go back to the porch.
Use your Crow friend to get the Apple from the tree and go back to the stable to give it to the horse. If you look in the bag around the horse’s neck, you will find the Fishing Tackle. Add it to the Fishing Rod to collect the Rod. Go back to the porch again. In the stained glass window over the left door you can use the Hammer. Once the glass is broken, use the Rod to fish the Key out. Use this to open the door of the leftmost house. Go inside!
Chapter 6: The Judge’s House
Now in the foyer, move the rug to find a hatch. If you look to the left there is a fireplace with a Manuscript for you to read. Take a look at the clock and collect the Globe Key. Now use the Saw to cut the door bolt on the upper level and go inside to a library. Open the globe with the Globe Key. Now read the letter on the first bookcase and then go to take the black books. A secret area will open with a hidden object area. Find all the hidden objects and you will be rewarded with the Signet Ring. Take the Coal Tongs from the bottom of the ladder and the Shawl from the top. Now go back to the Foyer and use the Coal Tongs on the Coal in the fireplace to take it, then go back to the library and use it on the bucket of ice. Now that it’s melted, take the Bucket of Water.
Come back to the foyer again and look at the fireplace once more before using the Bucket of Water. Once the fire is out you can take the Signet Ring (2). Now go back to the stable and go to the man and woman again. In the pile of sticks you can use the Coal Tongs to collect the Signet Ring (3). Once again, go back to the foyer. All three Signet Rings can be used in the doors under the stairs. This will start a puzzle. This is the answer:
Redemption Cemetery – Grave Testimony Puzzle 08
Now that the doors are open you can go to the next screen. There is an Amulet here for you to pick up at the bottom of the tree. You can fix the blade of the windmill with the Shawl. A Gem Eye will appear. Collect it, then the Guide Half from the fence ahead of you. Now go back to the Foyer. Use the Gem Eye and Amulet on the Statue in the left and then take the Ax. Go back out into the backyard and cut the branch against the gate with the Ax. Collect the Workshop Key. Now head back to the porch. The door on the right takes the Workshop Key. Go into the room and look at the hidden object area on the shelf.
Move the hat, then take the Chisel and Trowel. Remove the trap from the Racoon and then take the Bandage inside. Use it on the Racoon’s paw. Take the Oiler and Drawer Symbol. Go to the stack of books and move the top one to see the code. Now use the Oiler on the cabinet. Examine the plant and use the Trowel to collect the Golden Nut that you can use on the nutcracker. This will give you the Clock Button that you can use on the clock frame. Press the buttons at 1, 3, 12, then 2 so you can collect the Drawer Symbol (2). Use the Chisel on a loose board to pull it up, getting the Owl Coin. This will start a matching puzzle. When you finish you will collect Drawer Symbol (3).
You can use all three Drawer Symbols in the drawer with the three slots. Take the Incomplete Telescope. On the table on the right is a Crow Rune to pick up. Now go to the backyard again so you can examine the flat area in the tree. Here you will find a text and the Lever to take. Back in the Clock Workshop, you can look at the clock with no face. Move the top lever on the right to the middle, the left lever on the bottom to the middle, and the right lever on the bottom all the way to the left. You’ll be rewarded with the Gem Eye. Now go back to the Foyer.
Go to the statue that you had placed the previous Gem Eye into and place it’s twin in the slot. When the statue is out of the way, move into the next screen. There is another Guide Half to pick up and a note and Eyepiece in the coffin! Combine the Eyepiece with the Incomplete Telescope to make a Telescope and combine the two Guide Halfs to make an Unmarked Guide. Go back to the backyard now and return to the platform in the tree. You can place the Telescope in the stand here. Once you look through it, use the Unmarked Guide to start a puzzle. This is the answer:
Redemption Cemetery – Grave Testimony Puzzle 09
When you finish you will be given the Swamp Guide. Go back down to the backyard and go to the gate. You can use the Swamp Guide to move onto the next area.
Chapter 7: The Swamp
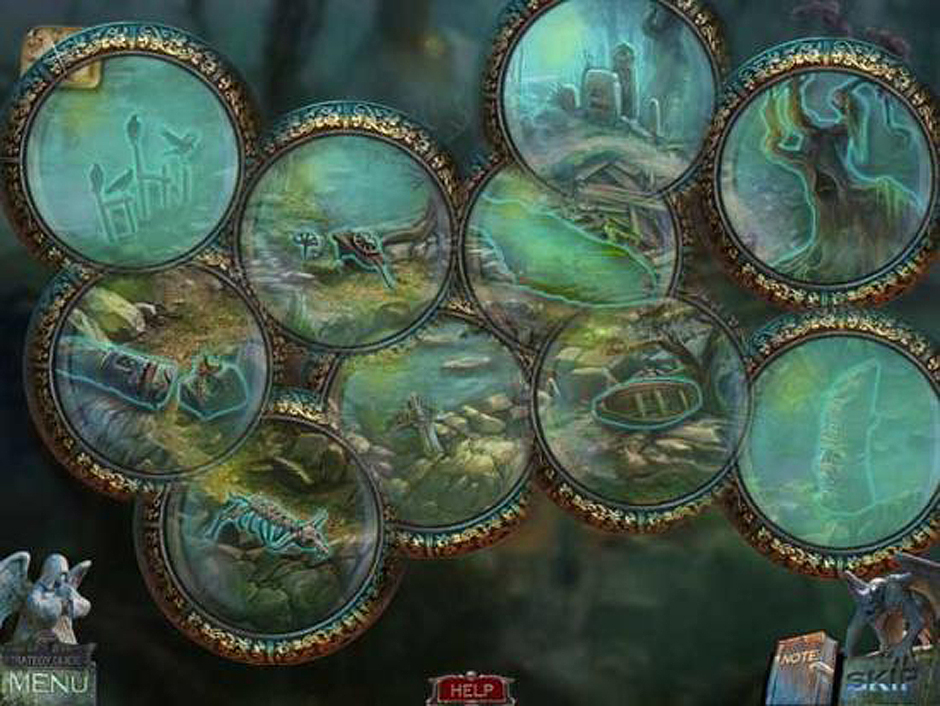
Welcome to the swamp! There is a hidden object area under the tree. Collect them all to get the Clock Weight then take the Fork. Examine the tower window ahead of you and then take the Crow Rune. You can go back to the main area to get your Crow friend to get the purse off the branch and look inside it. Take the note and then go back to the clock workshop. There is a hidden object area on the left. You want to knock over the Cup, then use the Shield on the frame and use the Toy Gun with the nutcracker. The gear goes into the watch and you can click twice on the bottom left gear to get inside the compartment. Collect the Mask Eye and then examine the stack of books to get the red Clip which you can use on the Green Bag. Take the Clock Hands and place them on the clock face. You’ll get the second Mask Eye to use with it’s twin on the Mask. Take the Spade Symbol and use it on the satchel. Now a bit of matching with the instuments and handles. Take the second tool on the bottom row to collect the Pliers.
Now at the back of the room, you will examine the chest. Use the symbol solution in your notes to open it. Now take the Urn and the Suction Cup. Use the Pliers on the mirror to the right, removing the flaps holding it. You can now take the Square Mirror. Head back to the swamp.
Take another look at the fallen purse. You can collect the Mirror inside by using the Suction Cup. Now head to the library again and open the hidden object area. Collect all the items to get the Dragon Lever. Move the ladder to put both the Square Mirror and Mirror into the slots above. Opening the book will start a puzzle involving lights. Use these images as a guide for the answers:
Redemption Cemetery – Grave Testimony Puzzle 10
Redemption Cemetery – Grave Testimony Puzzle 11
Redemption Cemetery – Grave Testimony Puzzle 12
You will be given the Tower Key when you finish. Now go back to the swamp and look at the hidden object area. Once you collect all the items, you will have the File. Use the Tower Key on the door for the tower to move on to the next chapter.
Chapter 8: The Tower
Safely in the tower, collect the Bullet, Stick and Dragon Lever (2). Now go all the way back to the foyer. On the left there is a panel where you can use the Dragon Levers. This will start a puzzle. Move the first lever to the center, the second to the top, and the third to the bottom. This will open a hatch on the floor and start another puzzle. The answer is:
Redemption Cemetery – Grave Testimony Puzzle 13
When you finish the puzzle you can move on to the secret chamber. Open the big cabinet and take the Clock Weight (2). Now go to the coffin room again where you can use both Clock Weights on the chains that are inside the clock. You can take the Set of Picklocks from inside. Now remove the lock from the shut window with the File and then take the Skull Knob. Go back to the secret chamber. There is a book stand on the left to examine and use the Skull Knob on. Take the Central Circle.
Now go back to the Coffin and use the Central Circle on the gap for it. This will start another puzzle. Rotate all the circles so that they match. This is the answer:
Redemption Cemetery – Grave Testimony Puzzle 14
The coffin will open when you finish so you can use the Urn inside to pick up the ashes, collecting the Vampire Ashes. Go to the backyard and go back into the tree. Use the Fork with the Stick to make a pair of Tongs. Use them to grab the Flask out of the tree. Now go back to the secret room and put the Flask, Vampire Ashes, and the Bullet on the table and start a puzzle. The book will tell you how to combine the ingredients to create the Potion. Now go back to the Tower and examine the cage with the woman inside. Use the Set of Picklocks with the cage and a puzzle will start. Arrange the picklocks into the proper slots by matching. Once the puzzle finishes you can give the Potion to the woman and read the paper scrap before the game takes you back to the swamp.
Chapter 9: The Ship
There is a ghost in the water to talk to and then take the Soul Stone (2). Now you’ll want to go to the right towards the lake of death. Another ghost will show up for you to talk to. Go through the portal he makes and you will end up on the deck. Look down at the grate in the floor and collect the Coin. Take the Wedge from the hatch doors and then examine the wrapped thing on the railing. Take the Coin (2). You can stop the barrel with the Wedge. Go inside the right door and into the cabin. There is Rope and the Dirk to gather here and a sick man to talk to. Take a better look at the window and use the two Coins to hold the latches. If you look out the window, a puzzle will start. Untangle the ropes like so:
Redemption Cemetery – Grave Testimony Puzzle 15
Take the Medicine from the buoy and take it to the sick man. He will give you a Chest Key which can be used on the chest on the right. Take the Oil Can and the Crow Rune from it and go back up to the deck. The Oil Can can be used on the hatch so you can open them. Take the Harpoon and Oar. If you examine the wrapped object again you can use the Dirk to get rid of the ropes. It’s a spear gun! Combine the Harpoon with the Rope to create the Harpoon with Rope. Use this with the spear gun and then use the Oar on the boat you bring close. On the boat, have your Crow friend to get you the rope so you can go to the other ship. Climb up the rope.
You can examine the fish statue here and use the Dirk to get rid of the seaweed. Take the Anglerfish Light from the monster hanging out over the door. Now go back to the boat and use this on the statue there before collecting the Horn. Then collect the Horn (2) from the other anglerfish. Go back to the rear of the ship and use both Horns on the two goldfish statues. The door will open to the Captain’s Room. Go inside and talk to the ghost, then pick up the Behemoth Eye from the glass tank on the floor. You can get another Crow Rune from the gold shield in the back and then have your Crow friend get the Fish Nose. Go back out to the rear of the ship and examine the monster over the door again. You can place the Behemoth Eye here. Open his mouth and use the Fish Nose to prop it open and grab the Crab Claw.
Go back to the Captain’s room and examine the back of the room. You can use the Crab Claw on the contraption to start a puzzle. This is the answer:
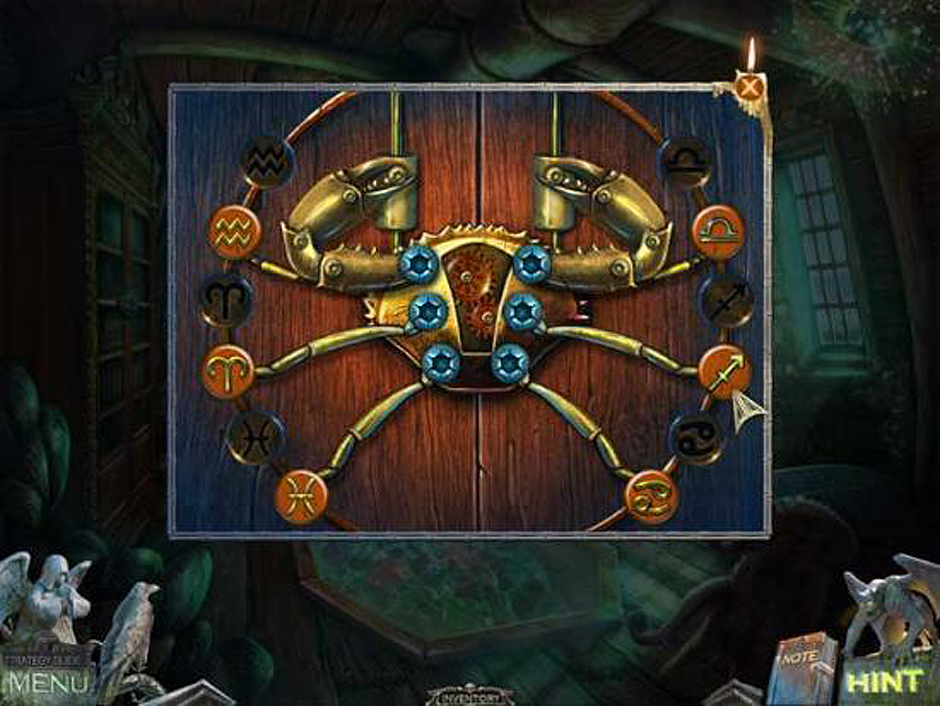
Redemption Cemetery – Grave Testimony Puzzle 16
The door will unlock so you can move on. Take a look at the cannon and open the back. Collect the Ramrod. Now look at the bucket on the rope and take the Scraper. Go up the stairs to the bow of the ship. There is a hidden object area here. Collect all the objects and you will get a Gem at the end. If you look at the chains to the left, you can get a book and then use the Scraper to collect the Starfish. The barrel has a Map on top of it. You can also use the Dirk to get inside the barrel and grab the Ring. Go back to the Captain’s room and take a look at the bookcase, where you can use the Starfish to open the lock. Grab the Gem (2) and the Pirate Hook. Combine the Pirate Hook with the Ramrod to make the Ramrod with Hook. Now take a look at the aquarium again and cut the glass with the Ring. Now it’s time to head back to the bow.
There is a statue with a crown here you can use both Gems in. Go into the now open hole and go below deck. The Ramrod with Hook can be used to grab the floating bucket so you can collect the Hatch Key. Go back to the deck of the ship and unlock the hatch. Take the Board and go back bellow deck. You can use the Board to make a bridge between the two barrels then get the Net from the right side. Use the Dirk on the barrel floating on the left to get rid of the net, which will let you collect the Fishnet and Cannonball. Back on the deck you can use the Cannonball inside the hanging bucket and a new hidden object area appears.
Pick up the Torch, Cannonballs, Scoop, Ramrod, and Stone. The Scoop in the barrel gets Powder before breaking the lamp with the Stone. Light your Torch on it and then add the Powder, Ramrod, Cannonballs, and Lit Torch on the cannon. Now aim for the platform with the cross on it and fire! You’ll be able to collect the Sea Horse. Go back to the Captain’s Room and go to the gold shield in the back. The Sea Horse can be used here to get the Map (2). Combine the Net and the Fishnet to get the improved Net, then use it in the aquarium to get the Electric Ray. Put this little guy in the bowl back on the deck. You can go down into the hold when it has been drained out.
Chapter 10: Redemption
While you are in the hold, collect the Boot and then take a look at the barrel and take the Map (3). Take the Corkscrew from the rightmost door. Now go back to the bow before going below deck once more. You can open the hatch on the right with the Boot so you can collect the Statue Hand. In the back you can start a puzzle with a mermaid. Switch pieces around until it makes this image:
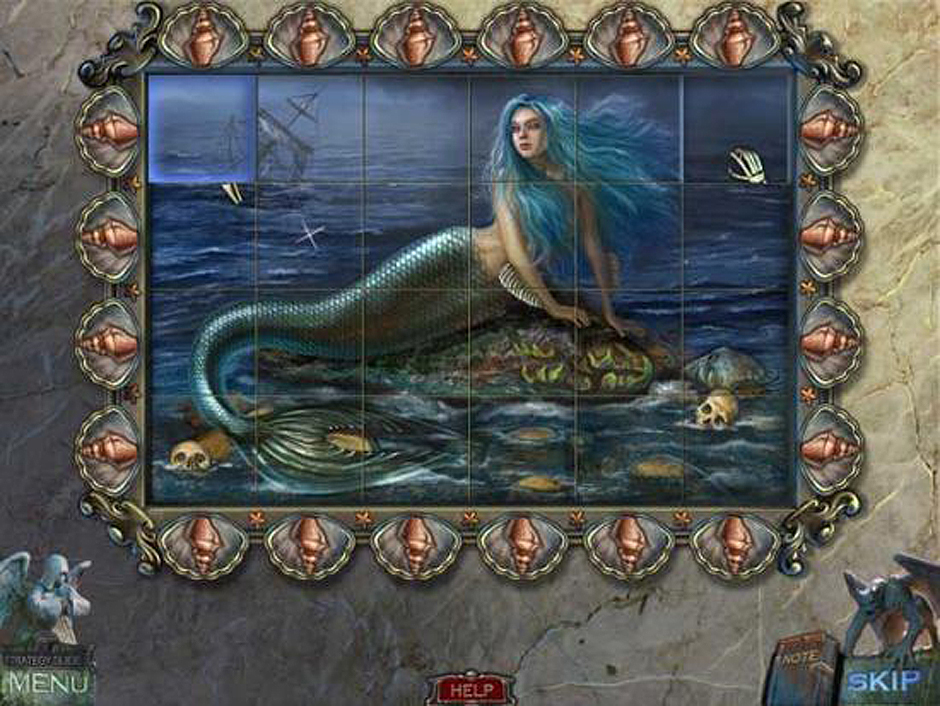
Redemption Cemetery – Grave Testimony Puzzle 17
Now had back to the bow and do the hidden object area there. Once you are finished you will be given the Diadem. Now take a look at the statue with bow and add the Statue Hand. Once the anchor rises, use the Ramrod with Hook to fetch the Bracelet. Below deck, take a look at the painting again and give the Diadem to her to get the Map (4). Go back to the hold and use the Bracelet with the tentacle so that the door will open to the cell. Go inside and take the Trident Tines from the statue on the left. Now collect the Bracelet by using the Ramrod with Hook. Now go back to the hold and look at the barrel again, adding the Bracelet to the tentacle. Now watch the octopus have a hissy fit and break the barrel. Examine the wreckage and collect the Crow Rune, Corked Acid and read the note.
Go back to the cell and go to the rusty bars on the right to use the Corked Acid. The bars will melt so you can look at the cage. Take the Bracelet from the cage. Go back out to to the hold and go to the right to use the Bracelet on the tentacle so it will open the door to the treasury. Go inside and take a look at the trident in the statue. Add the Trident Tines and place them in the correct spots:

Redemption Cemetery – Grave Testimony Puzzle 18
Afterwards, take the Parrot Head and take the scroll. Send your Crow friend to collect the Helmet. Now go back to the cell and take a look at the statue again. Put the Helmet on his head and then take the Mermaid Figure. Go back to the cell and use the Parrot Head on the bird in the cage. Adjust the wing to be lower, then collect the Map (5). Go back to the treasury. Go to the pedestal at the back and use the Mermaid Figure in the groove to start the puzzle. Switch the pearls around until the colors match with the shells. Collect the Map (6) and go back up to the deck. There is a hidden object area here.
The Hook combines with the Rope to become Rope with Hook, which you use on the cannon and chained box. Push the cannon over the side to crack open the box. Inside you will see rune dials you need to adjust, then take the Violet, Red and Green Gems. Now go to the sword and adjust the hilt until the picture of a rose is seen. When it is done, collect the Blue Gem. Use all the Gems on the box and move them so they match. Now you can collect the Map (7).
Go back to the Captain’s room and speak to the Ghost. The is a large frame in the room that you can use the Map (x7) on and start a puzzle. Rearrange them to form the map. You can now collect the Guides. After speaking the ghost, take these to the cabin of the first ship. Place the Guides into the compass box and then take to the man to collect the Hold Key. Return to the deck where you can use the Hold Key on the lock on the grate. Once the prisoner is free, you will be taken back to the Lake of Death. Take the Soul Stone (3). Now you can go back to the dock.
Look at the ferryman and give him all three Soul Stones. This ends the quest! Congratulations! You’ve completed our Redemption Cemetery – Grave Testimony Walkthrough! For more great tips and tricks, visit our blog!
Delicious – Emily’s Hopes and Fears Walkthrough
Big City Adventure – Shanghai Walkthrough
Building the Great Wall of China 2 Walkthrough
This Redemption Cemetery – Grave Testimony Walkthrough is meant as a guide and does not contain cheats, hacks or serials.