The second game in the Witches’ Legacy series, this game follows Lynn after she has awakened her magic power. After getting a letter about Elizabeth, she must go on a new journey to stop an evil being before she can complete her descent into darkness. Our Witches’ Legacy – Lair of the Witch Queen walkthrough will help you through this adventurous hidden object game.
Contents
General Tips & Tricks
At the start, you can pick a difficulty level.
Casual will make things easier to spot, and there are no penalties for clicking the wrong item. Hint and skip buttons will recharge faster.
Normal is the standard difficulty level for the game. Sparkles will still appear to indicate active areas.
Hard mode has no sparkles to indicate activities, no hint or skip buttons, and has penalties for mis-clicks in hidden object scenes.
Click on your journal in the lower left corner for notes on the story and important clues.
From the journal, you can also click on the map after you locate it. This will show you if you have things left to do in a certain area.
Your inventory is the bar at the bottom of the screen. Items you pick up will be here to use. It will hide unless you mouse over it. You can also click the lock on the right of the bar to keep it shown.
The skull on the bottom right is your hint button. You can use hints anytime, but you’ll need to wait for the skull to refill before you can use another one.
The cursor will change depending on what you can do. You will see the following icons:
The hand icon shows when you can pick up an item or interact with it.
The magnifying glass tells you when you can zoom in to an area.
A speech bubble means you can speak with that character.
Throughout the game you will need to solve hidden object scenes and mini-game puzzles. If you get stuck on a hidden object scene, you can opt to complete a memory match game instead by clicking the green button in the top right corner. You can switch back to the hidden object scene at any time.
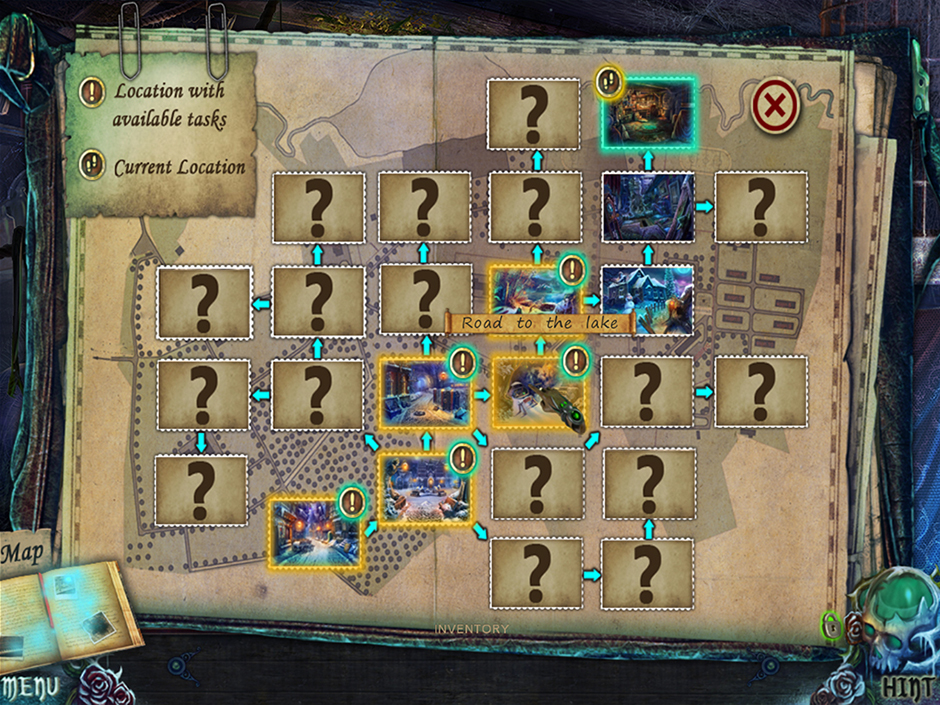
Witches’ Legacy – Lair of the Witch Queen – Map
Witches’ Legacy – Lair of the Witch Queen Walkthrough
Chapter 1: Follow Lynn
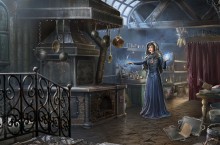
House
Complete the tutorial if you want an introduction to how to play.
Zoom in on the dollhouse and open the lid. Pick up the Imp inside and name it.
Open up the drawer underneath the dollhouse and take the Mirror and Ribbon.
Click on the planter on the left side of the room. Hang the Ribbon on the pole and then click on it twice to receive the Cabinet Key.
Click on the wardrobe on the right and use the Cabinet Key to open it. Pick up the Axe. Try to open the door; click the handle and use the Axe to chop it open.
Go up the stairs.
Upstairs Bedroom
Click on the desk and collect the ½ Rune Stencil. Open the book on the desk and turn the page to pick up a Ring.
Zoom in on the circle on the floor and pick up the Note. Click on the book to the left and insert the Ring. Click on the book two times to receive the 2/2 Rune Stencil. Zoom back out.
Put the Rune Stencils into the window. Click on the dress and put down the Mirror to get the combination. Go back downstairs.
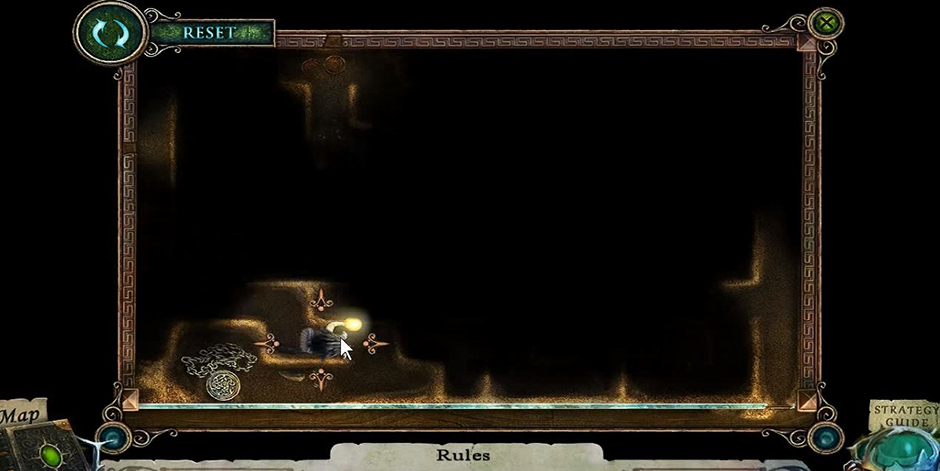
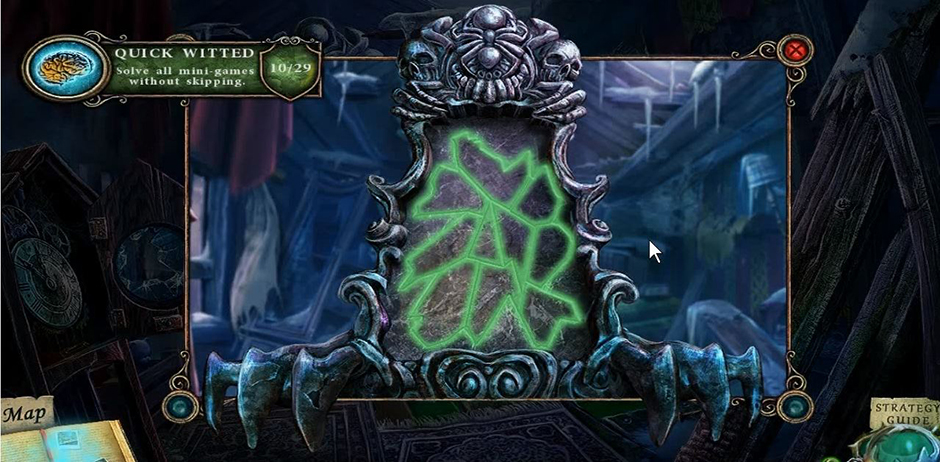
Click on the wardrobe and use the combination on the box to open it. Grab the Chalk and go back upstairs to the circle.
Put the chalk on the circle and complete the puzzle by connecting the colored circles. Paths cannot cross.
Witches’ Legacy – Lair of the Witch Queen – Colored Circles
Go through the portal that opens.
Chapter 2: Find Morgana
Outside Street
Pick up the Bag of Hay on the right. Open the mailbox and take the Map. Click on the wagon to complete a hidden object scene. Find all the objects or complete the memory game. You’ll receive Punch Card #80.
Use the Punch Card #80 on the mailbox and take the Lever. Place it on the side and pull it to get the Planets Diagram and Saw.
Click on the torch on the opposite side of the scene. Use the Saw to take the Torch and the Air Medallion. Use the Torch on the dark cloud and move forward.
Front of Building
Talk to Lynn, the girl on the bench. Select the snow pile in the center of the path and take the Valve. Walk to the right.
Outer Gate
Talk to Lynn again. Look at the manhole in the street and take the Glove. Walk back to the front of the building.
Front of Building
Take the Earth off of the bench. Use the Glove to pick up the blade. Go back to the right.
Outer Gate
Look at the gate. Speak to the guard. Give the Bag of Hay to the horse and use the Blade on the hay. Pick up the Breaker Handle and the Sun.
Look at the suspended platform and find the controls on the left side. Insert the Breaker Handle and lift it to unlock a mini-game.
To complete the mini-game, find the path from left to right using the right amount of colored circles.
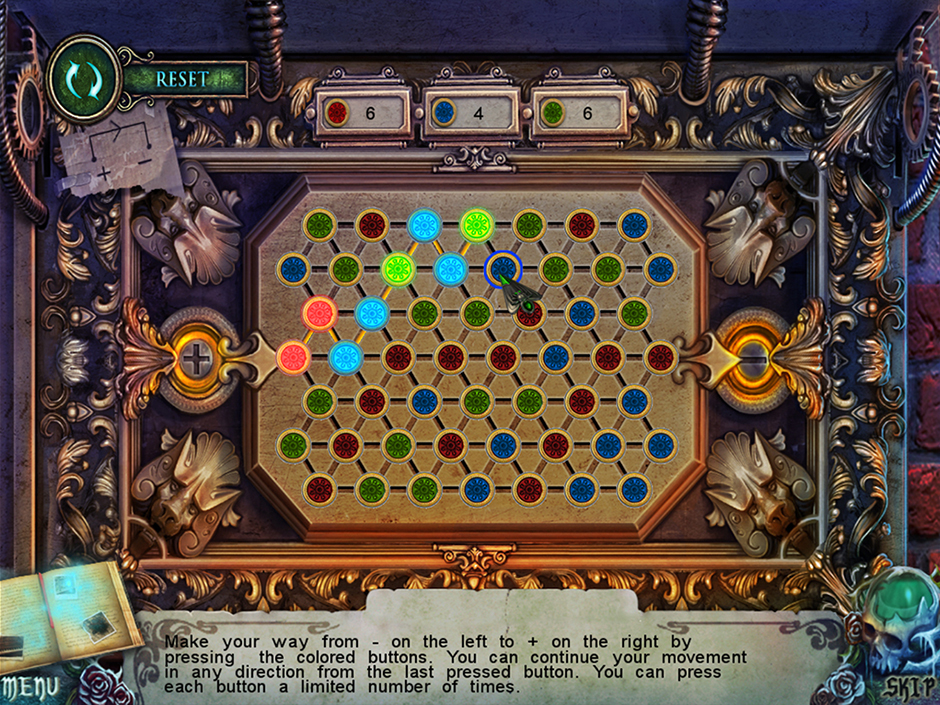
Witches’ Legacy – Lair of the Witch Queen – Minigame 1
Now you can click on the platform for a hidden object scene. Find all the items or complete the memory game to receive Punch Card #78. Go back twice to the outside street.
Outside Street
Use the Punch Card #78 on the mailbox and pull the lever. Take the Fly. Go forward and right back to the outside gate.
Outside Gate
Look at the gate and place the Fly in the web. Open the gate and go right.
Entrance
Pick up the Shovel to the left of the door. Knock on the door and speak with Morgana. Take the Bat and walk back down to the gate.
Outside Gate
Look at the box and put the Bat in the lock to open it. Take Tom’s Things. Head back right.
Entrance
Give Tom’s Things to Morgana and talk to her. Look in the box she holds. Talk to Lynn.
Open the box on the table and take Saturn and the Office Doorknob. Walk back to the area with the benches.
Chapter 3: Go to University
Click on the door to find a planets mini-game. Use the Planets Diagram, Earth, Saturn, and Sun on the door to activate the mini-game. Use the diagram to press the planets in the right order.
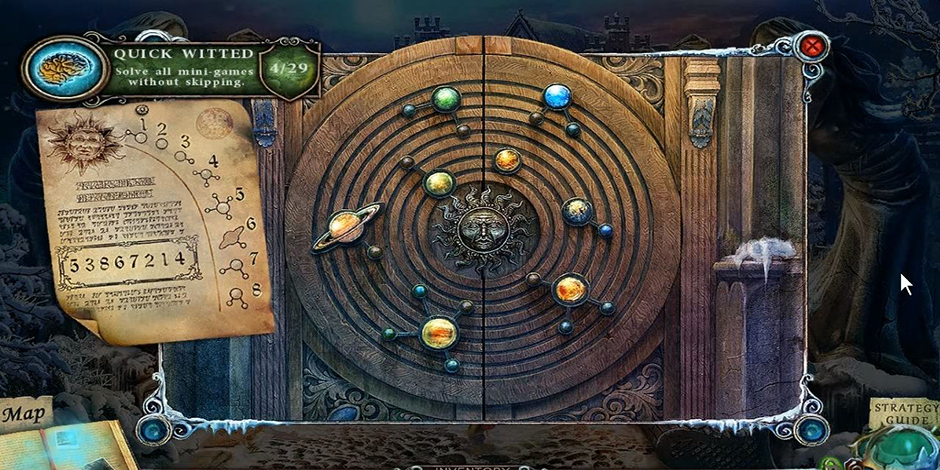
Witches’ Legacy – Lair of the Witch Queen – MiniGame Chapter 3
Elegant Hallway
Go through the door. Look at the desk and grab the Small Pliers. Read the certificate. Go back and right to the outside gate again.
Outside Gate
Look at the building’s ledge on the left and click on the nozzle to send your Imp in. Give him the Small Pliers and you’ll receive the Firehose Nozzle. Travel back through the planets door.
Elegant Hallway
Zoom in on the stairs and talk to Lynn. Open the cabinet here and attach the Firehose Nozzle to the hose. Put the Valve on the pipe and take the Hose. Walk forward.
Upstairs Hallway
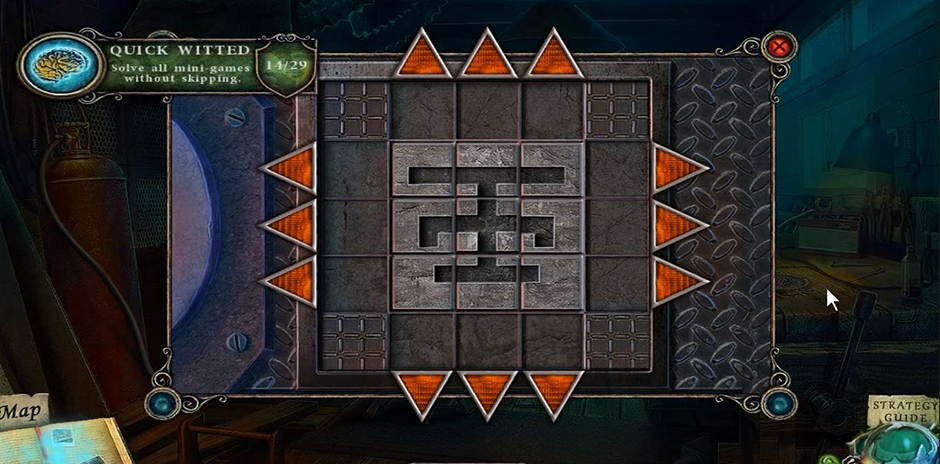
Take the ½ Bas Relief from the right chair. Click on the second door on the left for a hidden object scene. Find all the objects or complete the memory game to receive the Golden Spider. Look at the first door on the left for a mini-game.
Place the Office Doorknob on the door to start the game. Create a connected path using the grid that touches the circles a certain number of times. Complete all three levels to proceed. Go into the office.
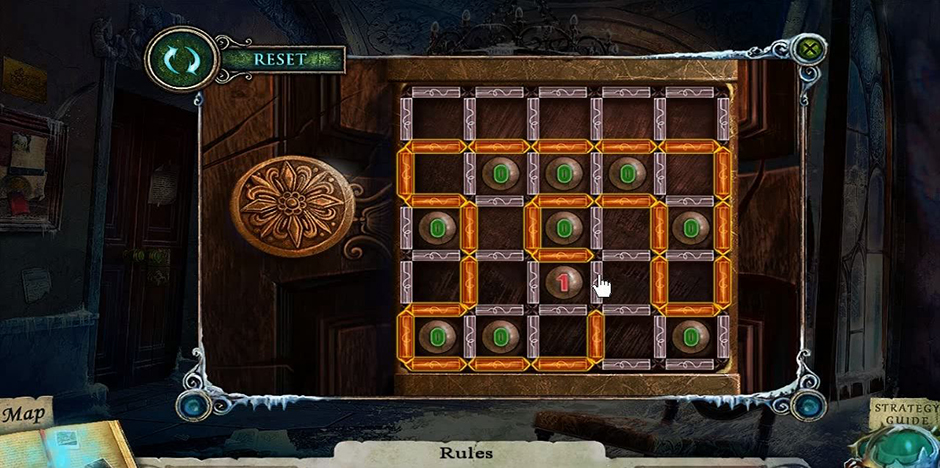
Witches’ Legacy – Lair of the Witch Queen – Level 3
Office
Talk to Lynn and read the note on the left wall. Zoom in on the desk and turn on the kettle to take a Hot Kettle. Take the 1/2 Heart Locket. Read the newspaper.
Look down at the frozen door and use the Hot Kettle to open it. Go back to the hall.
Upstairs Hallway
Use the Hot Kettle on the ice on the right side. Take the Ruby and go back into the office.
Office
Look at the safe on the bookshelf and put the Ruby in the indent. Click it and take the Fire Medallion and Punch Card #79. Go back four times to get to the outside street.
Outside Street
Use the Punch Card #79 on the mailbox and pull the handle. Take the Stone Clock Piece. Click on the wagon again for another hidden object scene. Find all the items on the list or complete the memory game to earn the Box of Matches. Go forward to the area with benches.
Front of Building
Look at the base of the left statue. Place the Stone Clock Piece in the indent and click the tile. Take the Half of Tile. Go forward twice to the upstairs hallway.
Upstairs Hallway
Click on the frame on the left side, and place the Half of Tile inside. Flip the tiles so that the number reads correctly. Take the Toy Torch and the Dynamite. Go back downstairs.
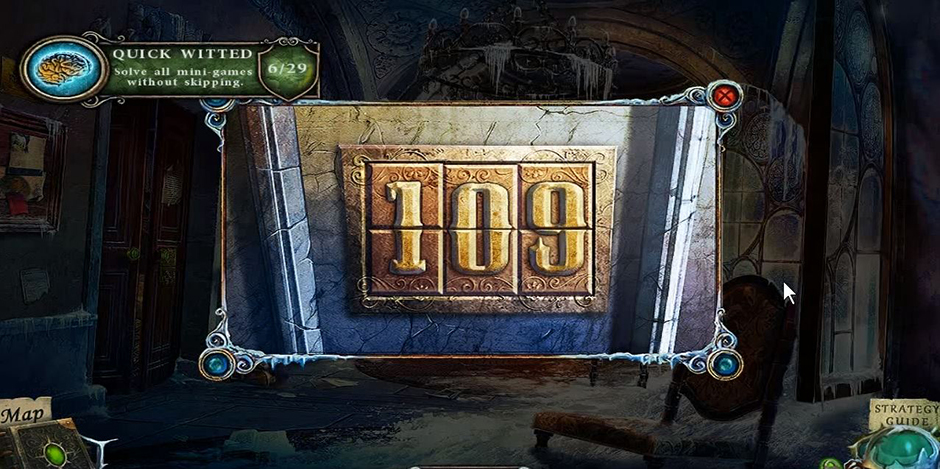
Witches’ Legacy – Lair of the Witch Queen – Number
Elegant Hallway
Zoom in on the desk and give the imp your Toy Torch. Click on the hole in the glass to start a mini-game.
Click on the arrows to create a path for the imp to follow to the other side to finish the mini-game and receive a Water Medallion. Go back and try to return to the outside gate.
Witches’ Legacy – Lair of the Witch Queen – Path
Front of Building
Look at the ice to the right and put the Dynamite in the crack. Use the Box of Matches on the dynamite. Go right and forward.
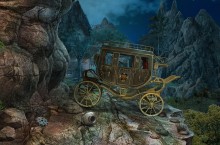
Abandoned Car
Take the Earth Medallion from the tree. Look at the rings and place the medallions in the right order. Place Fire Medallion in upper left, Air Medallion in lower left, Water Medallion in upper right, and Earth Medallion in lower right. This starts a mini-game.
To complete the mini-game, move the colored tiles to the circles of the same color. Click in this sequence to finish: A-D-E-B-B-C-D-E-E-D-E-E-E-B-E-E-E-A-E-E-E-C-C-E-A-E-E-E. Go forward.
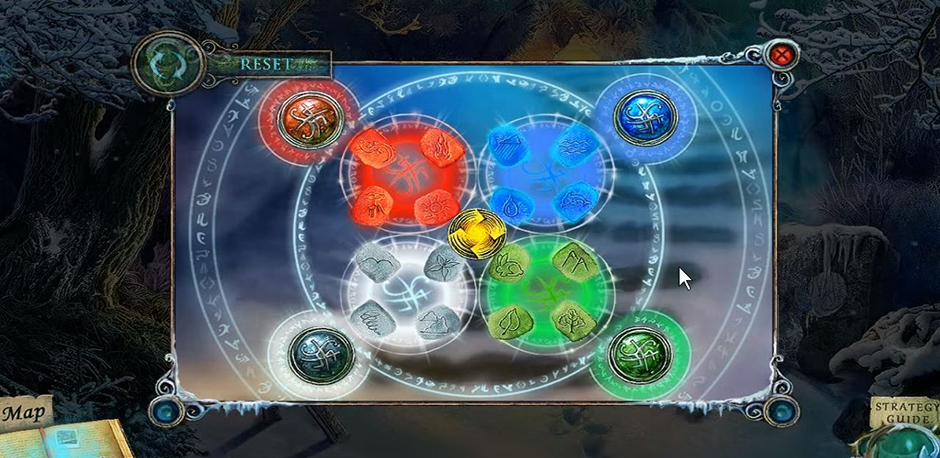
Witches’ Legacy – Lair of the Witch Queen – Tiles
Chapter 4: At the Lake
The Pier
Zoom in on the dock and take the Thermal Fuse. Try to take the Horn. Click on the boat for a hidden object scene. Find all the objects on the list or play the memory game to earn a Gaff. Go to the left.
Frozen Crevice
Take the Folding Knife and the Lever. Talk to the tree. Move forward.
Fountain
Take the 1/2 Vine and the Crowbar. Use the Gaff on the right side tree to get the 2/2 Vine. Use the Vine on the boulder and walk down.
Frozen Crevice
Give your Vine to the tree and take the Bowl near the roots. Use the Shovel on the snow by the tree and pick up the Acorn. Go forward.
Fountain
Zoom in on the fountain and put the Bowl under the water to pick up a Filled Bowl. Go back down to the pier.
The Pier
Use the Shovel on the dirt to dig a hole. Put your Acorn in the hole and use the Shovel to bury it. Pour your Filled Bowl over the dirt. Go back to the area with the car.
Abandoned Car
Click on the car and use the Crowbar to open it. Take the Chest Emblem. Zoom in on the fire extinguished and cut the straps with the Folding Knife. Take the Fire Extinguisher. Go down and right back to the house entrance.
Entrance
Look at the box on the table and place the Chest Emblem in the indent. Take the 2/2 Heart Locket piece and go back to the pier.
The Pier
Use the Fire Extinguisher on the fire. Walk forward towards the house.
Outside Cabin
Put your Heart Locket in the chest of the angry snowman. Take the Strainer. Go back to the pier.
The Pier
Click on the boat to start a hidden object scene. Find all the objects on the list or complete the memory game to receive a 1/2 Triangular Rune.
Zoom in to the dock and click on the hole in the water. Use the Strainer to receive the Horn. Go forward.
Outside Cabin
Use the Horn on the skull in order to open the door and go inside.
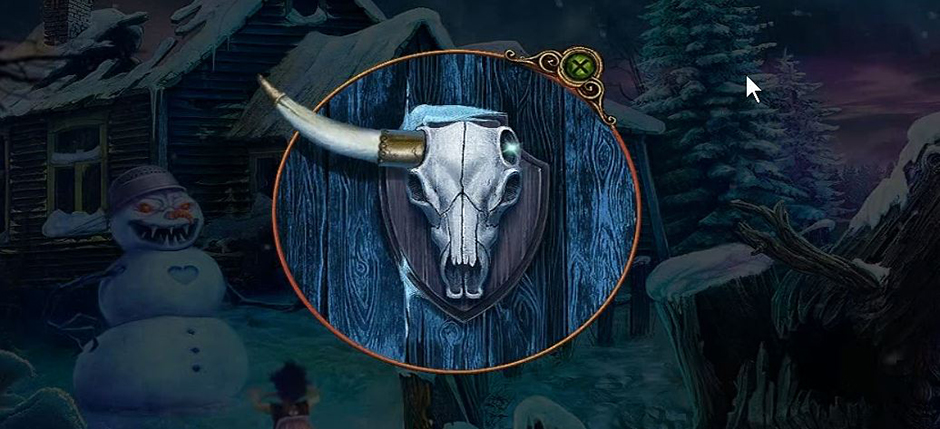
Witches’ Legacy – Lair of the Witch Queen – Skull
Chapter 5: The Decrepit House
Decrepit House
Take the Disc Part and click on the mirror to make it break. Take the 2/2 Triangular Rune. Take the 1/4 Mirror Fragment from the trapdoor area. Put your Triangular Rune in the indent and go through the trapdoor.
Basement
Pick up the 2/4 Mirror Fragment. Use your imp to get the Gas Burner from the left shelves. Pick up the Wrench from the left table. Click on the center table to start a hidden object scene.
Find all the hidden objects or complete a memory game in order to receive the Clockwork Key. Go back upstairs.
Decrepit House
Use your Clockwork Key on the clock to the left. Pick up the 3/4 Mirror Fragment and Silver Spider inside. Go back through the trapdoor.
Basement
Find the mini-game located on the shelves. Insert the Golden Spider and Silver Spider to start the mini-game. Swap spiders in order to complete the mini-game. Move them as follows:
A2 to B3, E2 to D3, B3 to D1, D3 to B1, A4 to B3, B3 to C4, D1 to E2, E4 to C2, C2 to A4, B1 to C2, C4 to A2, E2 to C4, C2 to D1, A2 to B1, B1 to E4, C4 to D3, D1 to B3, B3 to A2, and D3 to E2.
Witches’ Legacy – Lair of the Witch Queen – Spiders
Pick up the Pliers and Hose Clamp. Go back upstairs.
Decrepit House
Use your Pliers and grab the 4/4 Mirror Fragment. Look at the broken mirror and use the Mirror Fragments to fix it. You’ll need to complete the mini-game, which is like a jigsaw puzzle. You can rotate and drag the pieces to complete it. Go into the mirror.
Witches’ Legacy – Lair of the Witch Queen – Broken Mirror
In the Mirror
Talk to Wolfgang and receive the Book Emblem. Grab the Lantern hanging from the chain. Go back through the trapdoor to the basement.
Basement
Remove the cover on the furniture to the right. Use the Book Emblem and take the 1/2 Coat of Arms. Click on the table for another hidden object scene. Find the items on the list or finish a memory match game to receive the Bar.
Outside Cabin
Look into the tree stump and hang the Lantern up on the left side. Click inside the stump and take the Magic Crystal. Go back two screens to the car.
Chapter 6: Return to University
Abandoned Car
Melt the ice on the right with the Gas Burner and take the 2/2 Coat of Arms. Go back into the University and up the stairs.
Upstairs Hallway
Look over the door and place the Coat of Arms in the indent. Go into the second door on the left to complete a hidden object scene. Find the items on the list or complete the memory game to get a Workshop Key. Go through the double doors.
Library
Take the 2/2 Bas Relief and zoom in on the counter to pick up a Safe Handle. Go back to the University office.
Office
Click on the desk and insert the Safe Handle to start a mini-game. To complete the game, you need to click on the buttons in order to move the characters into the right positions. To finish, follow this sequence:
A, E, C, B, F, C, F, C, B, F
Witches’ Legacy – Lair of the Witch Queen – Portraits
Receive the Access Card, Thermal Fuse, and the Shawl. Go back to the library.
Library
Zoom in on the counter and use your Access Card on the cash register. Take the Lock Part and Acid. Zoom in on the fire and use your Shawl to receive the Tongs. Go back downstairs.
Elegant Hallway
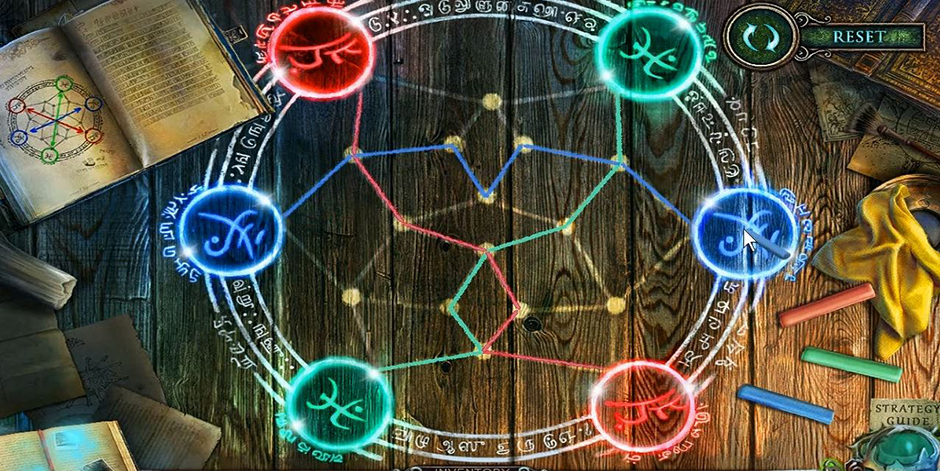
Zoom in on the door to the left. Use your Wrench and remove the bolts. Put the Lock Part inside to start a mini-game. Move the symbols around to their proper colored circles. Use the outer shield to rotate the symbols and the inner shield to grab them and place them in the correct location. Go through the doors.
[insert screenshot Chapter6_Circles]
Statue
Zoom in on the sundial to the left side. Put the Bas Relief on top and take the Iron Key. Go back to the library.
Library
Zoom in on the counter and use the Iron Key on the safe. Grab the Mold Part and Anvil Emblem. Go back to the statue.
Statue
Zoom in on the book on the bench to the right. Move the leaf to pick up the Chip. Click on the door of the cabin and put the Anvil Emblem in the indent. Use the Workshop Key and go inside.
Workshop
Zoom in on the tank and attach the Hose and Hose Clamp. Zoom in on the hearth and put down the Bar and Tongs. Put the bowl on the heat and place the Bar inside. Receive the Dolphin Symbol. Go back.
Statue
Click on the dolphin statue and use the Acid. Receive the Astronaut. Place the Dolphin Symbol in the indent. Complete the mini-game by matching the numbers. To do this, follow this sequence:
Press 6, 7, and turn C.
Press 7, 9, and turn D.
Press 2, 6, 9, and turn E.
Press 6, 7, 9, and turn F.
Press 2, 6, 7, 9, and turn G.
Press 7, 18, and turn H.
Press 7, 9, 18, and turn I.
Witches’ Legacy – Lair of the Witch Queen – Minigame
Take the Mold Part. Go back to the workshop.
Workshop
Click on the furnace and start a new mini-game by placing the two Mold Parts. To restore the mold, press the buttons in this order:
V, M, M, Q, P, O, M, N, T, S, W, L, M, U, R, Q, O, T, U, V, W, N, W, T, T, S, S, V, V, V, L, L, M, M, O, P, and Q.
Witches’ Legacy – Lair of the Witch Queen – Furnace
Press the mold and use the Tongs to pour the metal into it. Take the Sewer Key and go down three times and right to the open gate.
Chapter 7: Sewers
Outside Gate
Use the Sewer Key on the manhole cover and go in.
Sewer Entrance
Pick up the Knight and go forward.
Control Room
Take the Bird Key from the panel. Click on the table to start a hidden object scene. Find all the items or finish a memory game and receive the Big Valve. Go back down.
Sewer Entrance
Place the Big Valve on the left pipe. Use the Lever on the valve and go forward.
Control Room
Open the fencer. Zoom in on the panel and receive the Seeds. Go back to the University entrance.
Front of Building
Zoom in on the gate and use the Bird Key. Pull the lever and go through.
Street
Zoom in on the bird cage and take the Thermal Fuse. Go back to the sewer control room.
Control Room
Zoom in on the panel and place the Thermal Fuses to start a mini-game. Use the arrows to place the fuses in the correct sequence.
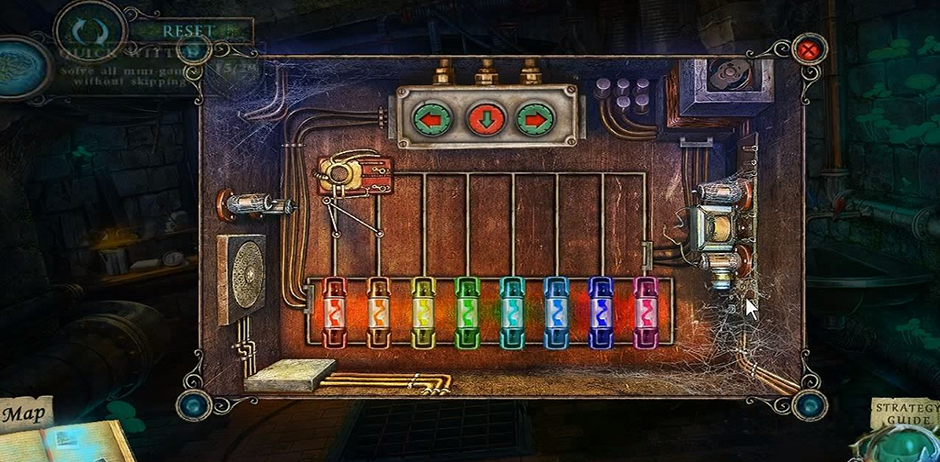
Witches’ Legacy – Lair of the Witch Queen – Fuses
Take the Lock Part and Dimensional Key. Go down.
Sewer Entrance
Click on the left panel for another mini-game. Use the Lock Part to start. Swap tiles so they will have the right color and symbol for the position. Receive the Cro Magnon and Lion Bas Relief. Go back to the street.
Witches’ Legacy – Lair of the Witch Queen – Lock Part
Street
Zoom in on the door and place the Cro Magnon, Knight, and Astronaut to start a mini-game. Turn all the figures so they face inward. Click them in order, 1-5, to complete it. Go through the door.
Chapter 8: Enter the Museum
Museum Start
Pick up the Diagram and look at the statue to take a Twig Key. Go back to the street.
Street
Place the Twig Key in the bird cage and grab the Spearhead. Put the Seeds in the cage and receive the Caged Bird. Go into the museum.
Museum Start
Zoom in on the statue and use the Caged Bird and Spearhead to take the spear. Go forward.
Museum Exhibits
Put the spear on the man to the right. Take the Curtain Tie off the tiger. Go back.
Museum Start
Use the Curtain Tie on the hook hanging from the ceiling. Pull the rope and click on the dinosaur for a hidden object scene. Find the items or finish a memory game to receive a Lion Bas Relief. Go back to the sewer control room.
Control Room
Click on the door and put the Lion Bas Relief into the indent. Go through the door.
Sewer Room
Grab the Pickaxe from the left. Zoom in on the figure to take a Hairpin. Go back to the workshop.
Workshop
Zoom in on the worktable to the right. Use the Diagram and Chip to start a mini-game. Move the chips to match the diagram using the following pattern:
H, F, F, F, F, I, I, G, G, G, G, G, H, H, and I, I, I, I, I.
Witches’ Legacy – Lair of the Witch Queen – Diagram
Take the Slingshot and Stone Rune, and go back to the street.
Street
Use your Slingshot on the right to get the Tusk. Go into the museum.
Museum Entrance
Look at the doll and use the Hairpin to unlock the handcuffs. Take the Prehistoric Child and go forward.
Museum Exhibits
Put the Prehistoric Child on the left and take the Glasses. Use the Tusk on the podium to receive the Stone Eye. Go back.
Museum Entrance
Click on the dinosaur for a hidden object scene. Find all items or do a memory game to receive another Prehistoric Child. Go forward.
Museum Exhibits
Place the second Prehistoric Child on the left. Take the Dimensional Key. Go back to the entrance to Morgana’s house.
Chapter 9: Morgana
Entrance
Zoom in on the door and put the Glasses on the face. Go through the door.
Living Room
Take the Bone from the plate. Zoom in on the photo and look at the mini-game to the right. Put the Stone Eye in to start the game. Slide the eye through the path to hit each cell once. Finish to get the Green Gem. Go back to the street.
Street
Zoom in on the hungry dog and give him the Bone. Receive a Second Skull. Go back into the mirror from the Witch’s House.
Mirror
Zoom in on the lock and use the Magic Crystal and a Dimensional Key. Get the Sword Hilt. Go back to the sewer.
Sewer Entrance
Use the Sword Hilt on the blade to the left. Use the Pickaxe to get the Sword. Take the Stone. Go forward.
Control Room
Click on the table to start a hidden object scene. Find all the items or finish a memory game for the Spellbook. Go forward.
Sewer Room
Zoom in on the figure and use the Sword and Spellbook. Receive another Dimensional Key. Go back to Morgana’s living room.
Living Room
Zoom in on the case and break the glass with the Stone. Take the Baton and go to the gate.
Outside Gate
Click on the lowered platform for a hidden object scene. Find all the items or do a memory game and get a Bottle. Go to the car.
Abandoned Car
Zoom in on the trunk and use the Bottle to get a Bottle of Glowing Liquid. Zoom in on the statue and give it the Baton to get the First Skull. Go back to Morgana’s living room.
Living Room
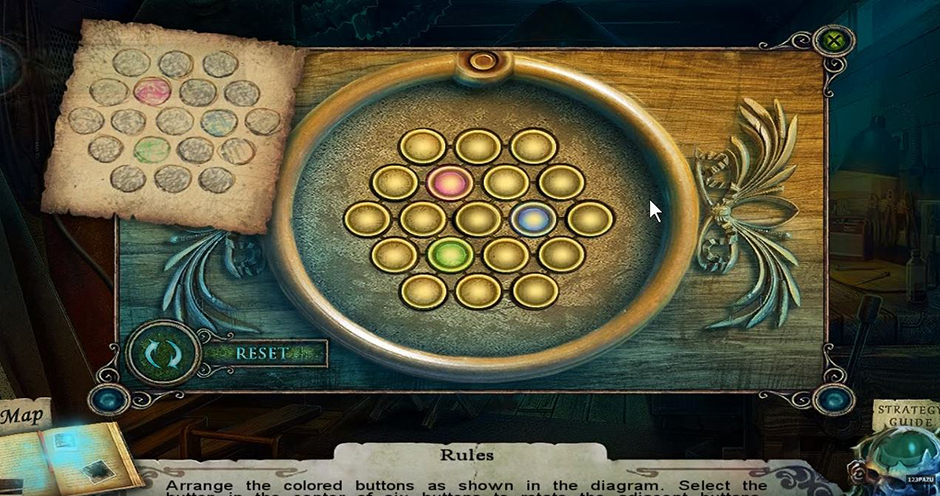
Zoom in on the chest and place the two Skulls. Use the Bottle of Glowing Liquid to start a mini-game. Rotate the rings to connect each skull and get a Dimensional Key. Go back into the mirror.

Witches’ Legacy – Lair of the Witch Queen – Skull
Mirror
Zoom in on the lock and use the remaining Dimensional Keys. Go forward.
Chapter 10: Mystic World
Mystic Entrance
Take the Sleepy Fruit from the left. Look at the building for a hidden object scene. Find all the items or finish a memory game to get a Dagger. Go forward.
Mystic Gate
Talk to the knight. Take the Pendant Without Chain and use the Dagger to pick up a Stone Bowl. Go to the left.
Battleground
Take the Hexagon. Talk to the tree stump. Click on the fire to complete a hidden object scene. Find everything or do a memory game and receive an Enchanted Sword. Go forward.
Mystic Tree
Take the Small Jug and go back to the entrance.
Mystic Entrance
Place the Pendant Without Chain on the chain hanging on the right to get a Pendant. Go to the gate.
Mystic Gate
Give the Pendant to the knight. Take the Battle Net. Look at the gate and use your Enchanted Sword to break the chains. Go forward.
Mystic Building
Take the Hexagon. Zoom in on the water and use your Battle Net to get a Fish. Go back to the battleground.
Battleground
Zoom in on the case. Use the Small Jug, Fish, Sleepy Fruit, and Stone Bowl. Place fruit in bowl. Use pestle on bowl. Pour the bowl into the jug and add the vial. Use the jug on the fish to make a Fish with Sleeping Potion.
Place fruit in bowl. Use pestle on bowl. Pour the bowl into the jug and add the vial. Use the jug on the fish.
Click on the fire for another hidden object scene. Find all items or do a memory game to get a Whip. Go forward.
Swamp
Give your Fish with Sleeping Potion to the cat to get the Charged Crystal. Use the Whip on the signpost. Have the imp climb up and get the Hexagon. Go back to the building.
Mystic Building
Zoom in on the arch and use the Charged Crystal and Stone Rune to start a mini-game. To finish it, drag the runes so none of the lines cross each other. Receive a Sacred Wand. Go back to the battleground.
Battleground
Use the Sacred Wand on the ground and talk to the tree stump. Pick up the Jewel and Gate Handle. Go back to the entrance.
Mystic Entrance
Zoom in on the statue and use the Jewel and Green Gem. Take the Hexagon. Click on the building for another hidden object scene. Find all items or do a memory game to get another Hexagon. Go forward to the building.
Mystic Building
Use the Hexagons, Disc Part, and Gate Handle on the door to start a mini-game. Rotate the discs to create paths that go to the center. Go through the door.

Witches’ Legacy – Lair of the Witch Queen – Hexagon
Final Room
Talk to Lynn. Select the following responses – 3, 1, 2, 1, and 3.
Congratulations, you’ve now finished our Witches’ Legacy – Lair of the Witch Queen Walkthrough!
For more great tips and tricks, visit our blog!
The Witches’ Legacy – Lair of the Witch Queen is meant as a guide and does not contain cheat codes, hacks or serials.